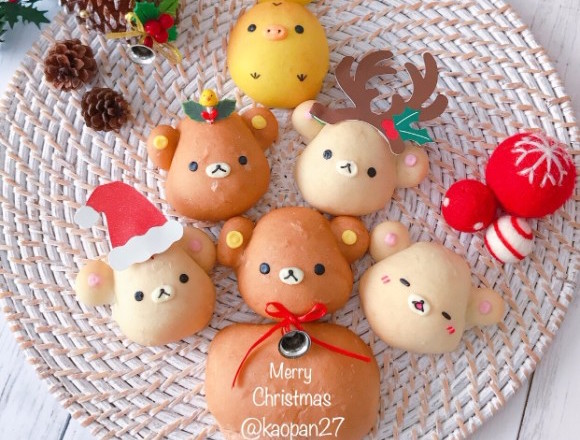
With just a small bit of ingenuity, turn everyday food into something cute using Kaori’s recipe series! With a few simple ideas, an ordinary recipe magically transforms into a cute dish.
This time, I will introduce to you “Soft and Juicy Rilakkuma Bun.”
It is a rich-tasting heavy bun which has lots of eggs and butter inside.
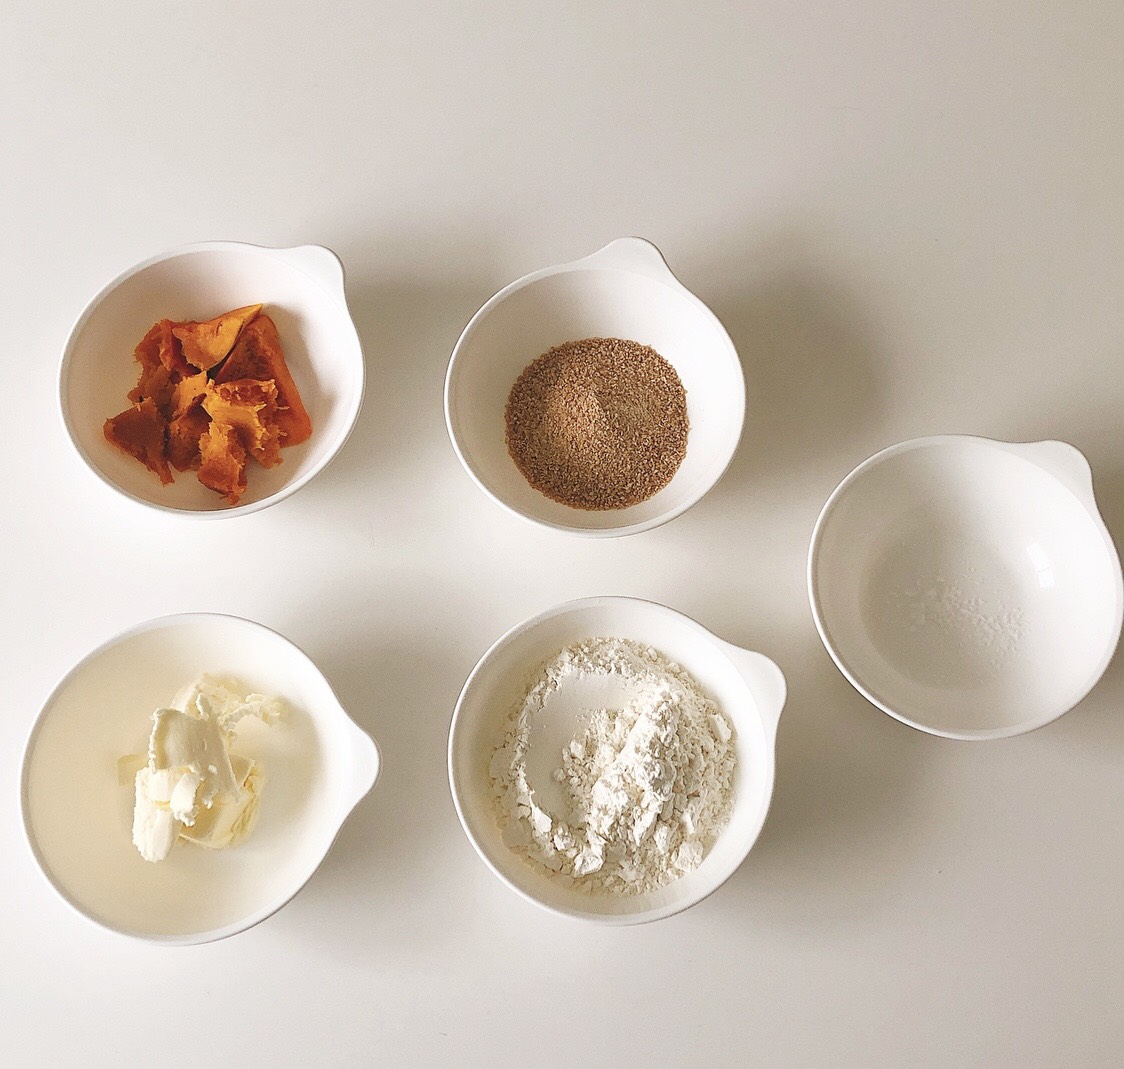
1: ingredients
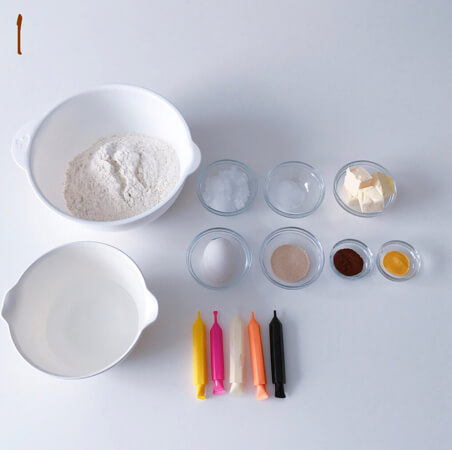
Bread flour – 320g
Dry yeast – 2 tea spoons
Sugar – 3 table spoons
Salt – 2/3 tea spoons
Egg – 1 to 2 (100g)
Warm butter – 80cc
Salt-free butter – 80g
Cocoa, pumpkin powder – moderate amount
Chocolate pen
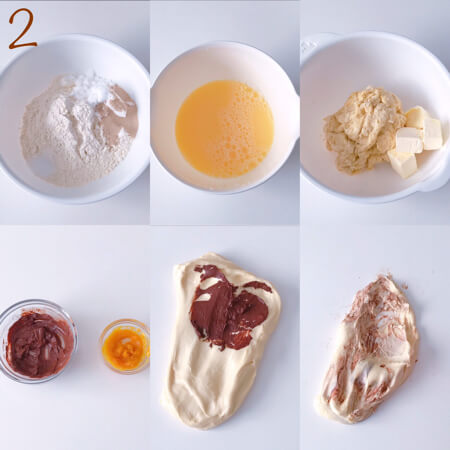
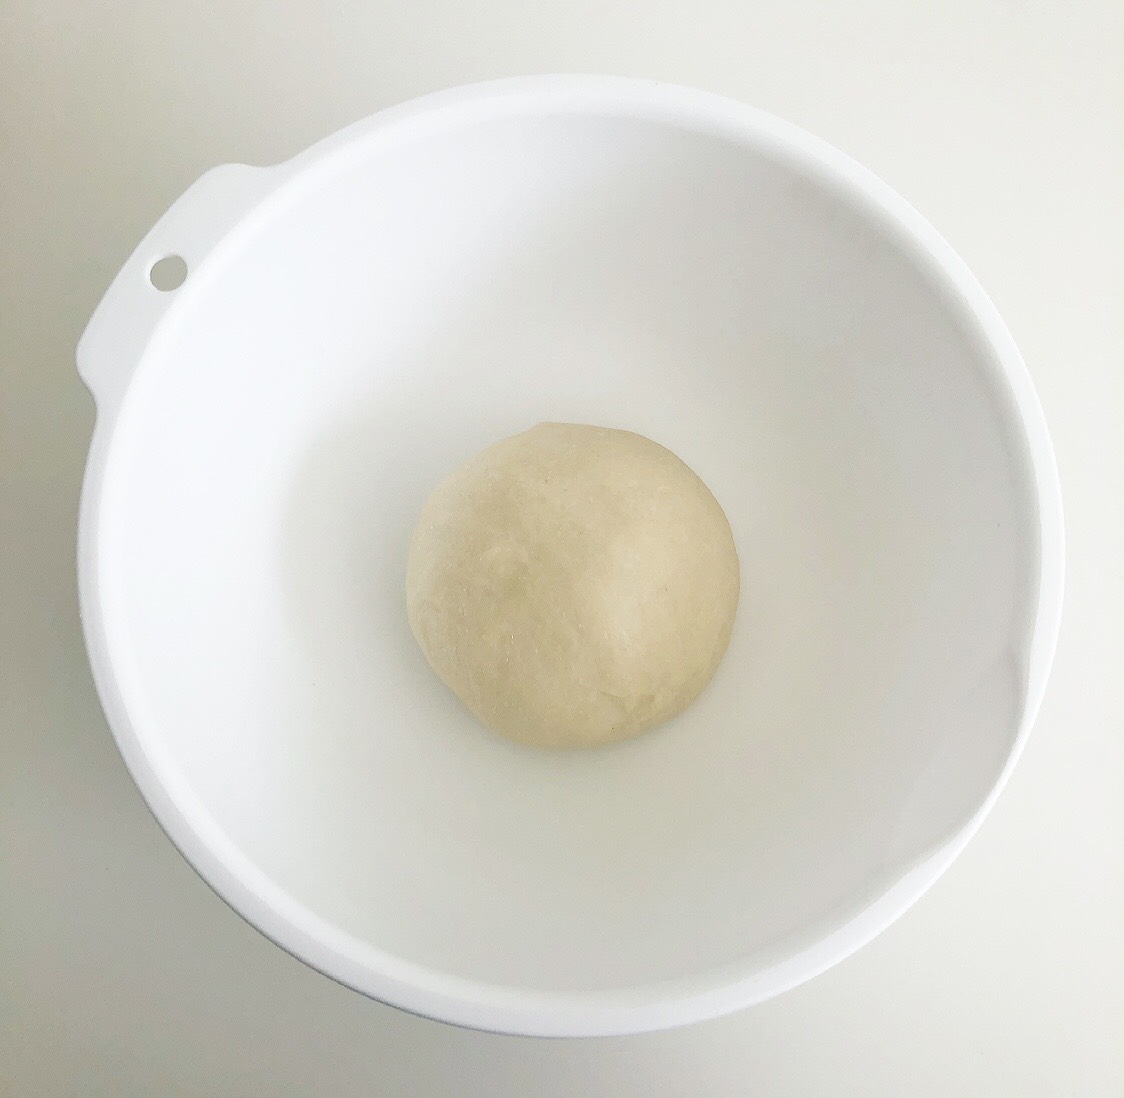
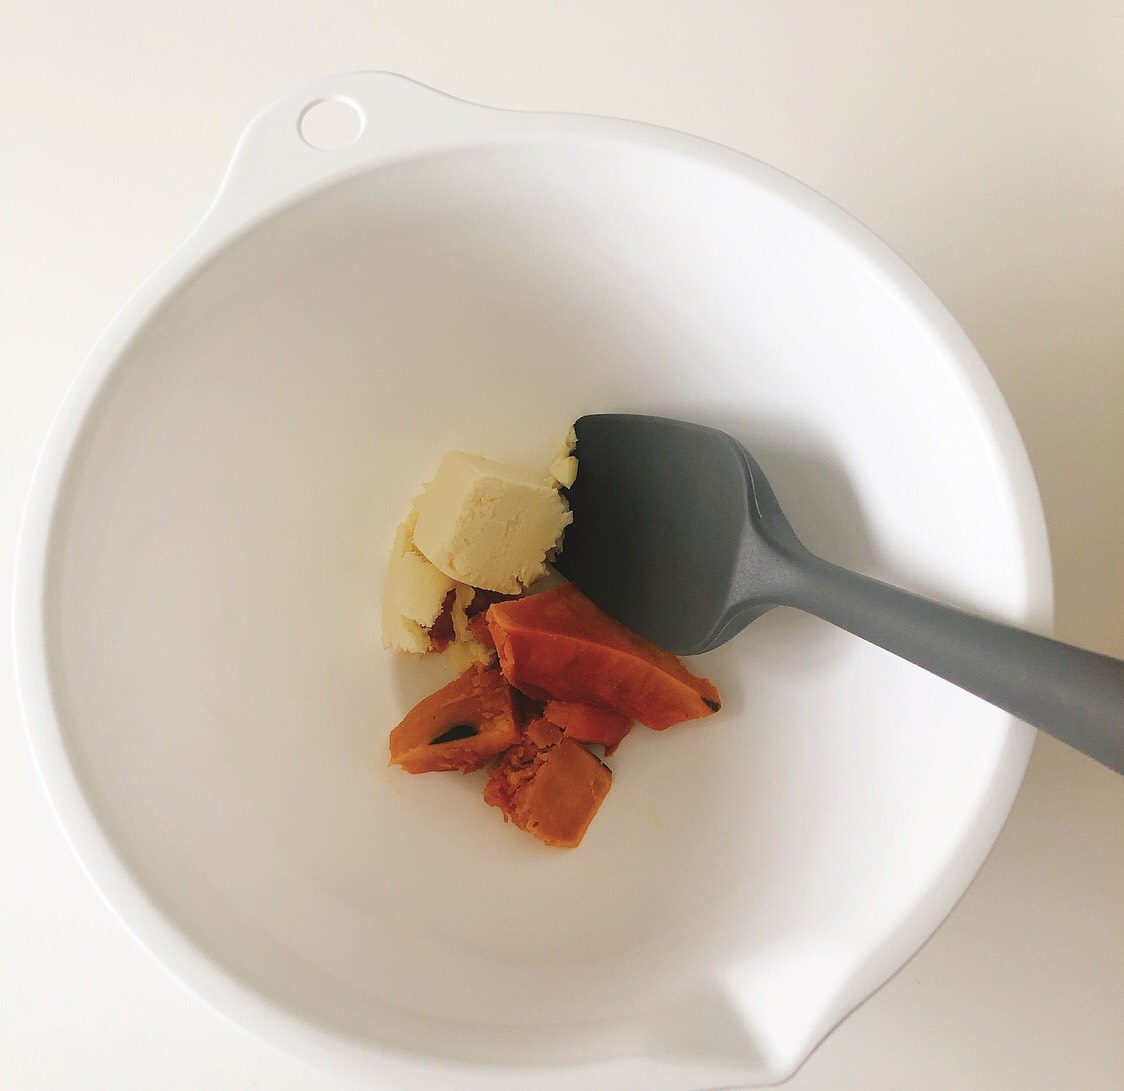
2:
- Put the flour, yeast, sugar and salt into a bowl. Place the yeast beside the sugar and place the salt on the opposite side to enhance fermentation.
➁ Mix warm water and the eggs.
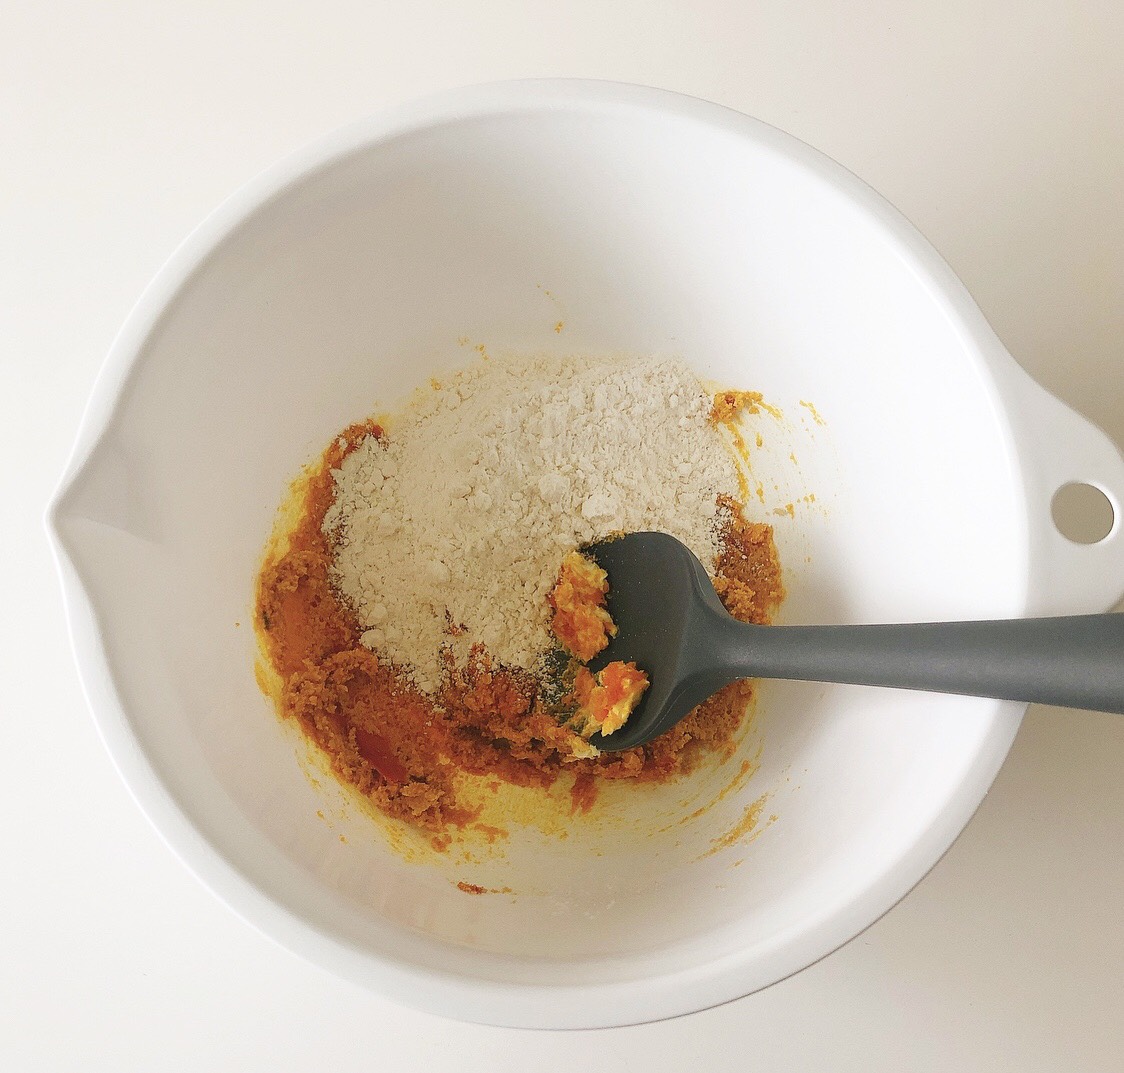
Put ➁ into ➂ and ① and mix thoroughly then add butter.
★You can use a beater or mix the ingredients by hand.
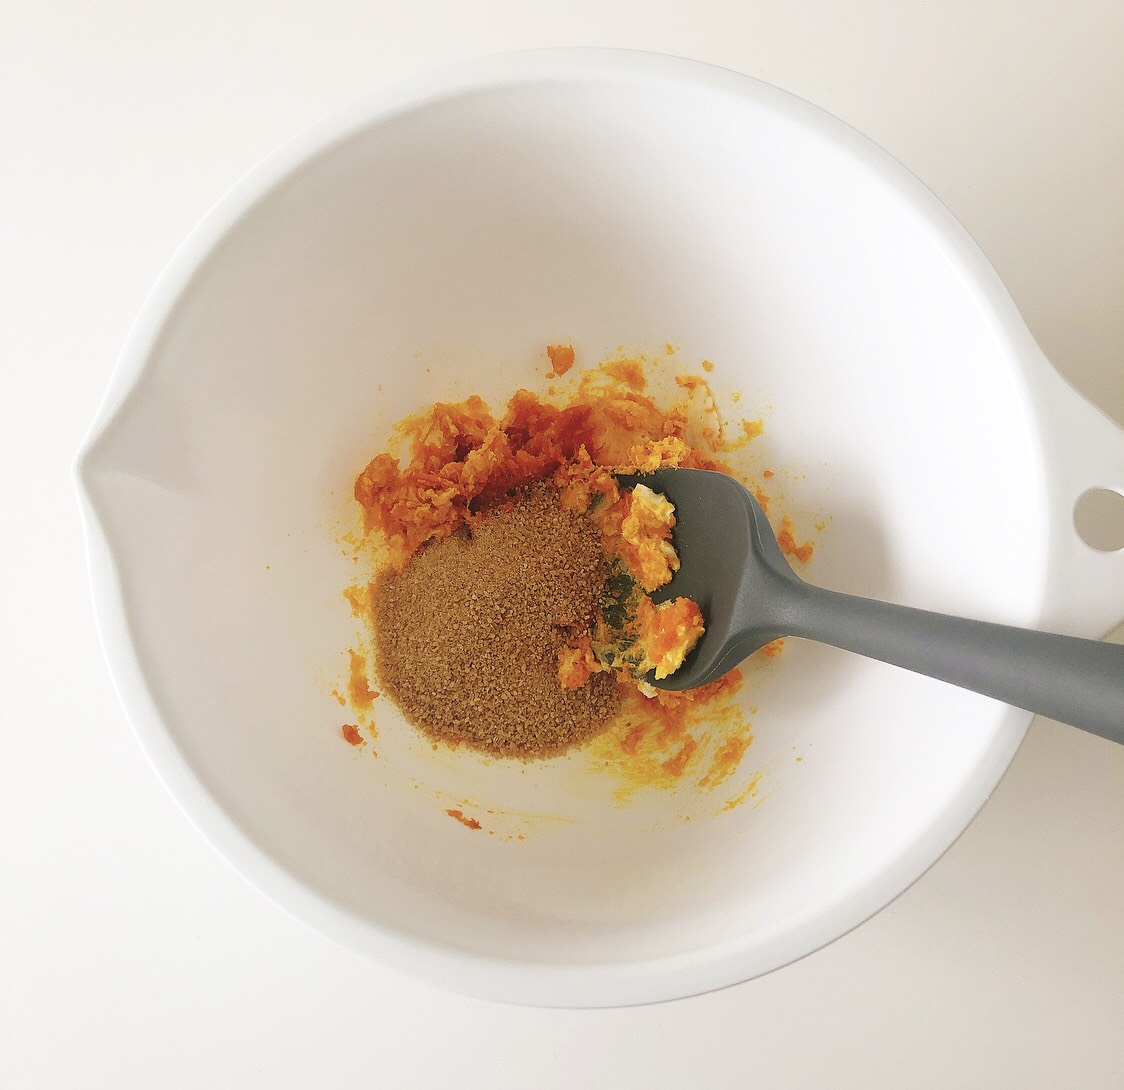
- Put cocoa and pumpkin powder into a small amount of water and mix it.
- Color the ingredients.
The amount of the dough→640g
Pumpkin powder dough (Kiiroi Tori)→80g
Cocoa powder dough→(Rilakkuma and the tree trunk)→320g
Place dough (Kolirakkuma)→240g
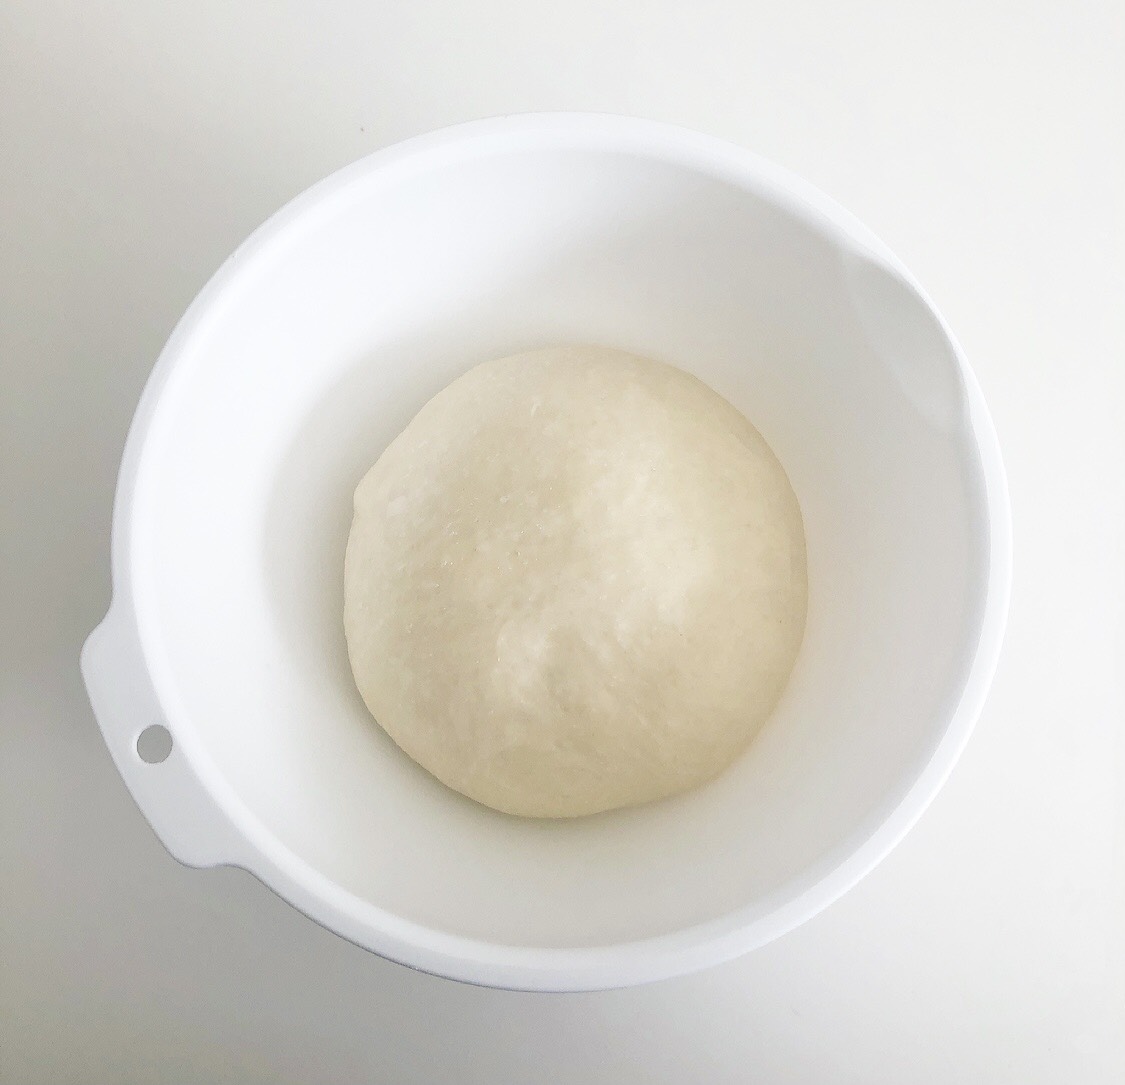
3:
Color each dough and leave them for about 40 minutes (put wet towels on them) to enhance primary fermentation.
★Refer to the recipe of KITTY Chan’s Chigiri Pan regarding the method of fermentation.

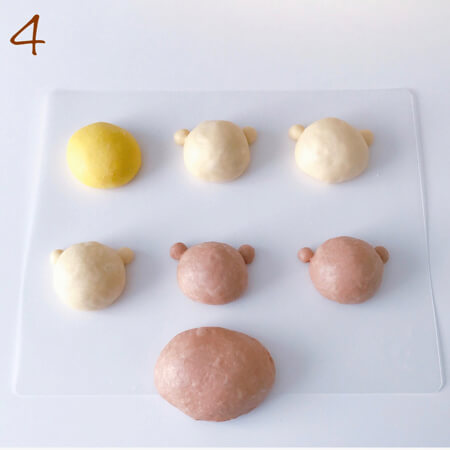
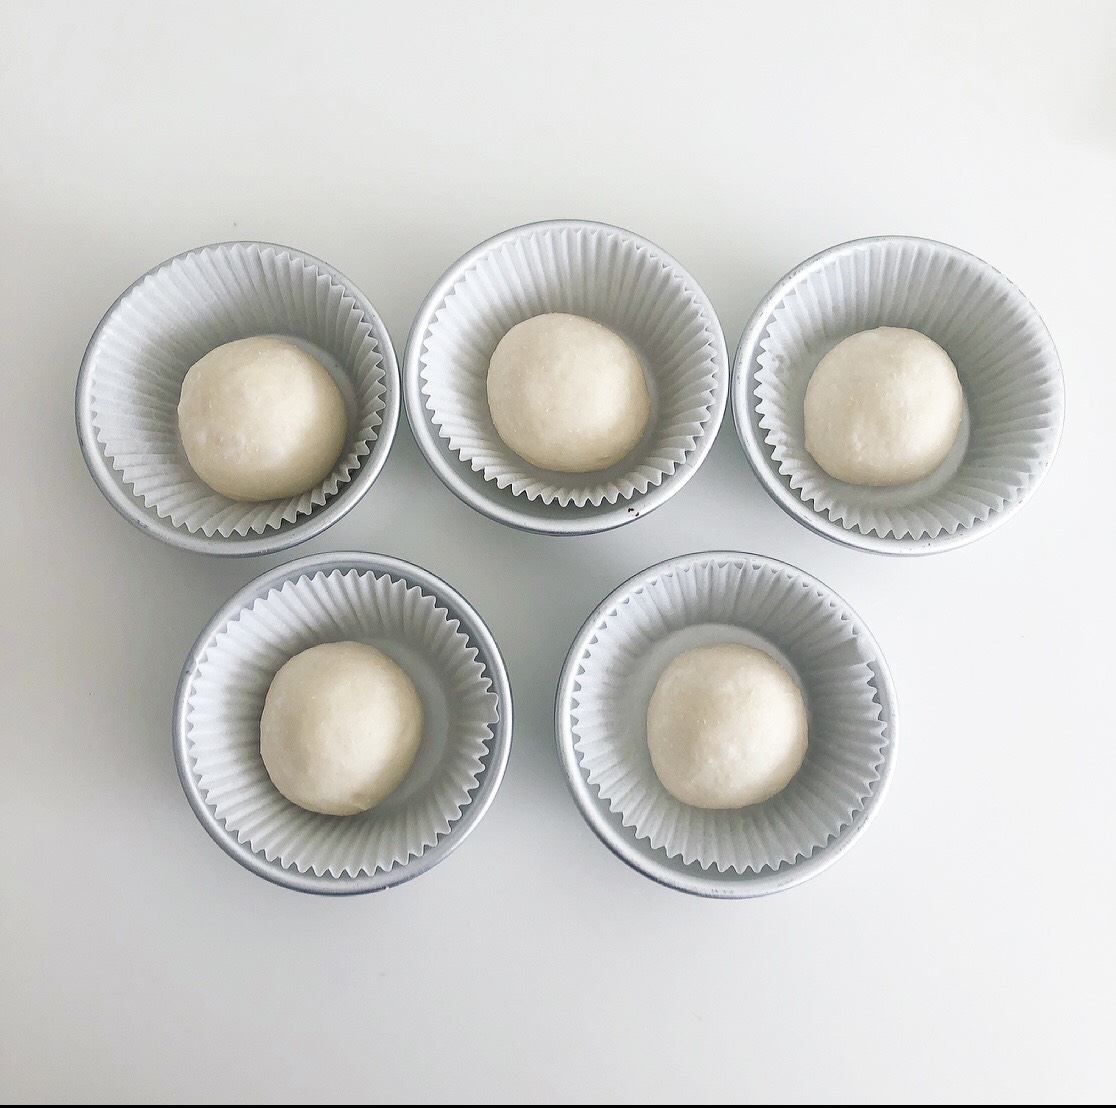
4:
Separate the doughs after primary fermentation is done.
Kiiroi Tori→80g
Rilakkuma→face 72g / ear 4g ×2
Tree trunk→160g
Korilakkuma→face 72g, ear 4g ×2
★The weights noted above are approximate weights since the dough differs according to the amount of water and the weather conditions.
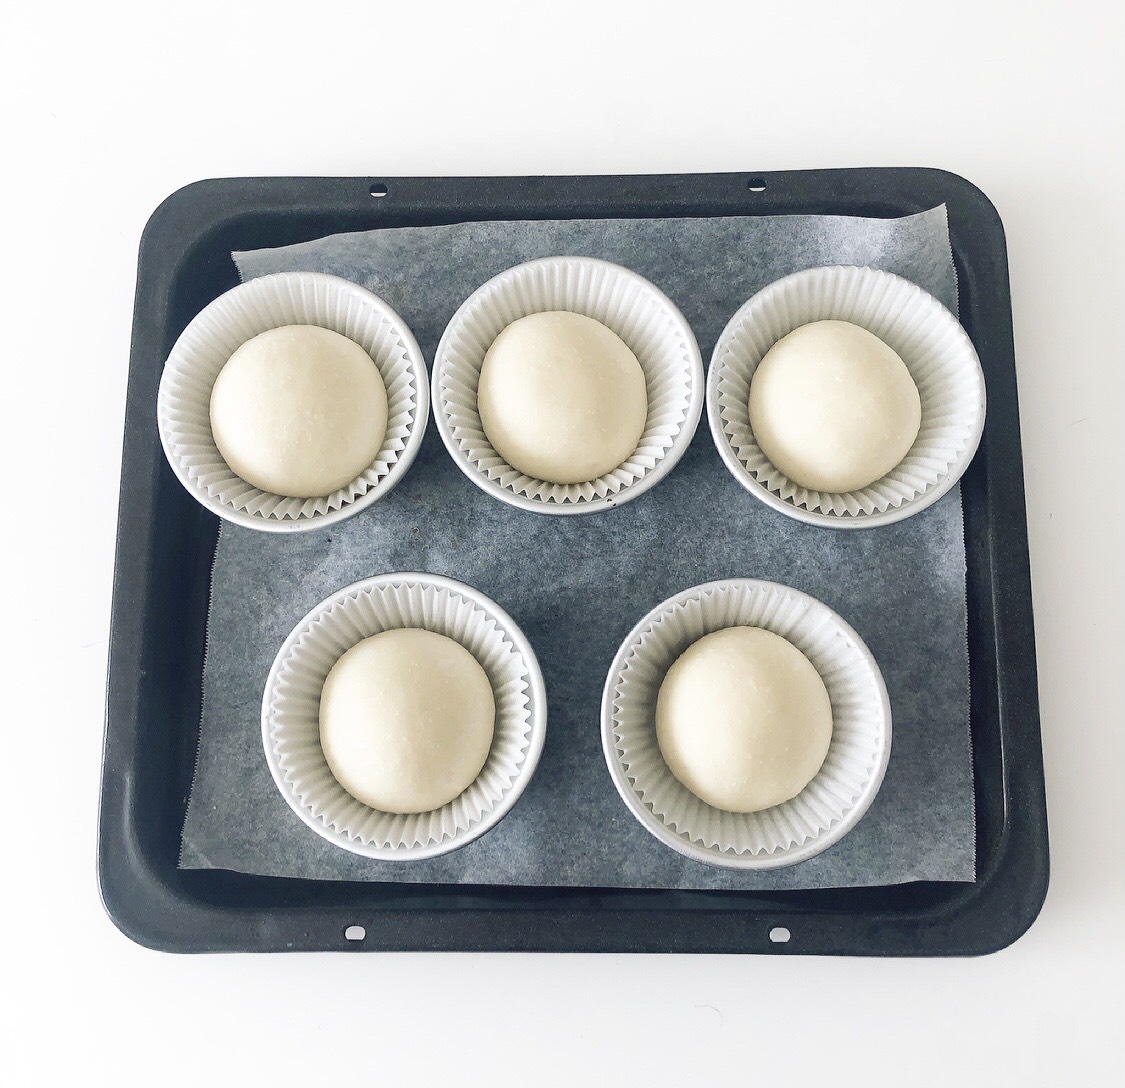
Place wet towels on the doughs and leave them for about 30 minutes to enhance the second fermentation.
Put the dough inside the oven (180 degrees) after the second fermentation is finished. Lower the oven’s temperature to between 140 to 150 degrees and bake the dough for about 20 minutes. Place an aluminum foil on top of the dough if it looks like they are it is getting burnt.
5:
Draw the face after the buns are cooled.
Use the round side of the toothpick to draw the ears, mouth and eyes and use the tip of the toothpick to draw the nose.

Voila! You are finished.
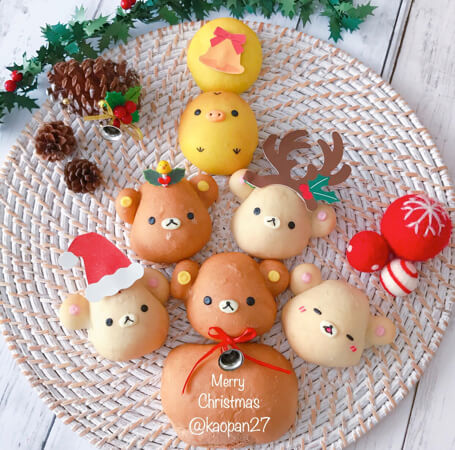
It is now the Christmas season so I decorated it to match the season.
Kaori also invites you into her world of character-themed rice dishes in her recipe series! Please check out her Instagram where she has uploaded many pictures of her character dishes!
■profile
Kaori Kubota (@kaopan27)
I live in Hokkaido and I love to make character-shaped meals, desserts and breads.
I enjoy making character foods because I want to see my family smiling,
The character foods and character bento boxes are introduced in my Instagram page→@kaopan27
RELATED ENTRIES
-
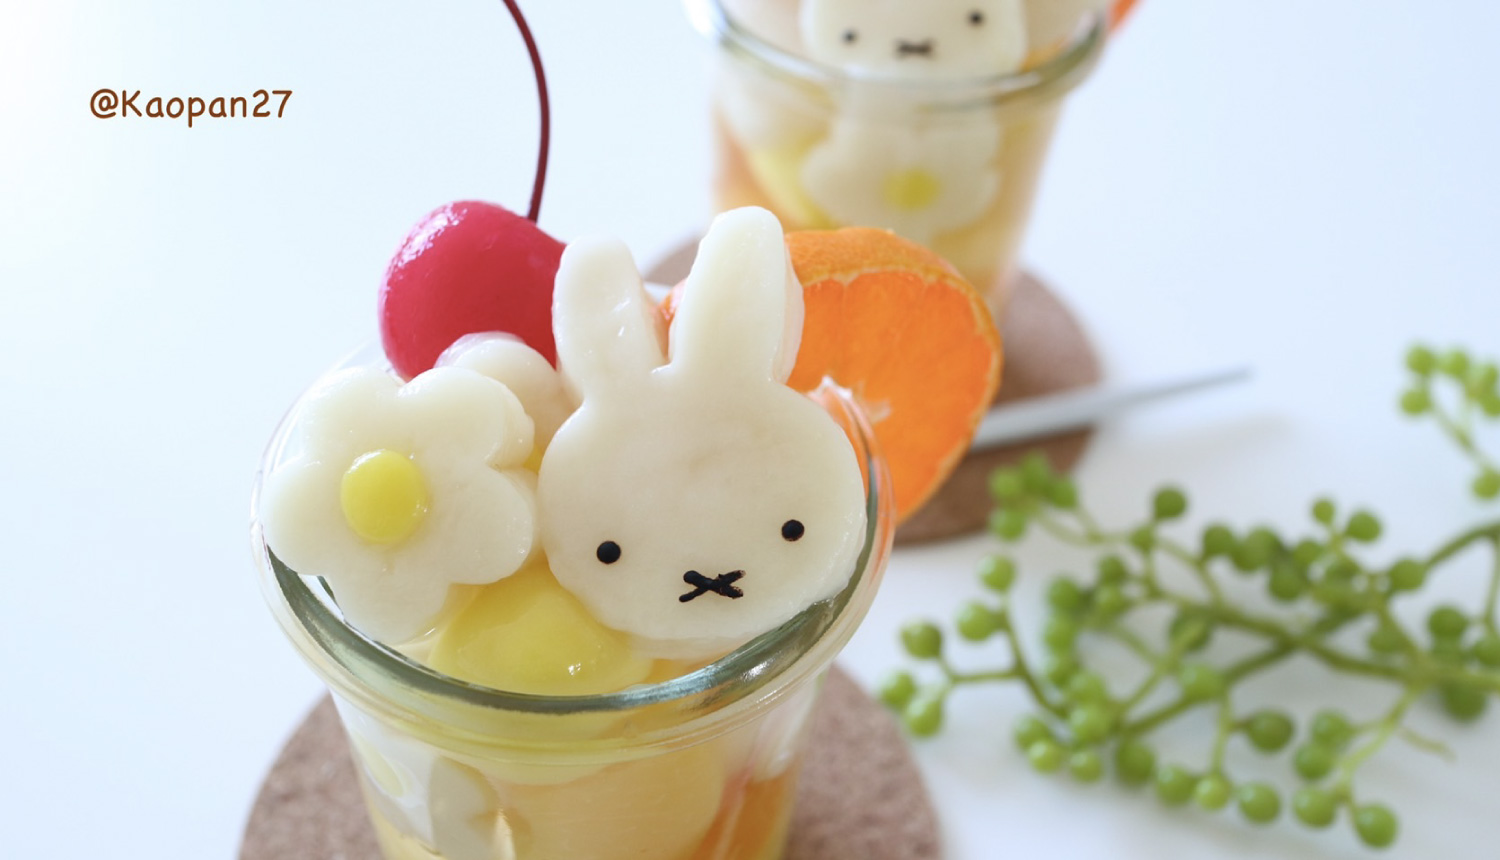
With just a small bit of ingenuity, turn everyday food into something cute using Kaori’s Easy Recipe! With a few simple ideas, an ordinary recipe magically transforms into a cute dish.
In this recipe, I’ll show you how to make an adorable Miffy Parfait using tofu shiratama!
Tofu shiratama can be frozen without hardening, so it’s great to use for cooking as well as making sweets.
Ingredients
250g refined rice flour
300g silken tofu
✩ This is about 1 bag of refined rice flour and 1 piece of silken tofu.
Canned fruit or fruit of your choice
①
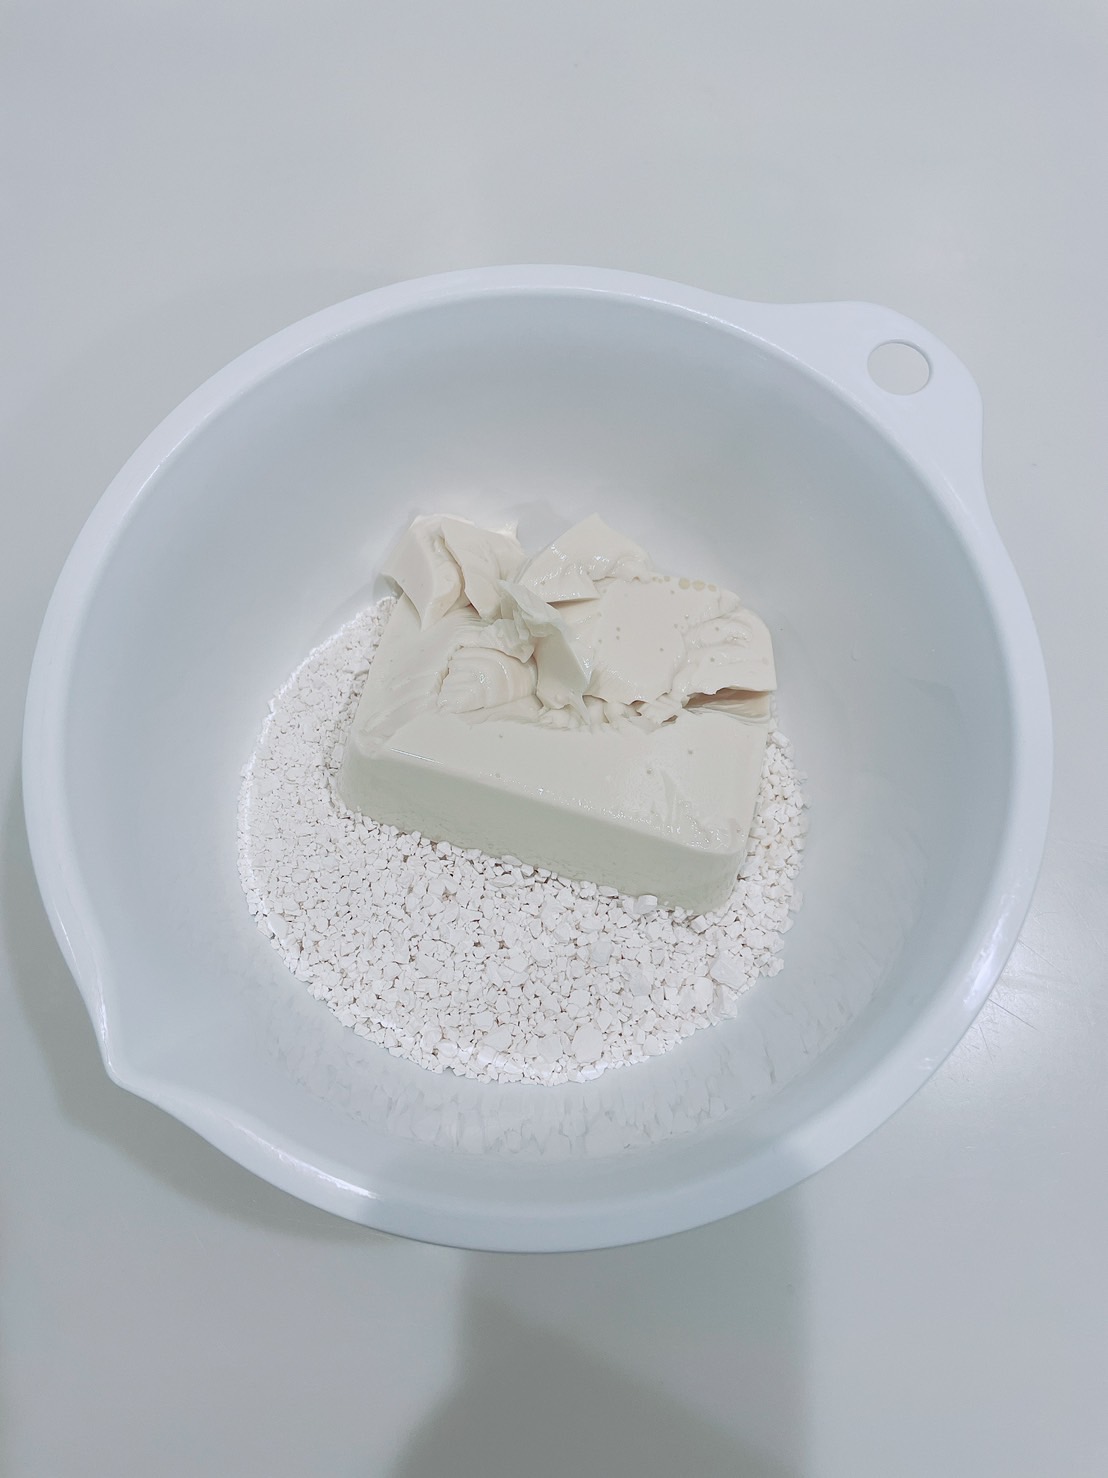
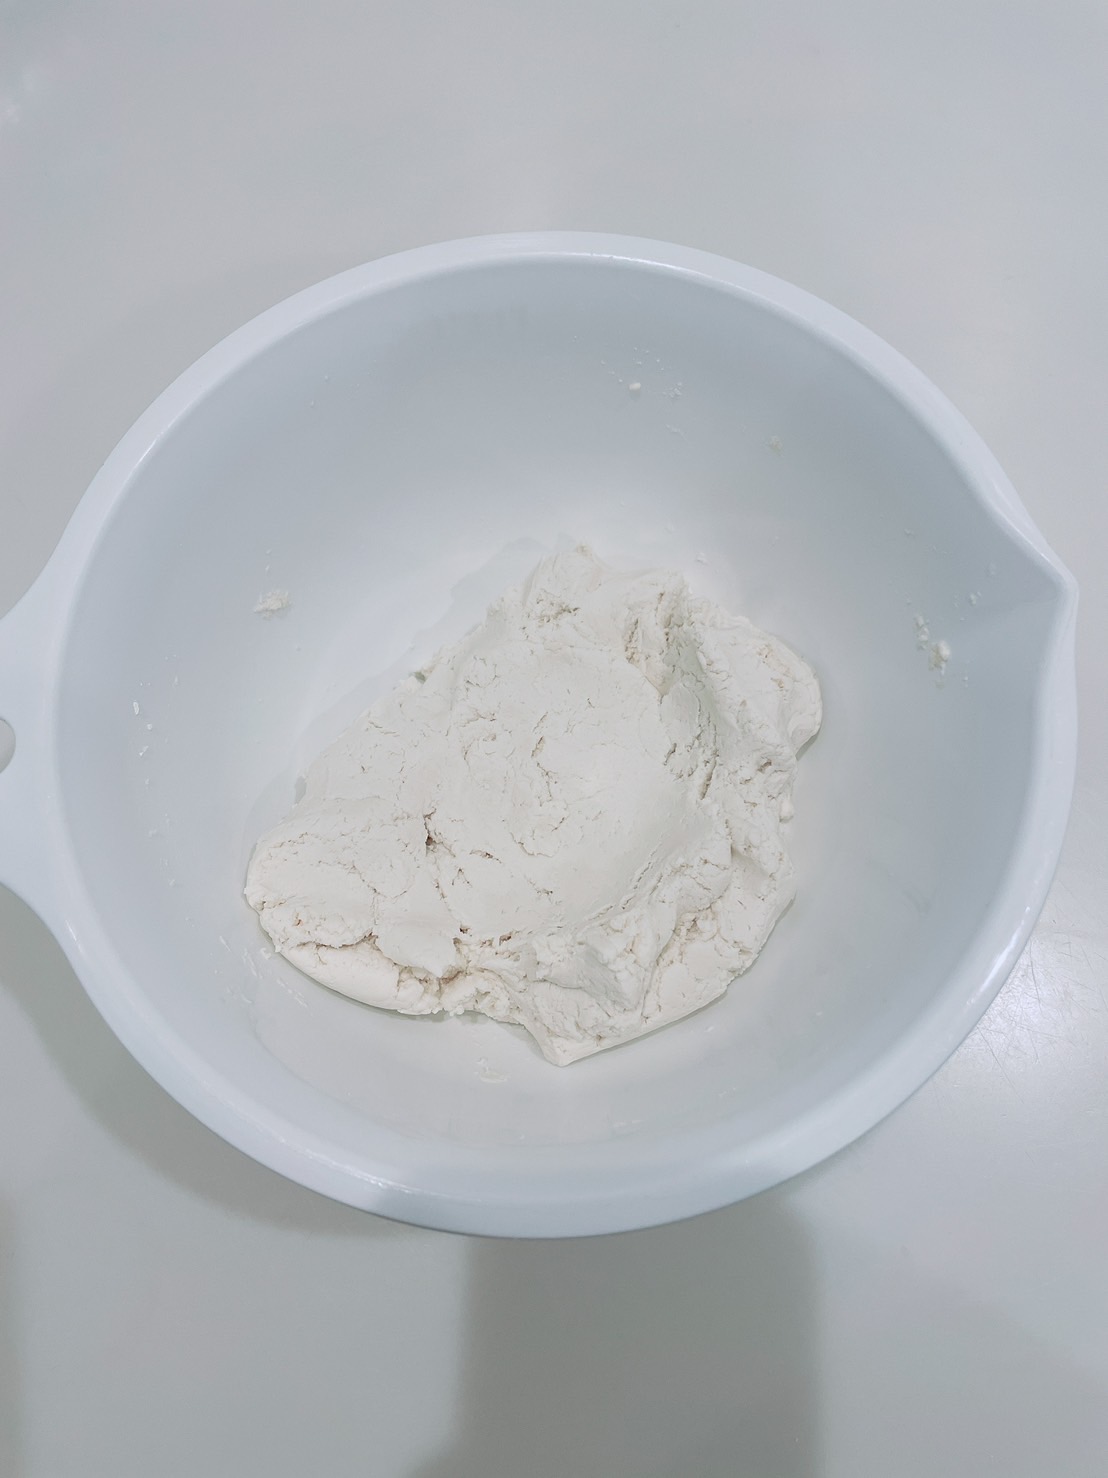
Put the refined rice flour and silken tofu into a bowl and mix well.
⚠️ Do not drain the tofu!
Don’t add water, just these two ingredients.
✩I knead all ingredients and then freeze it.
Feel free to freeze it as dough, or boil it first.
You can put them in Tupperware and store them in water in the refrigerator for a day or two. Don’t worry, they won’t harden!
②

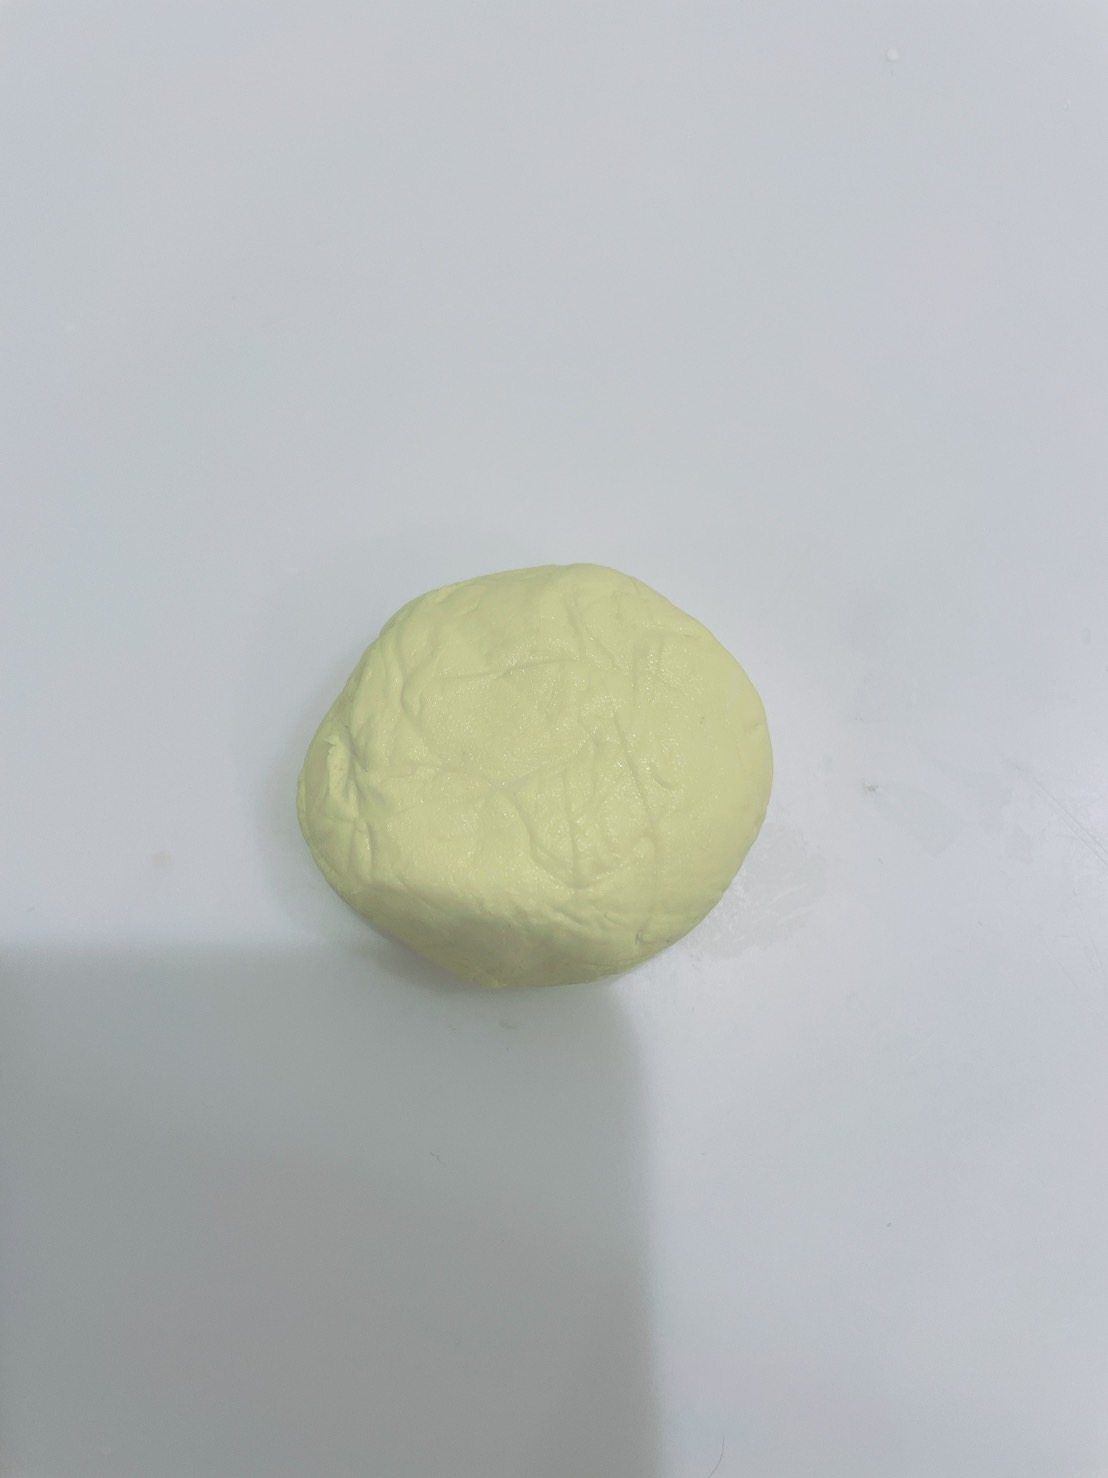
Add the coloring.
Take a little bit of food coloring and add as you like.
Here, I’m adding the yellow that will be the center of the flower.
③
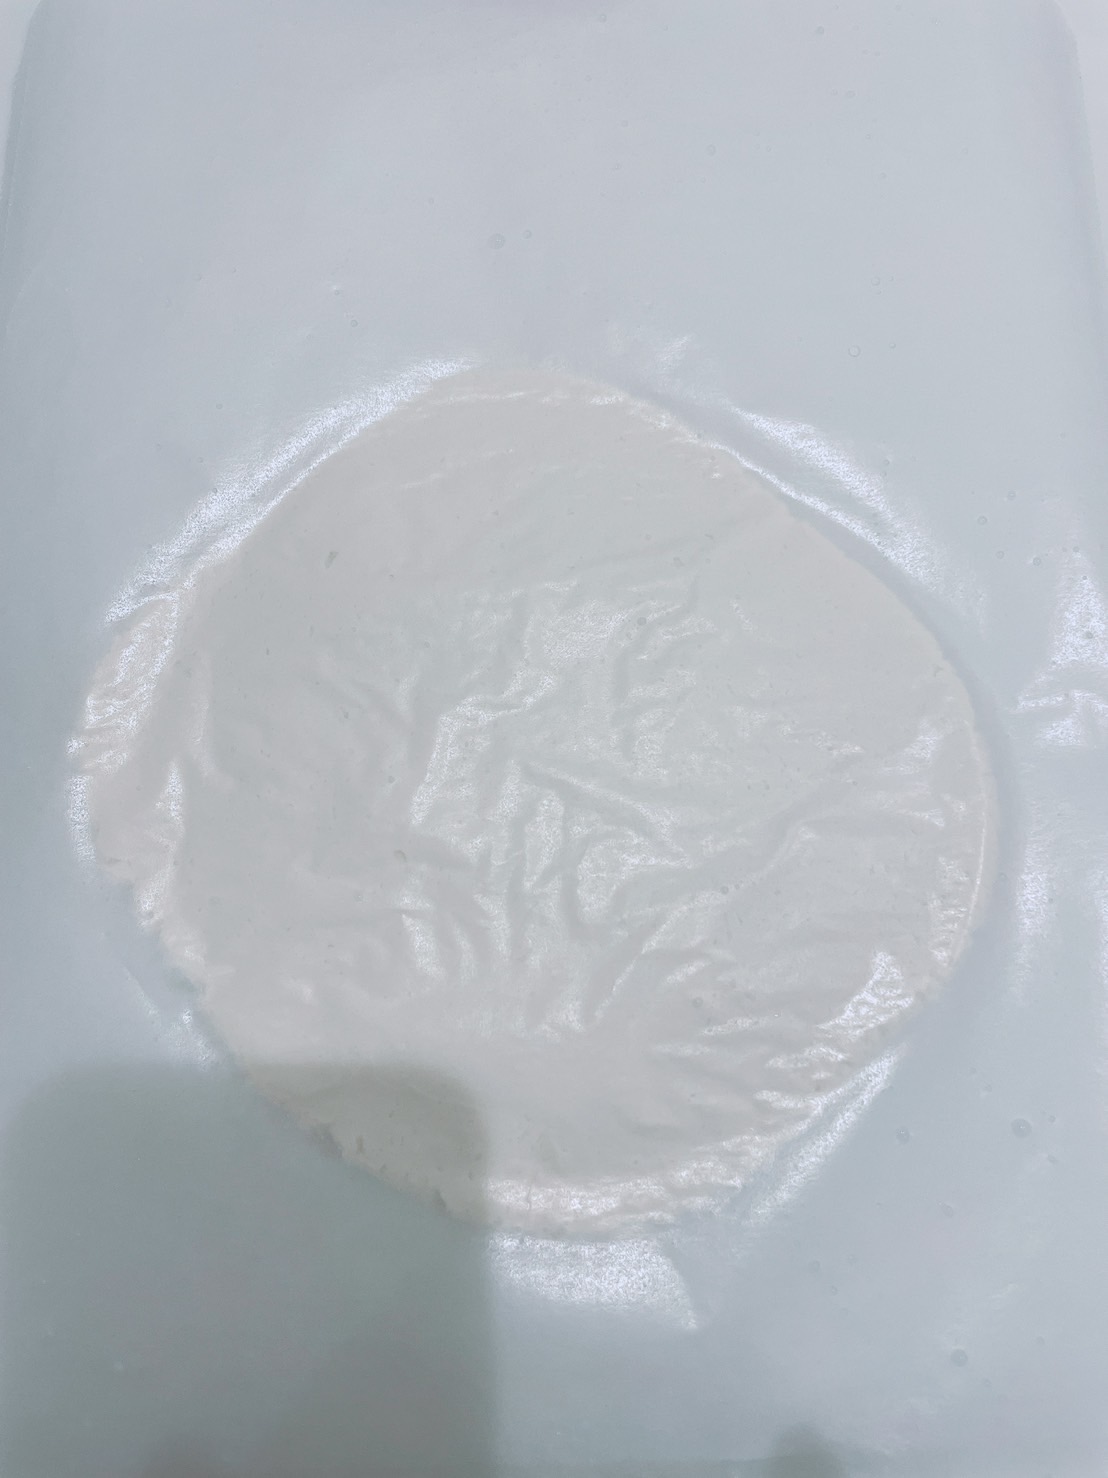
After mixing the dough, place it on parchment paper and put it in the freezer for about 30 minutes.
You can shape it before placing it in the freezer, but chilling it will make it easier to work with.
④

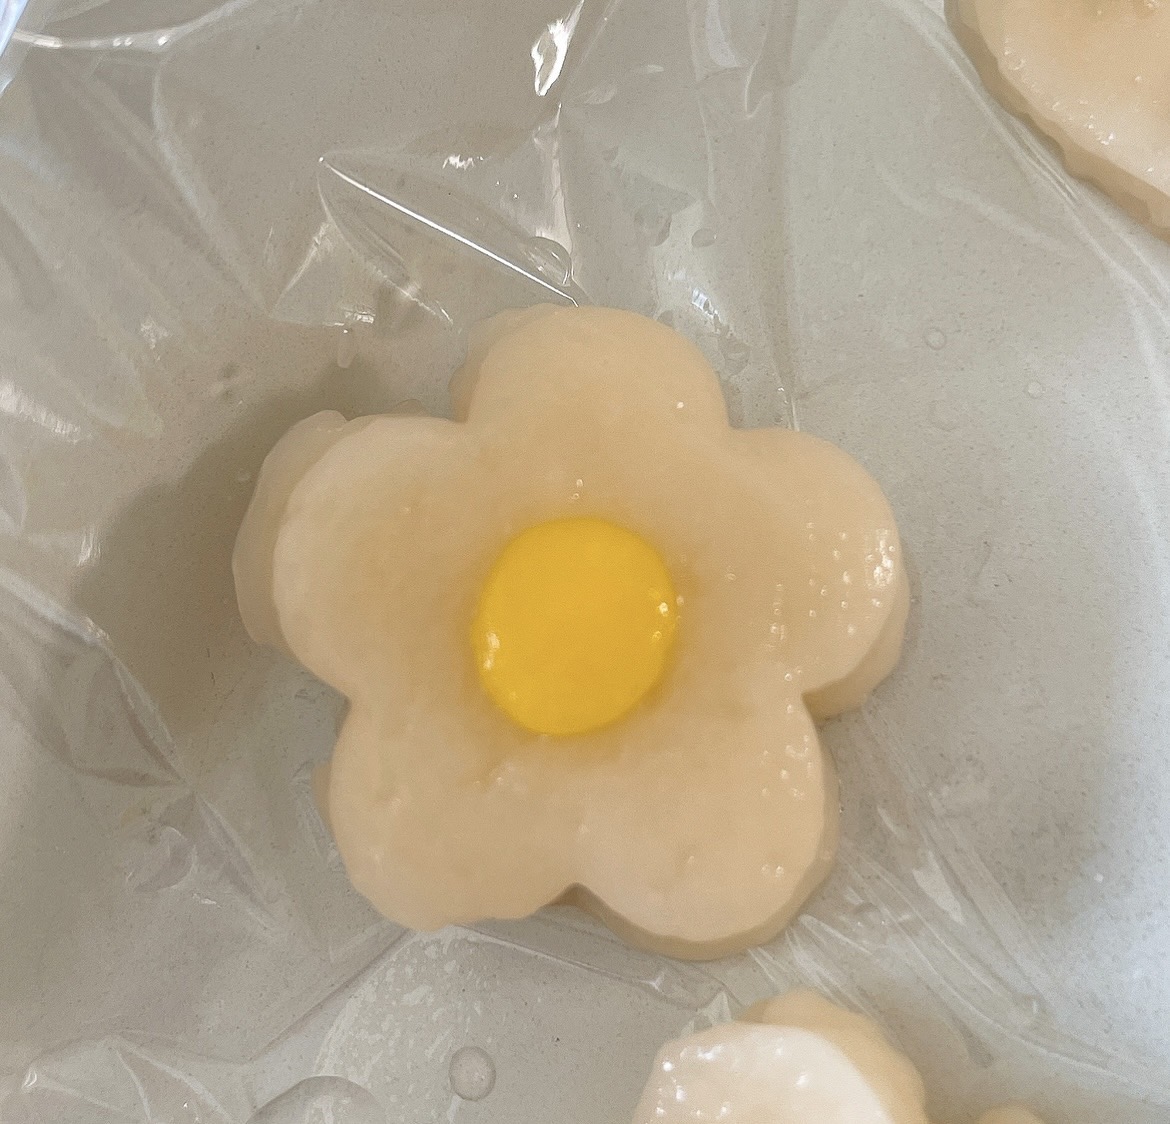
Cut out Miffy and her flowers.
Place the yellow-colored piece into the middle of the flower.
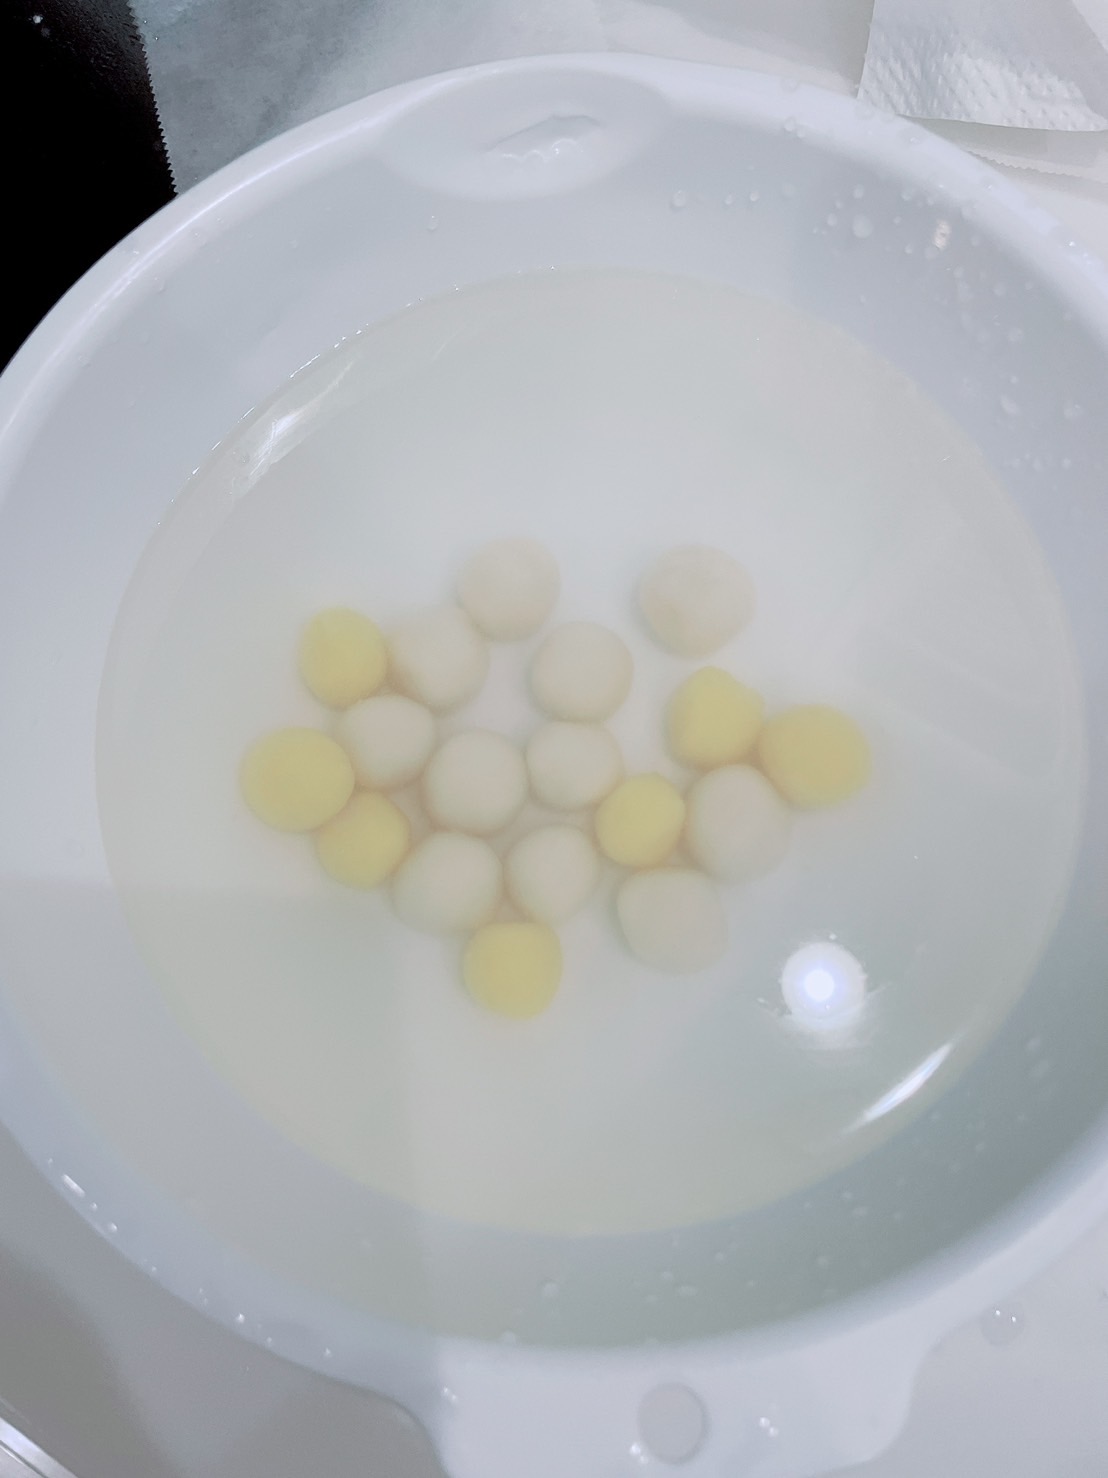
Roll the rest of the shiratama into balls.
⑤
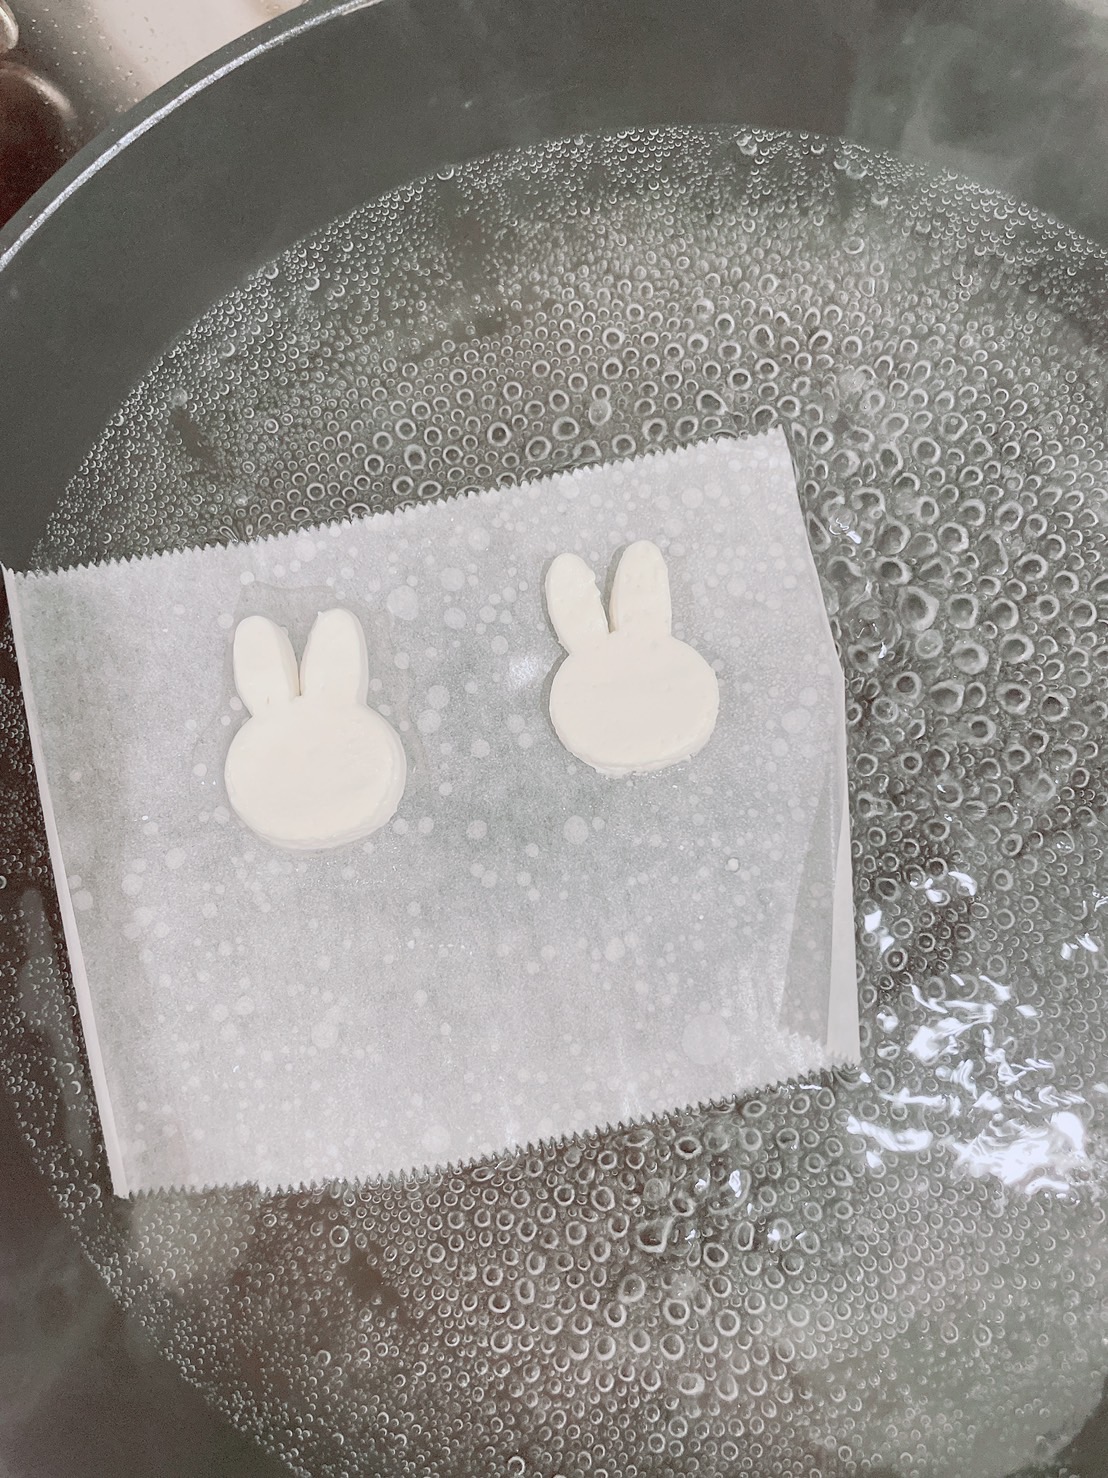
Boil the shaped shiratama while on the baking sheet.
Boil the round shiratama as well. When they float to the top, place them in cool water.
⑥
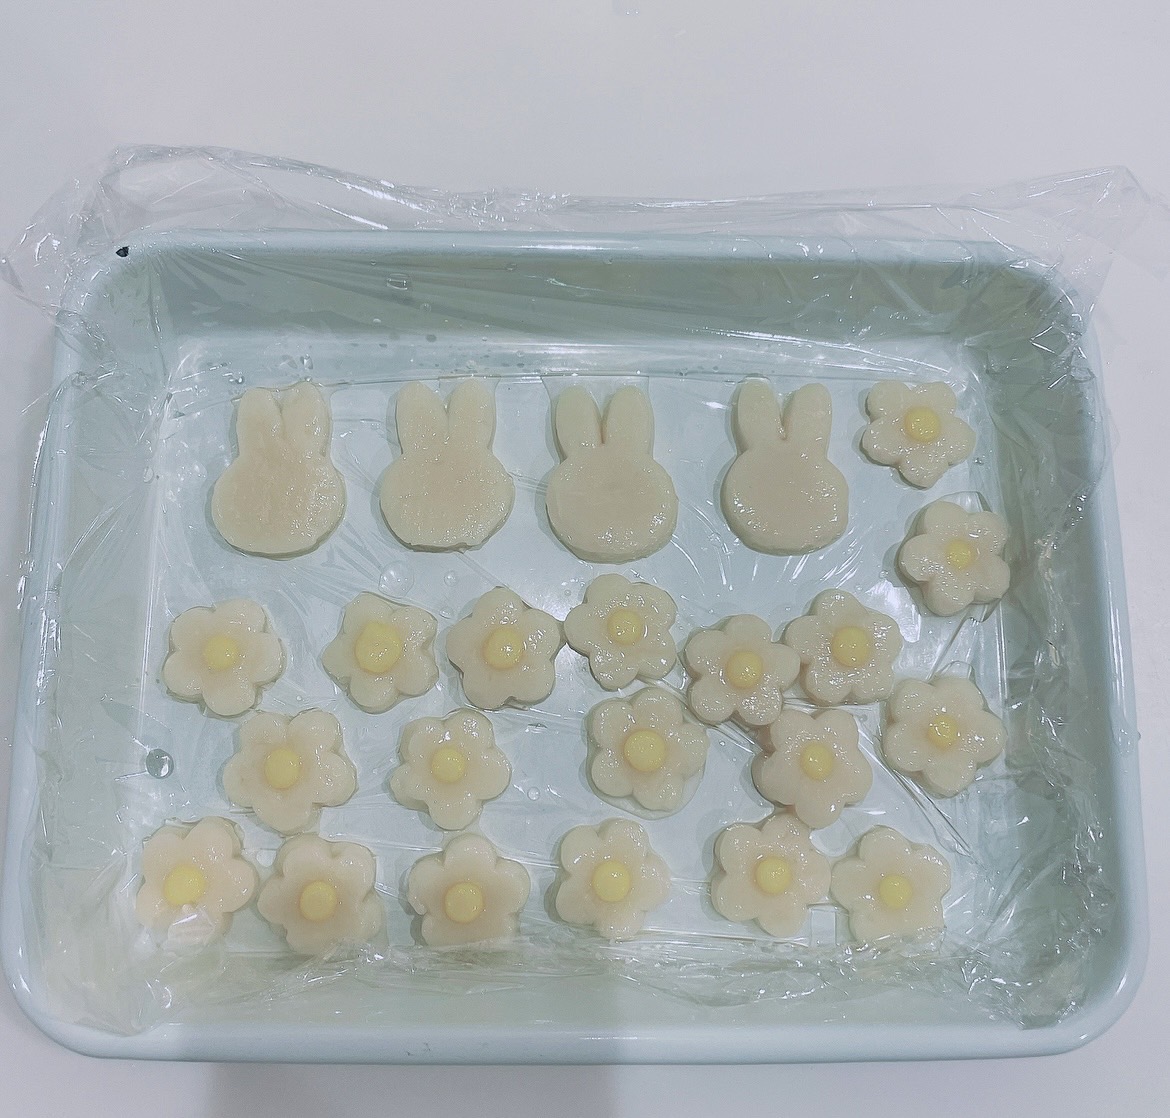
Place the shaped shiratama on parchment paper or plastic wrap and let dry briefly before adding decoration.
⑦
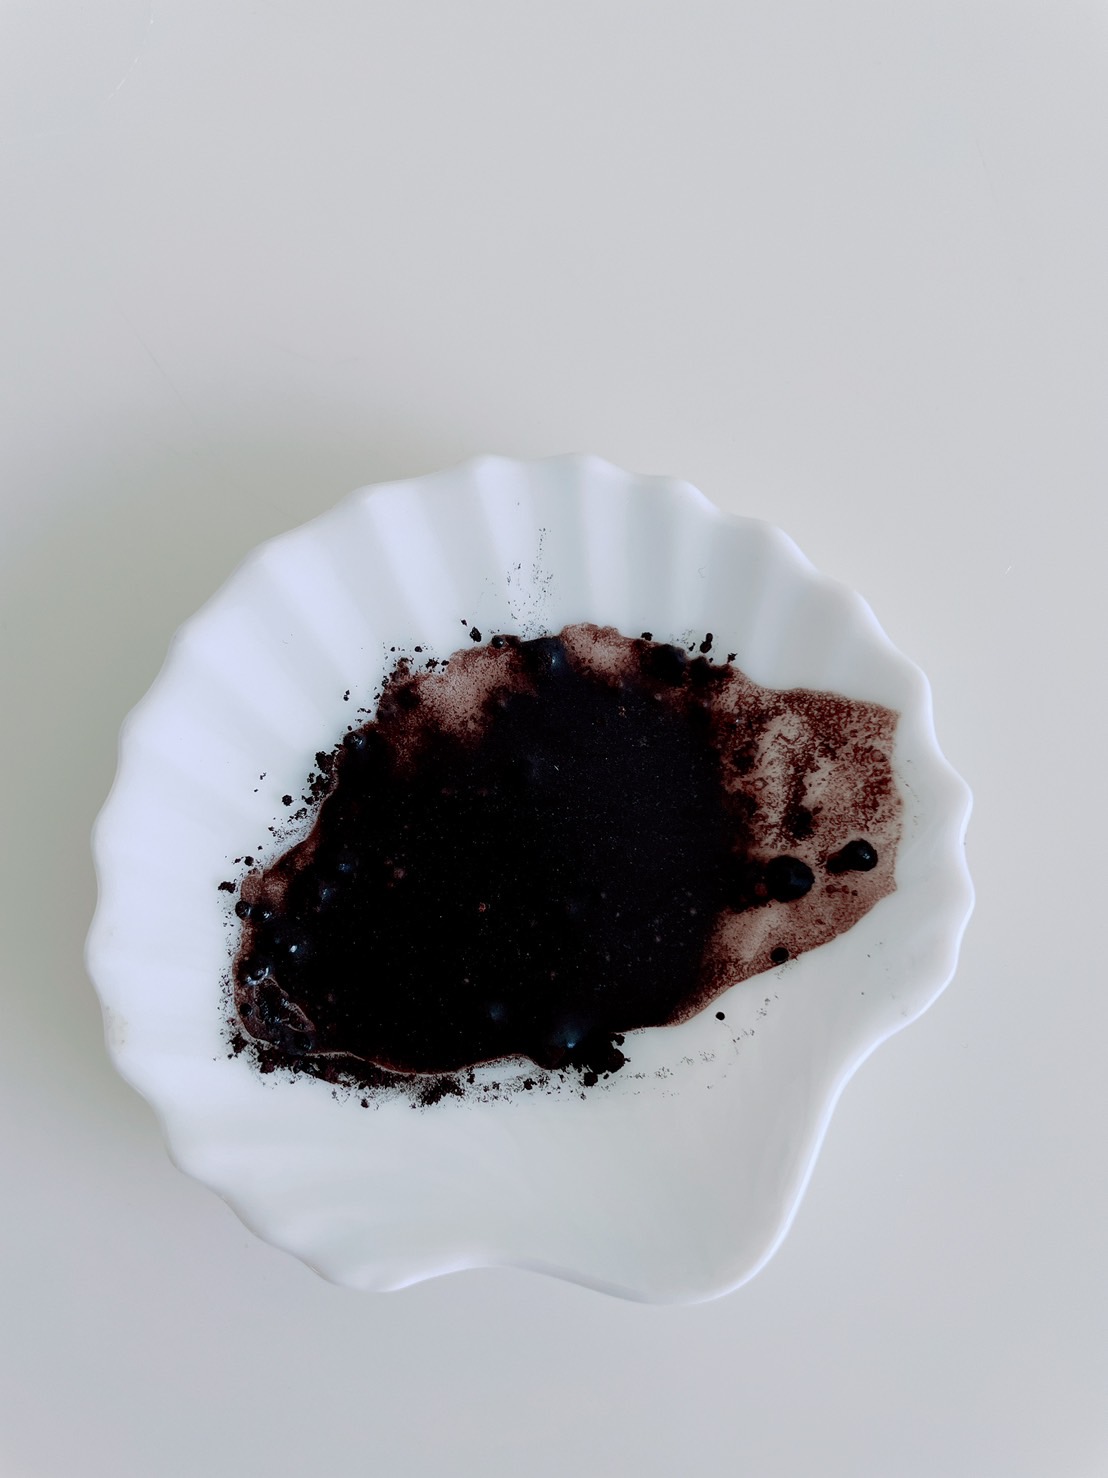
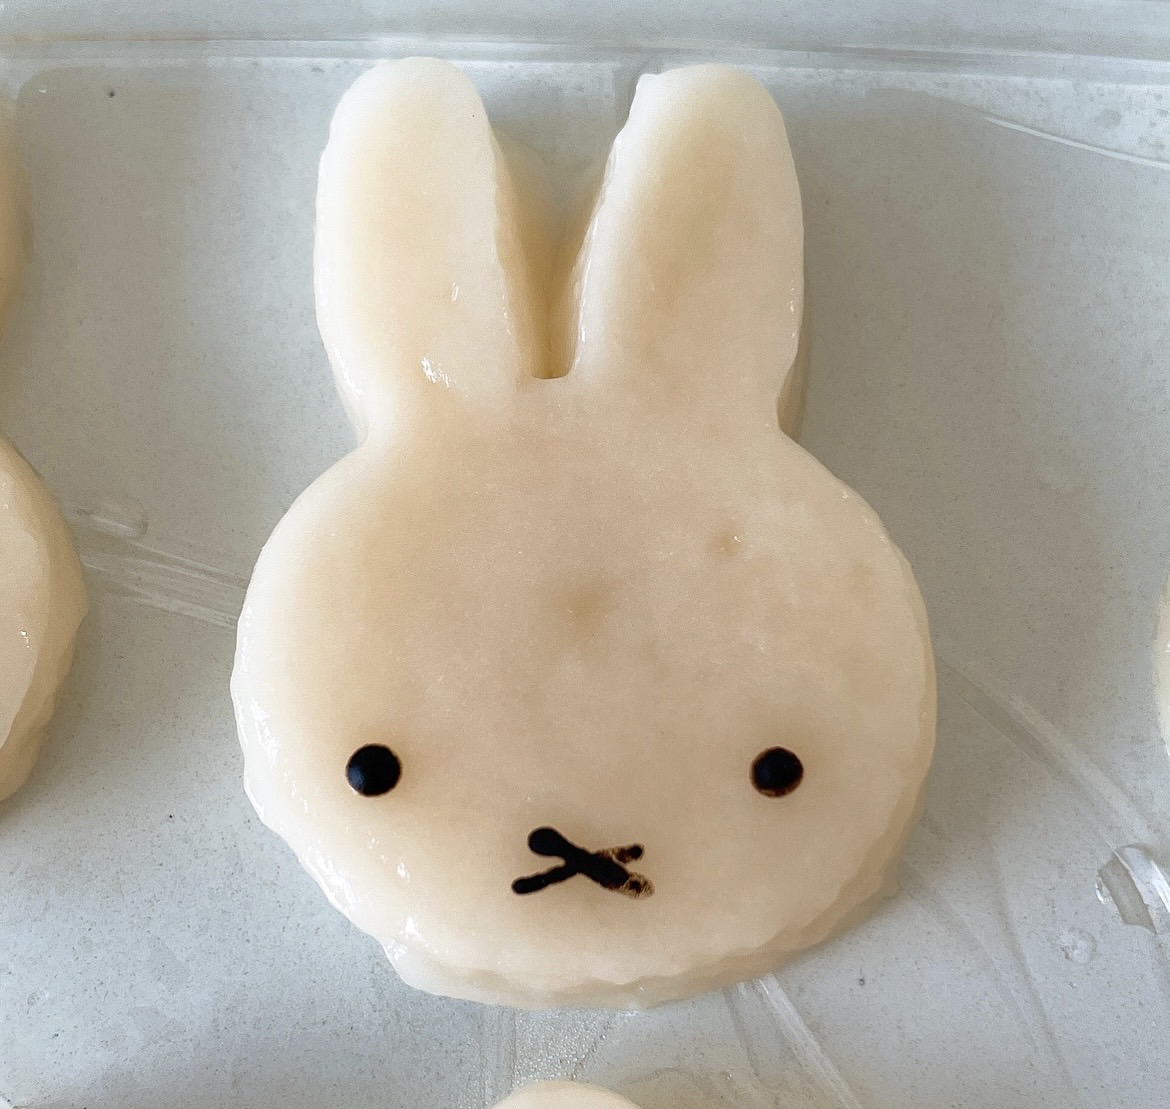
Mix black cocoa with a little water, and using the mixture, draw Miffy’s face.
⑧
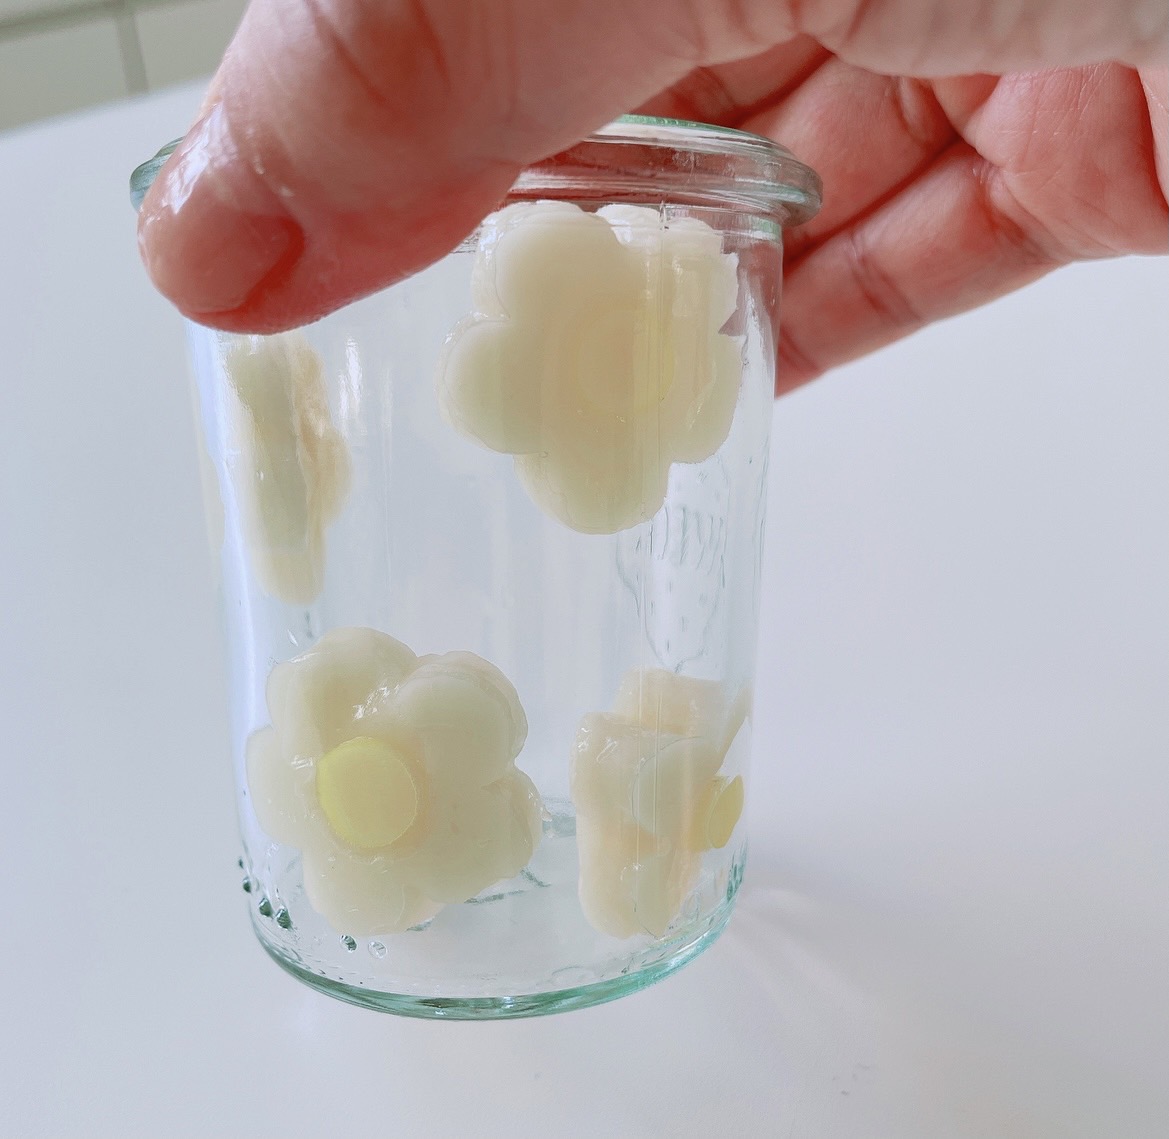
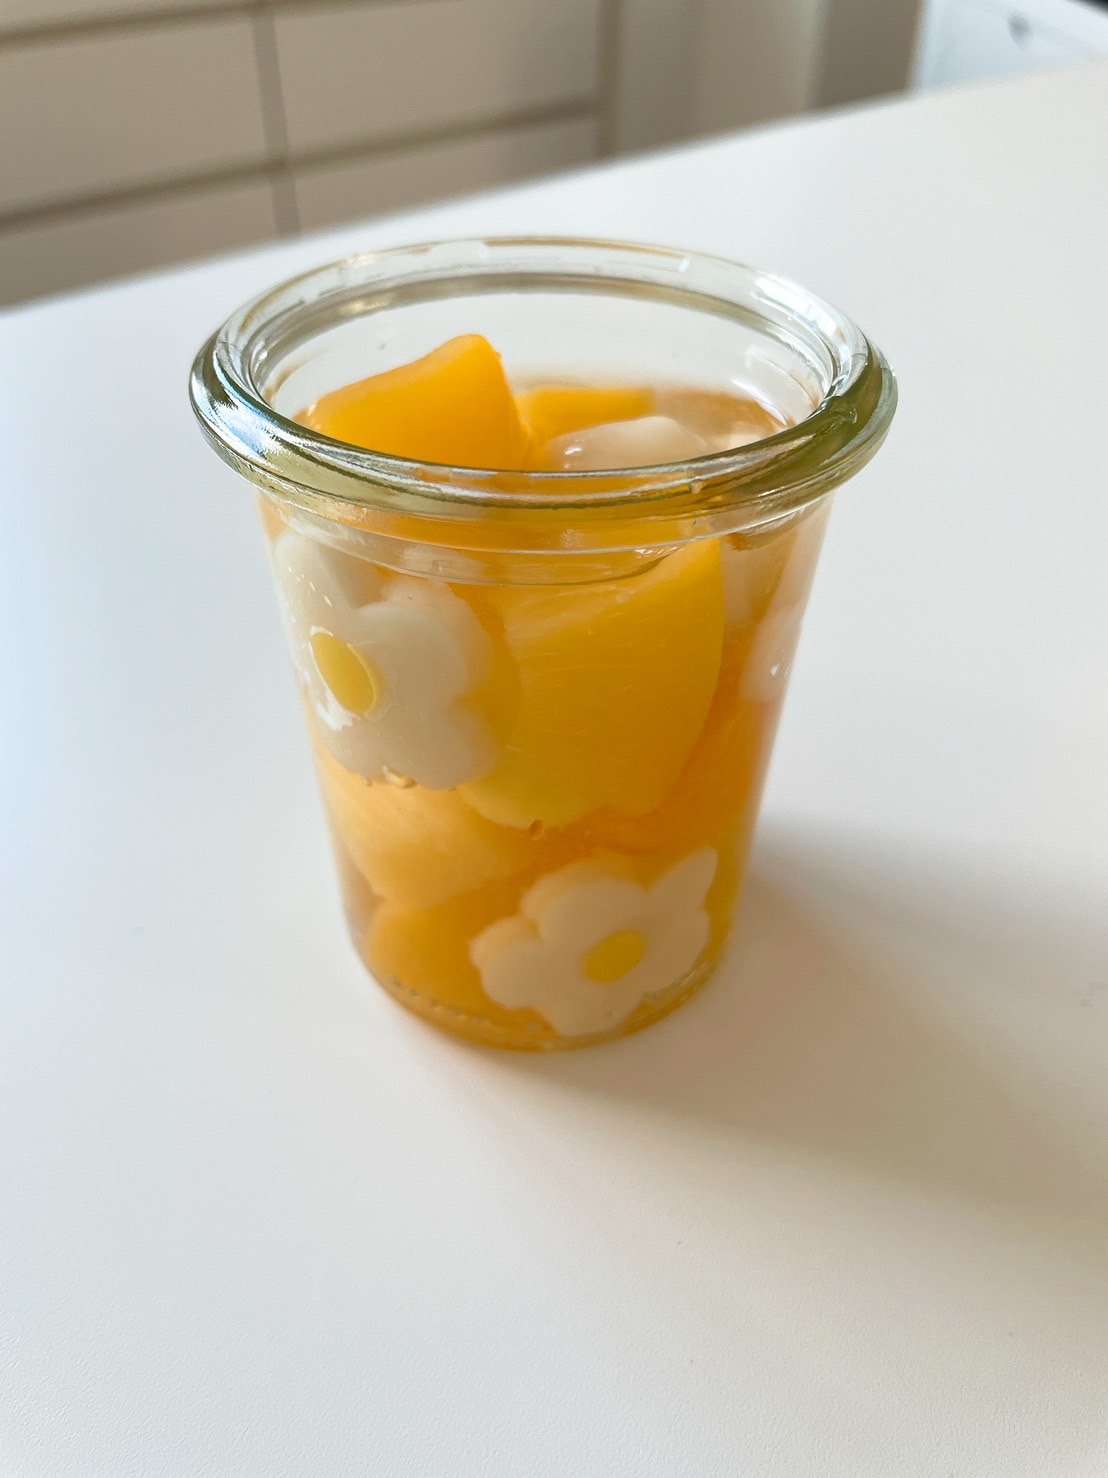
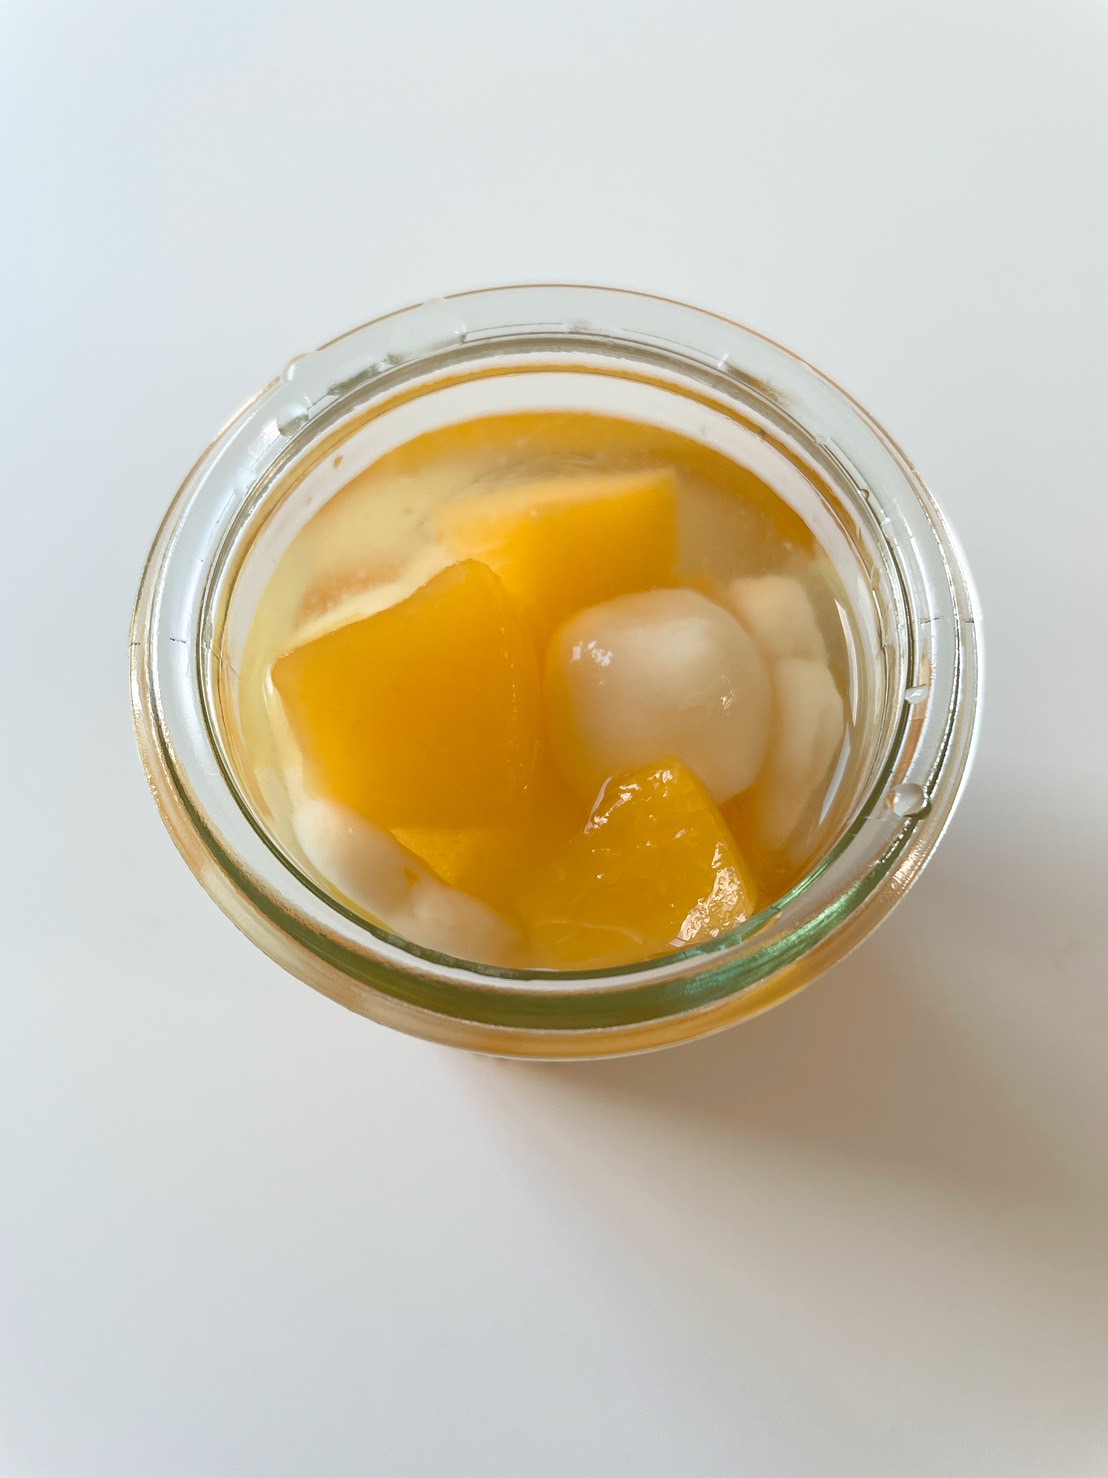
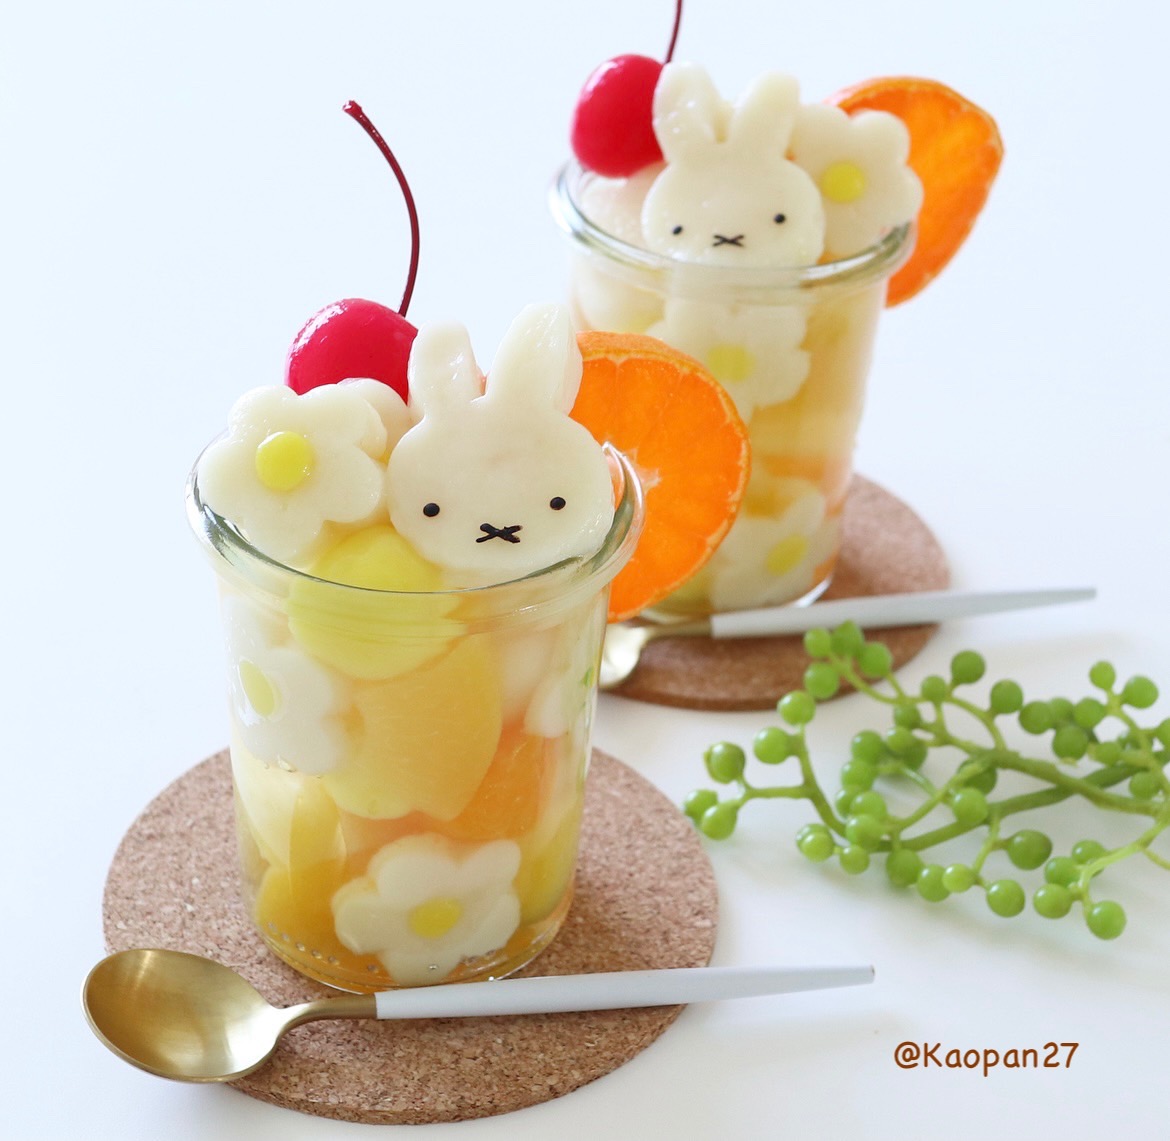
Place the flowers and shiratama balls inside the glass, follow up with your favorite fruits!
(If using canned fruit, feel free to add the syrup as well!)
I hope you enjoy decorating this colorful dish!
Kaori Kubota(@kaopan27)
I live in Hokkaido and I love to make character themed foods, desserts and pastries♡
I want to see my family smile, so I enjoy putting in a bit of effort to make character foods and changing food into something cute♡
You can see more of my character foods and character bento boxes on my Instagram page → @kaopan72
-
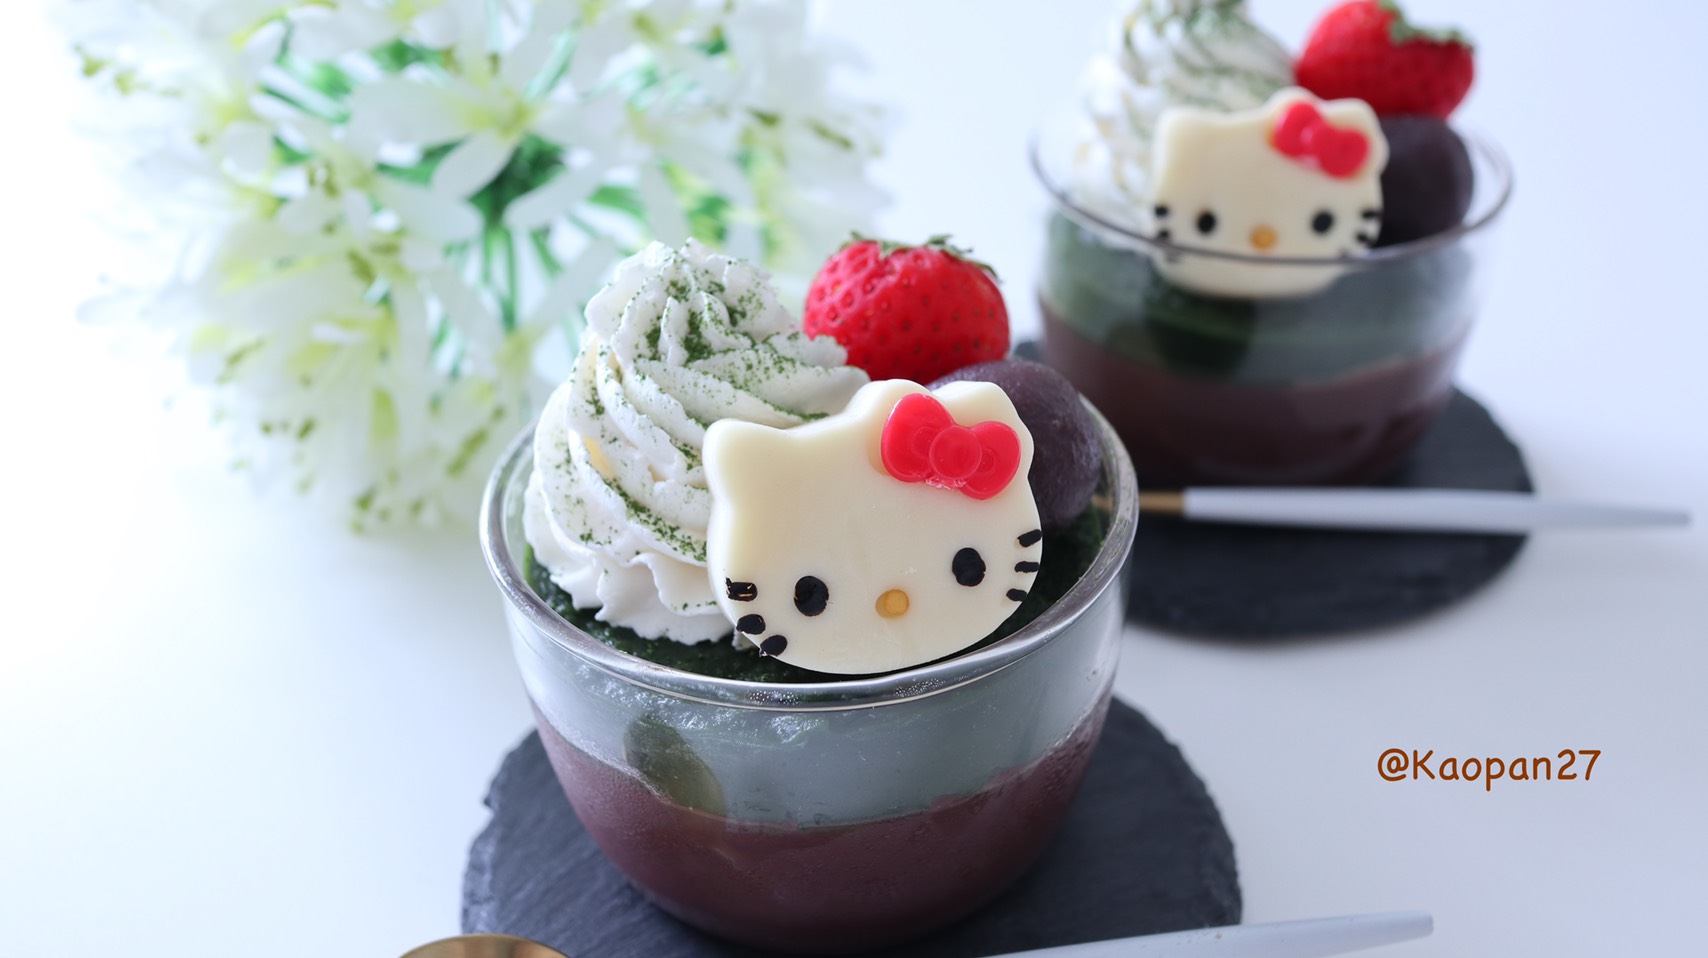
With just a small bit of ingenuity, turn everyday food into something cute using Kaori’s Easy Recipe! With just a few simple ideas, an ordinary recipe magically transforms into a cute dish.
Today, I’ll teach you how to make two-layer Mizu Yokan, perfect for a hot summer day!
You don’t even need an oven to make this sweet treat–just let it chill and harden! It’s great as a summer vacation snack.
Ingredients
This recipe makes 2 cups.

For Mizu Yokan:
120g fine-grained sweet bean paste
100cc water
Pinch of salt
1-2g Kanten powder
For Matcha Flavoring:
5g matcha
20g sugar
100cc water
1-2g Kanten powder
1
Place bean paste, water, salt, and Kanten powder into a pot and boil until dissolved.
⚠The Kanten powder needs to be heated for a further 1-2 minutes after boiling to harden properly. After boiling, reduce heat to low.
2
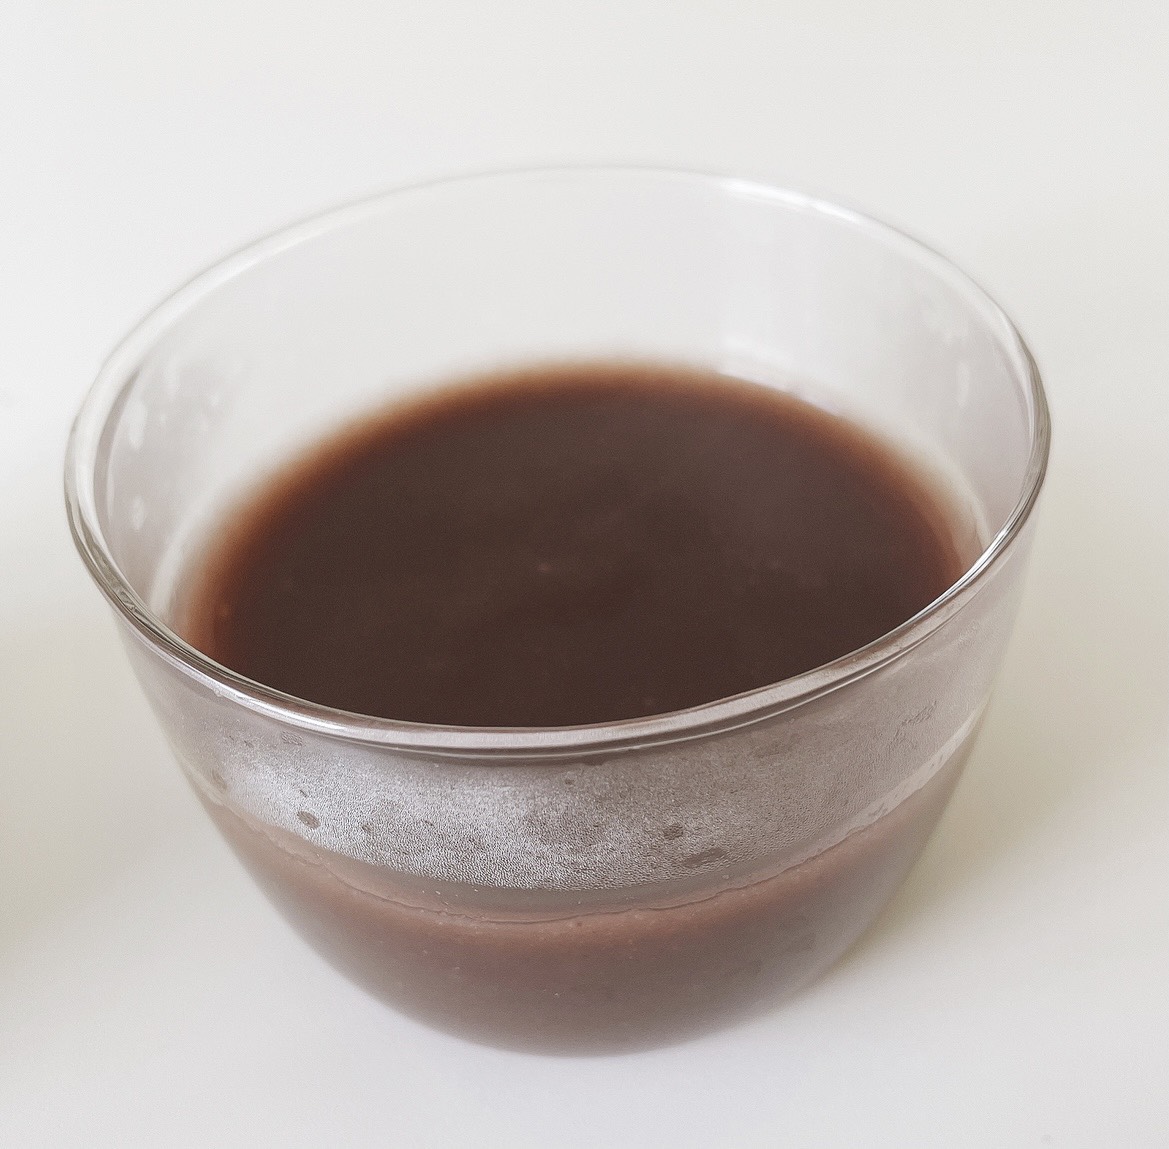
Pour mixture into container.
After about 30 minutes at room temperature, the mixture will start to harden. Work on the matcha flavoring when it begins to harden.
3
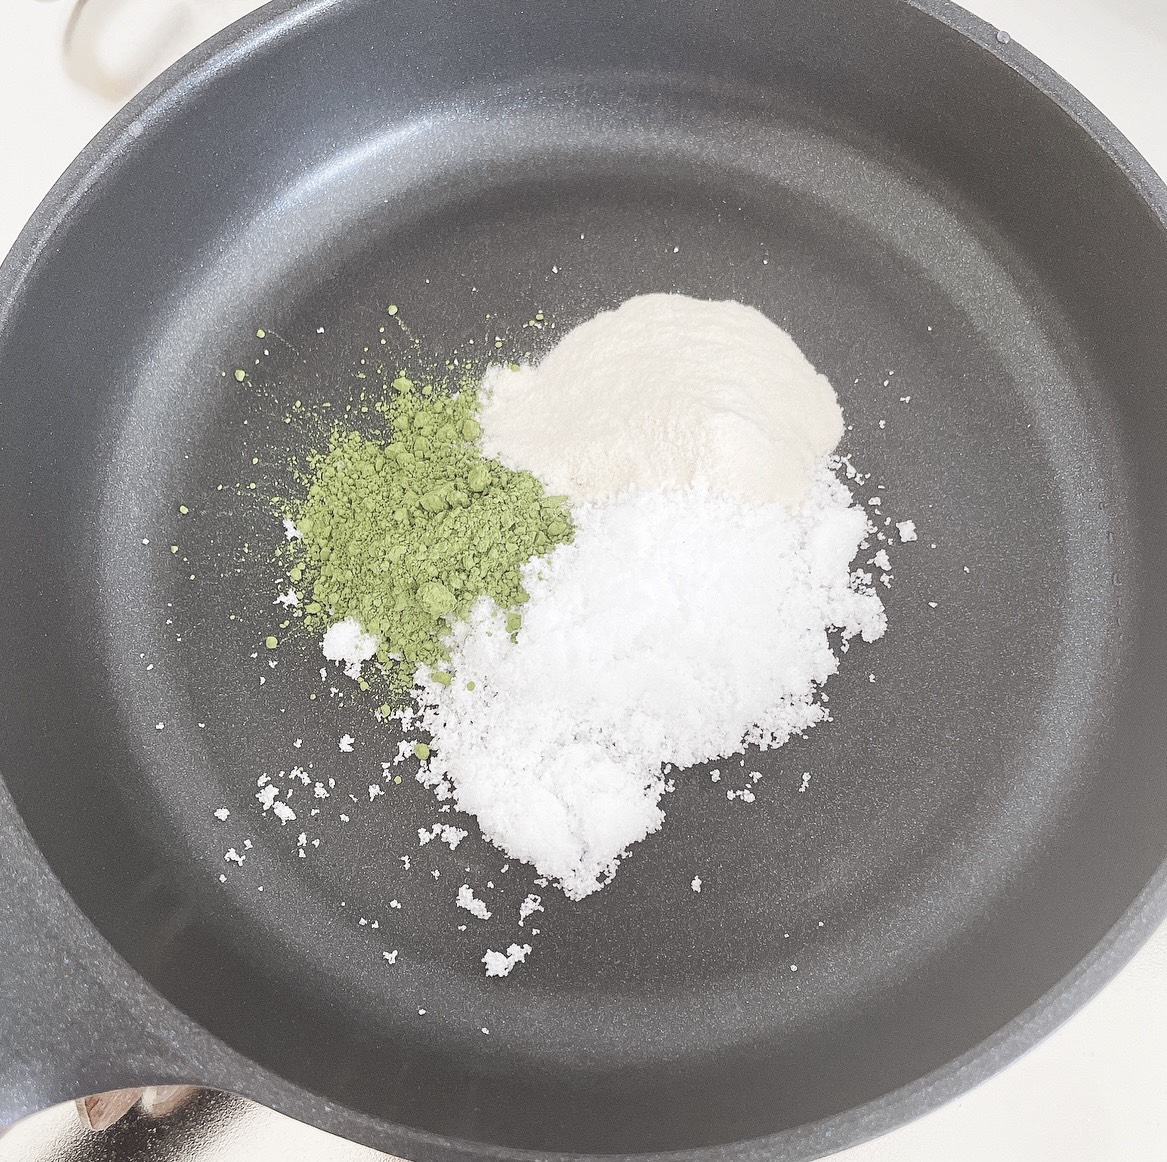
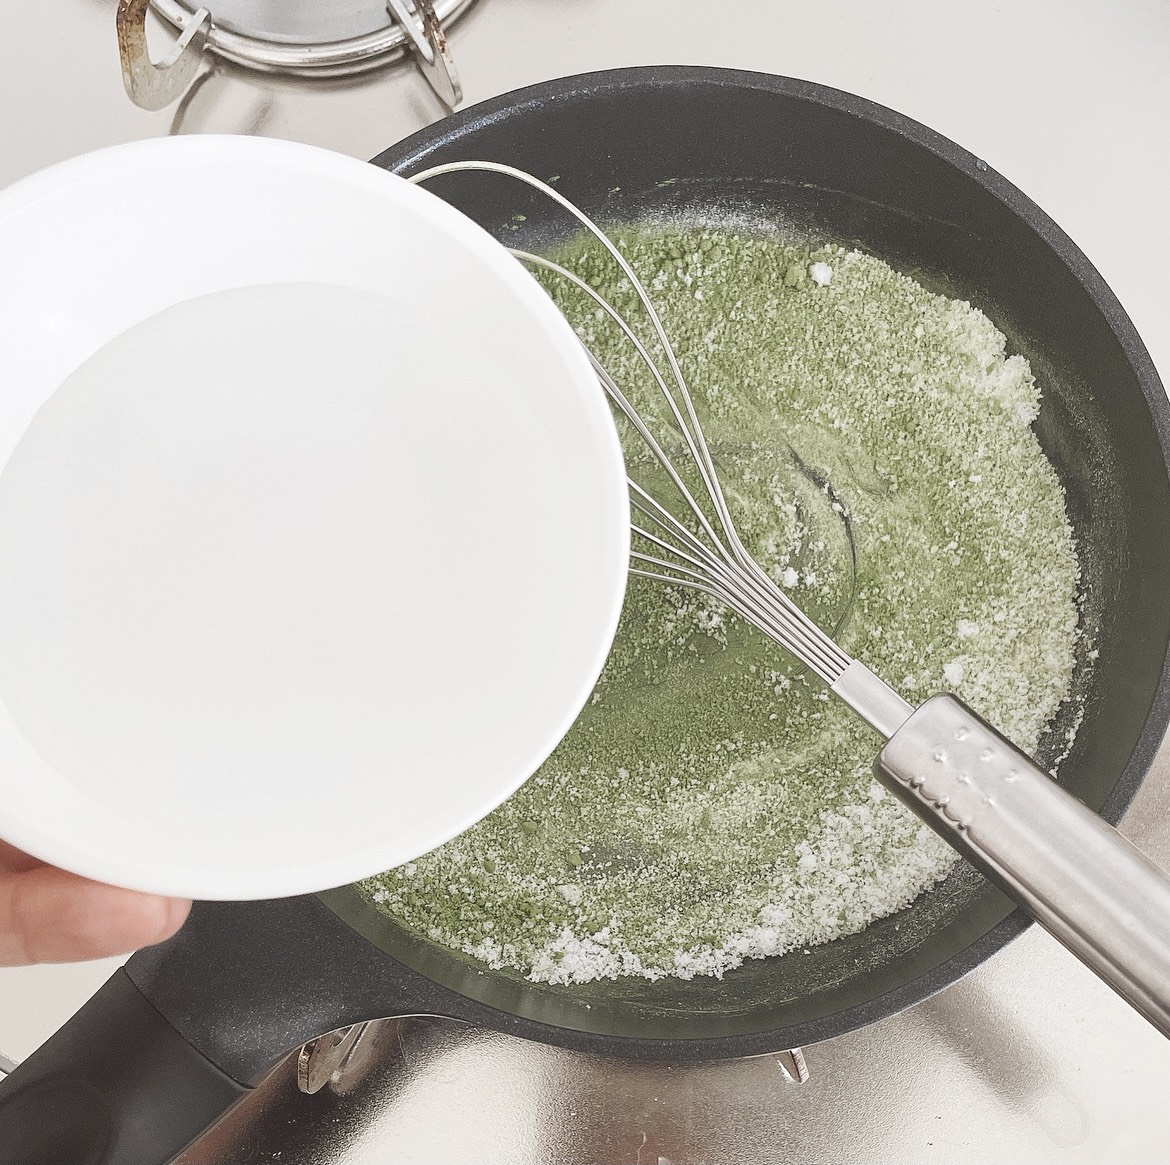
Place matcha, water, sugar, and Kanten powder in a pot and boil thoroughly.
As you did with the Mizu Yokan, reduce heat to low and continue cooking through.
4
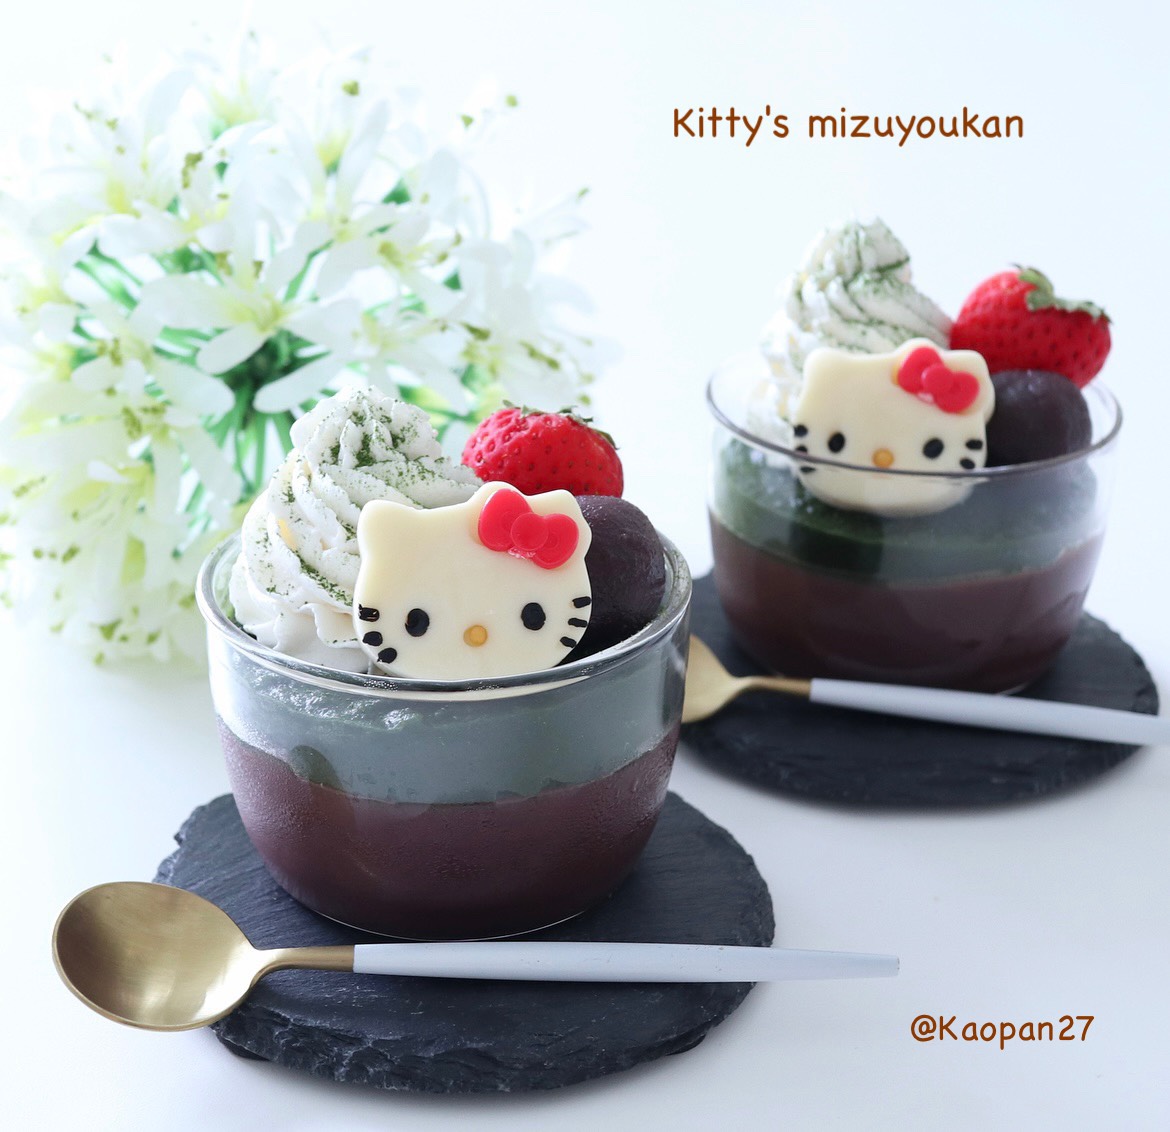
When the mixture is heated through, gently pour it over the Mizu Yokan and refrigerate until ready to serve.
This is delicious with a variety of toppings, from red bean paste and fresh cream to Shiratama dumplings and fresh fruit!
Kaori Kubota (@kaopan27)
I live in Hokkaido and I love to make character themed foods, desserts and pastries♡
I want to see my family smile, so I enjoy putting in a bit of effort to make character foods and changing food into something cute♡
You can see more of my character foods and character bento boxes on my Instagram page → @kaopan72
-
With just a small bit of ingenuity, turn everyday food into something cute using Kaori’s Easy Recipe! With a few simple ideas, an ordinary recipe magically transforms into a cute dish.
In this recipe, I’ll show you how to make a delicious banana cake that is tasty even if refrigerated!
Ingredients
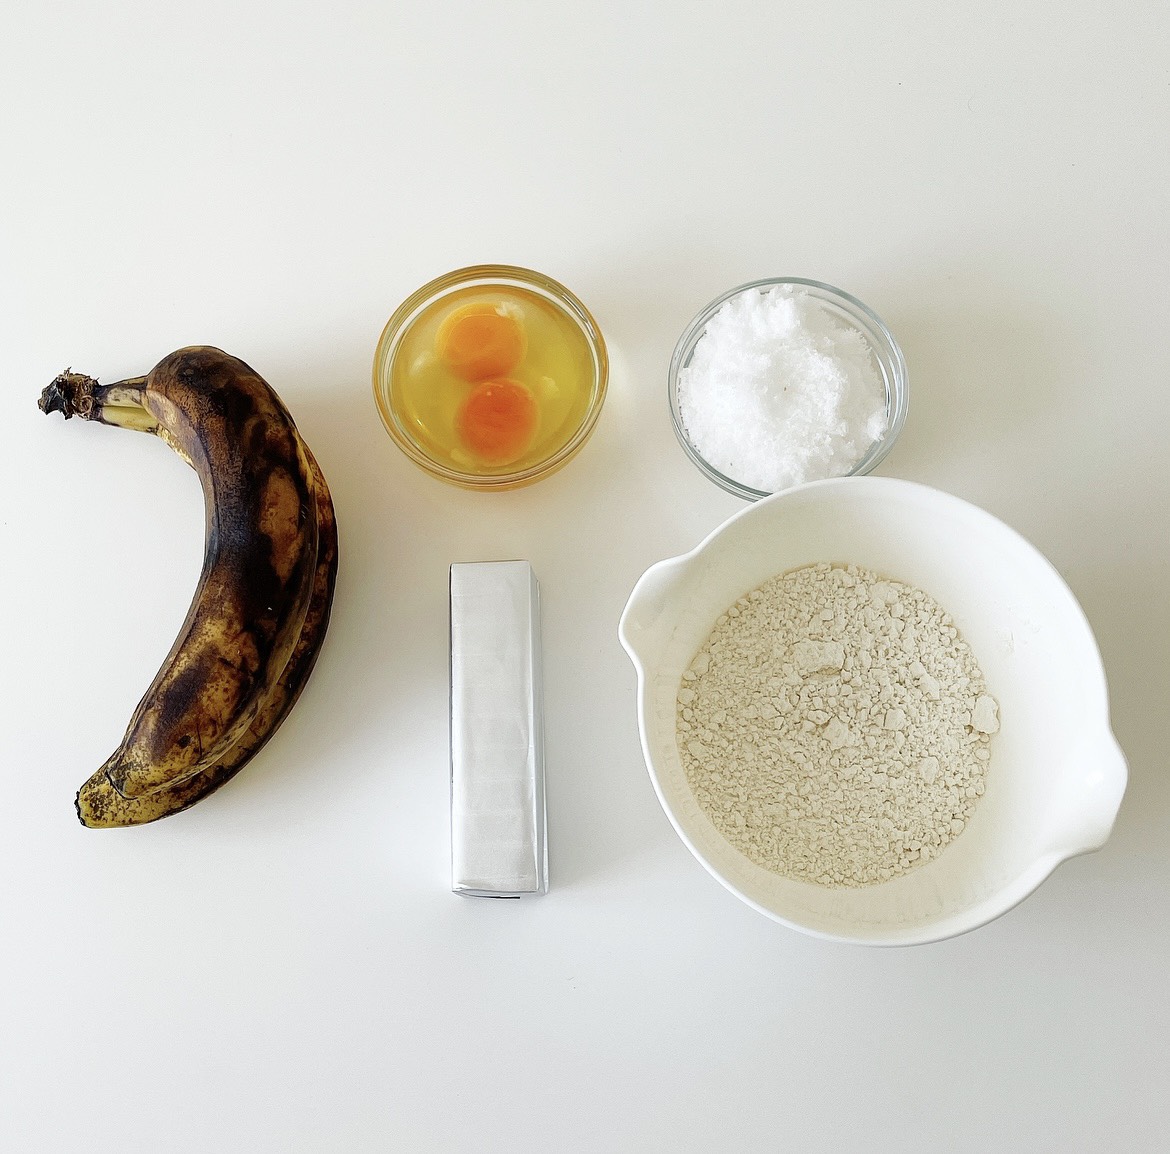
Makes a 18cm pound cake
2 ripe bananas
100g unsalted butter
50g granulated sugar
2 eggs
100g weak flour
1
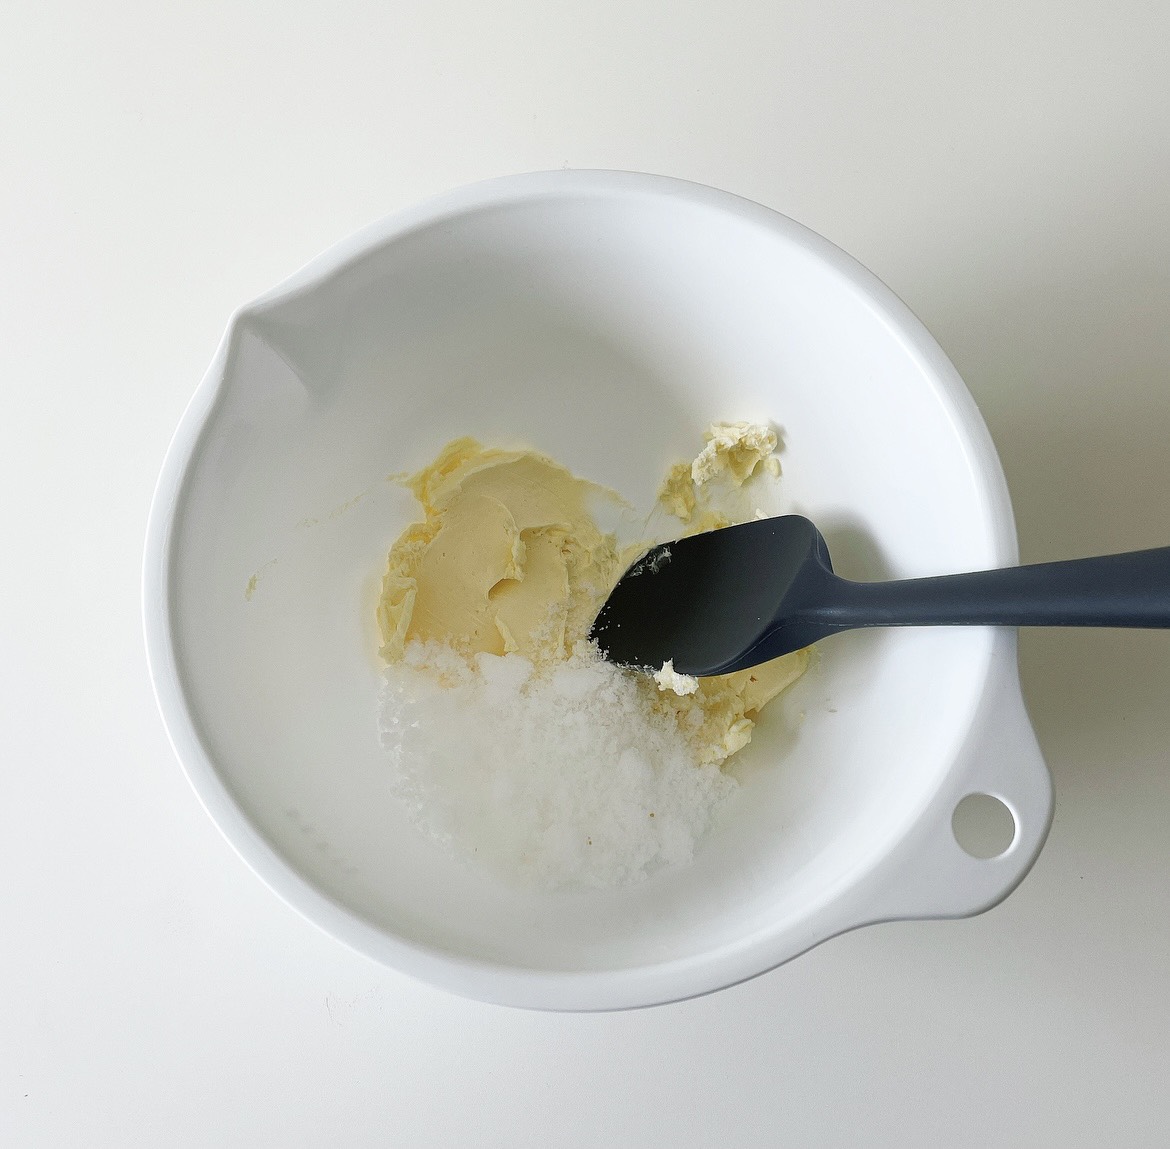
Bring the butter to room temperature and mix it with the sugar until it becomes white. I used unsalted margarine for this.
2
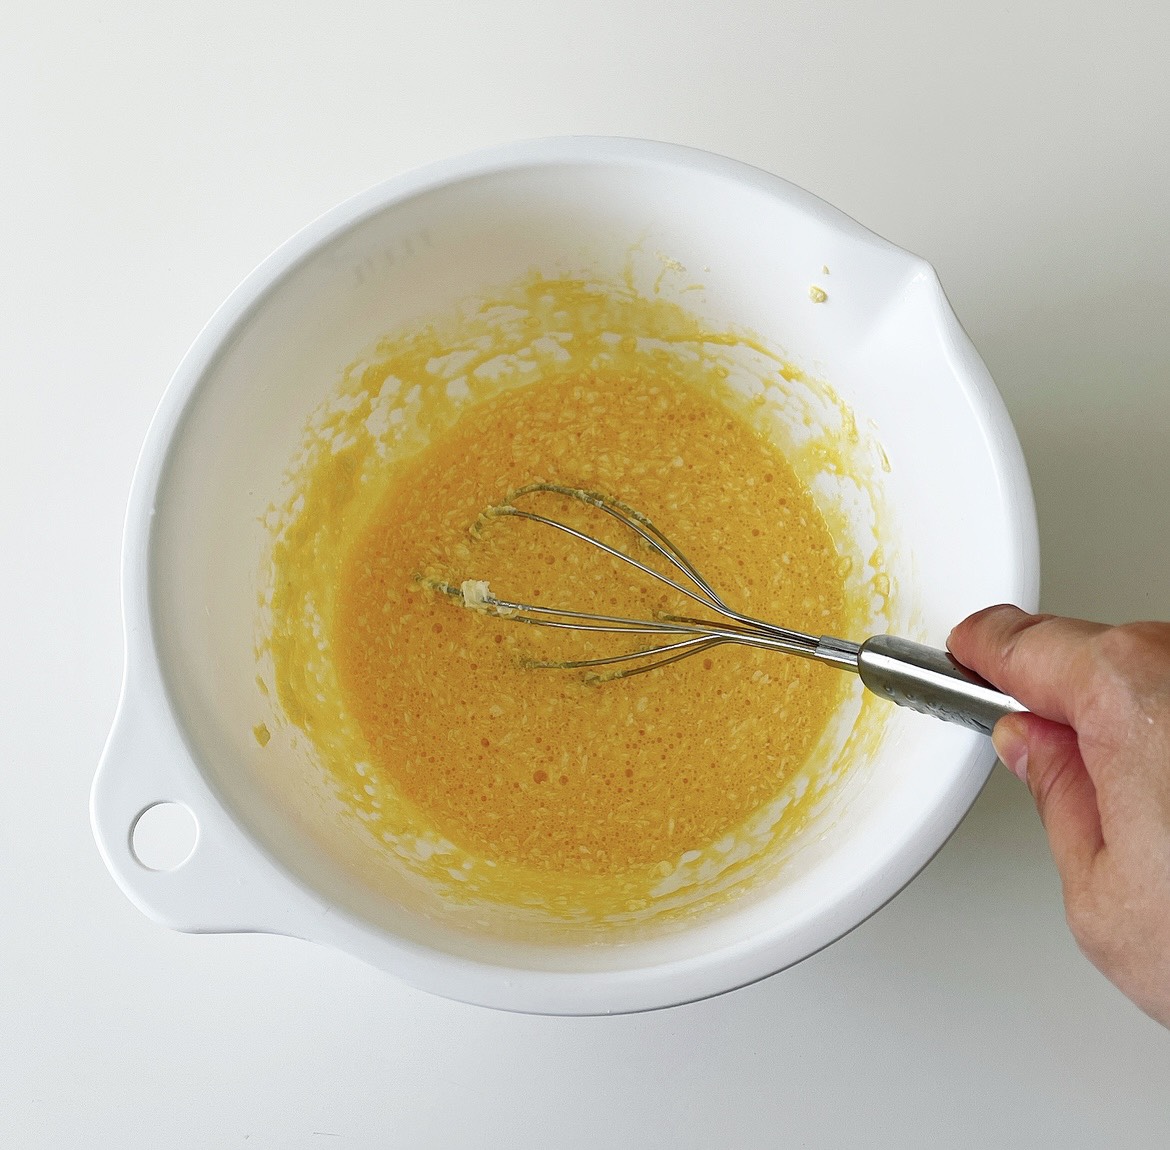

Gradually add both the egg whites and yolks and pour slowly into the mixture while mixing. Mash the banana with a fork, add to the bowl, and mix.
3
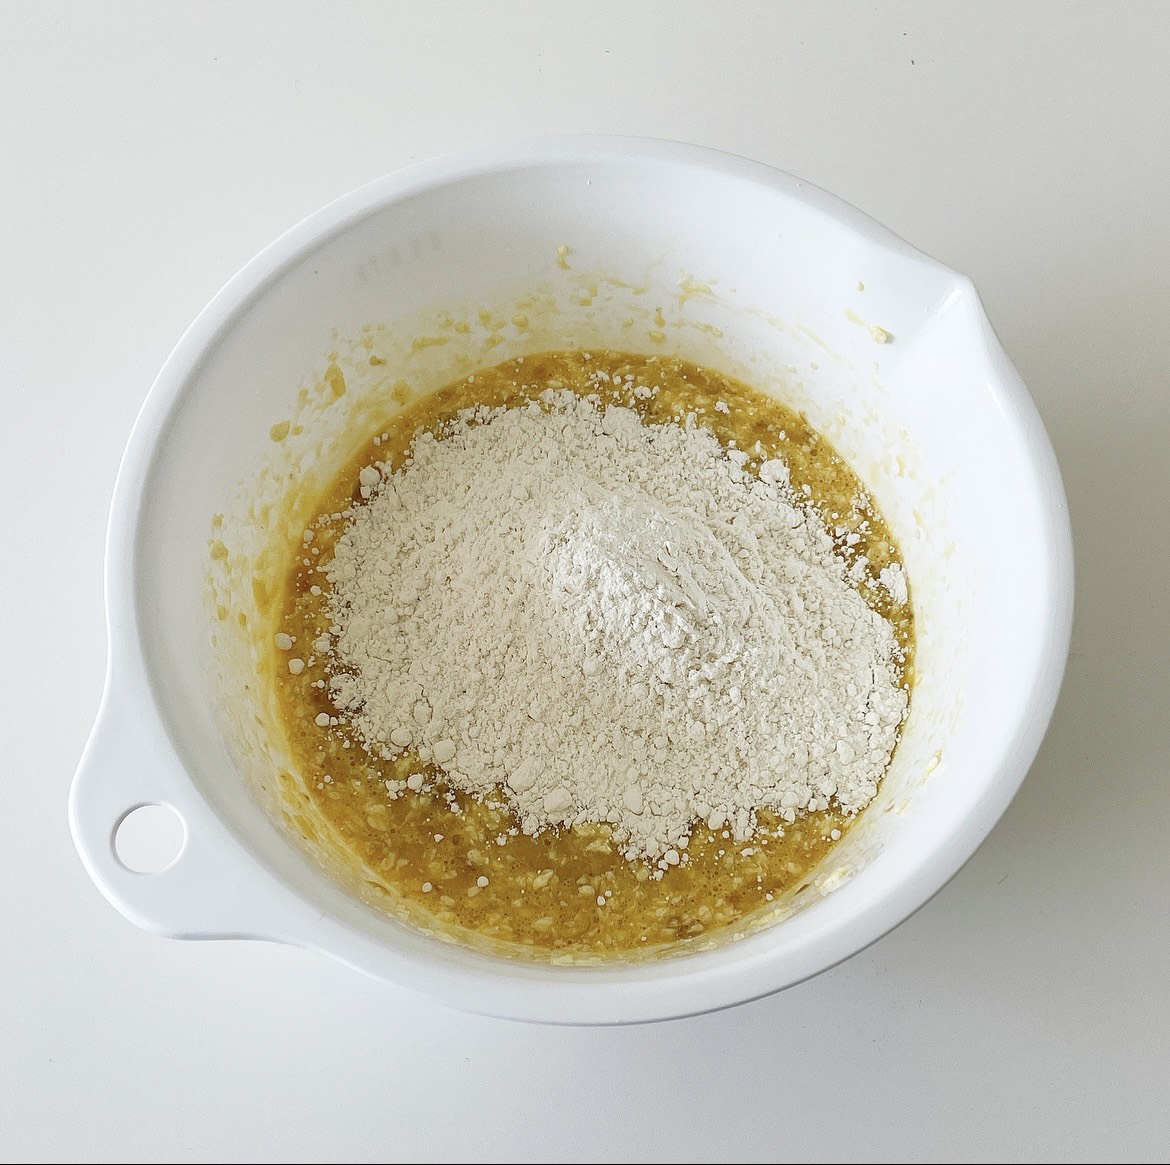
Sieve in the flour and mix lightly.
4
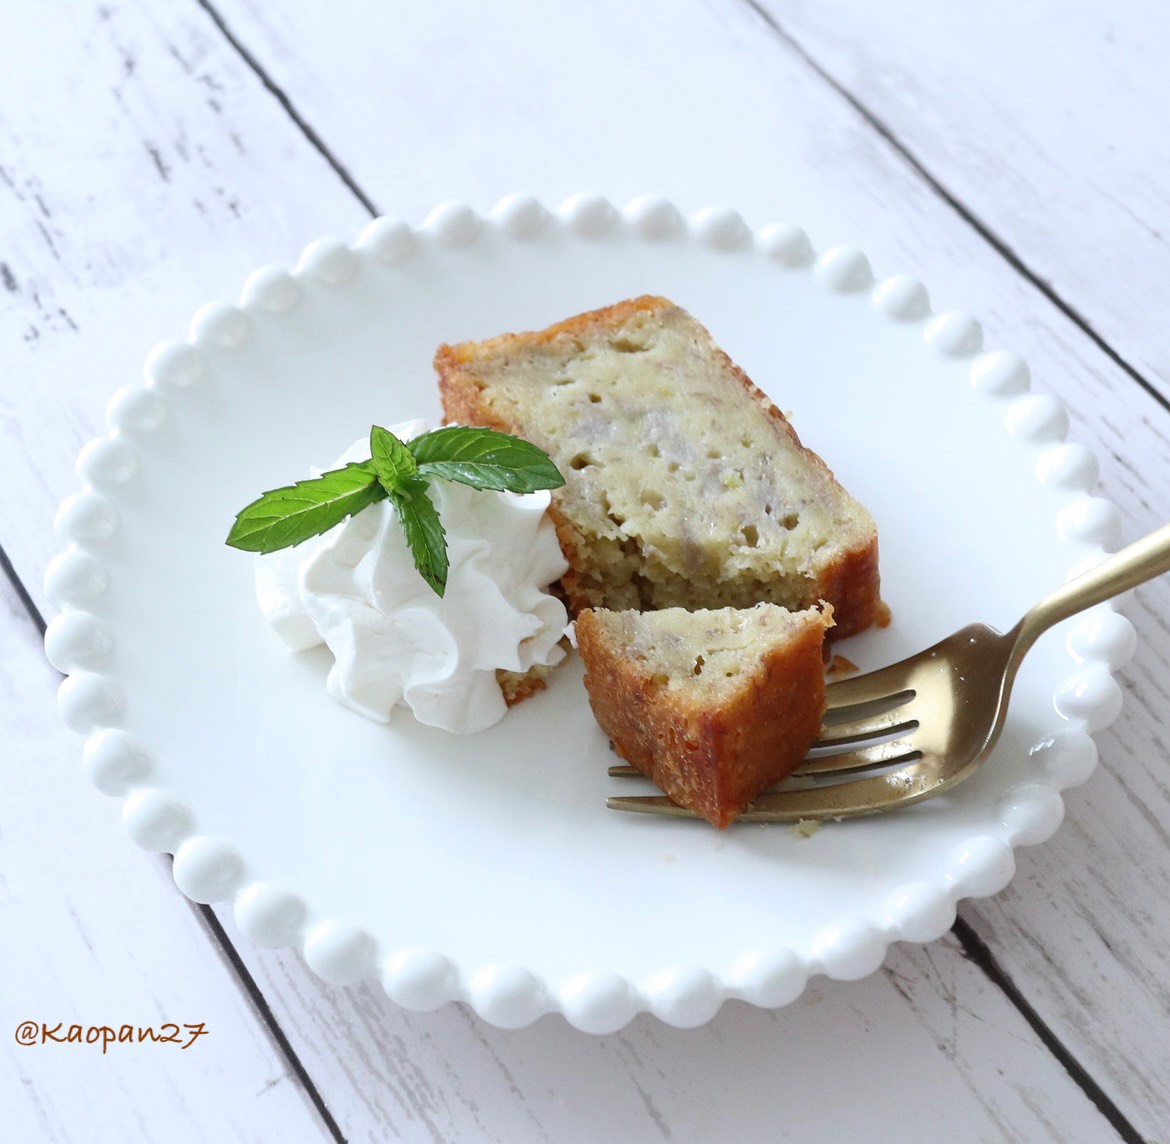
Bake at 160℃ for 40-45 minutes and it’s ready! I used a 15cm pound cake tin and muffin tin to make mine. If using a muffin tin, bake for 30 minutes.
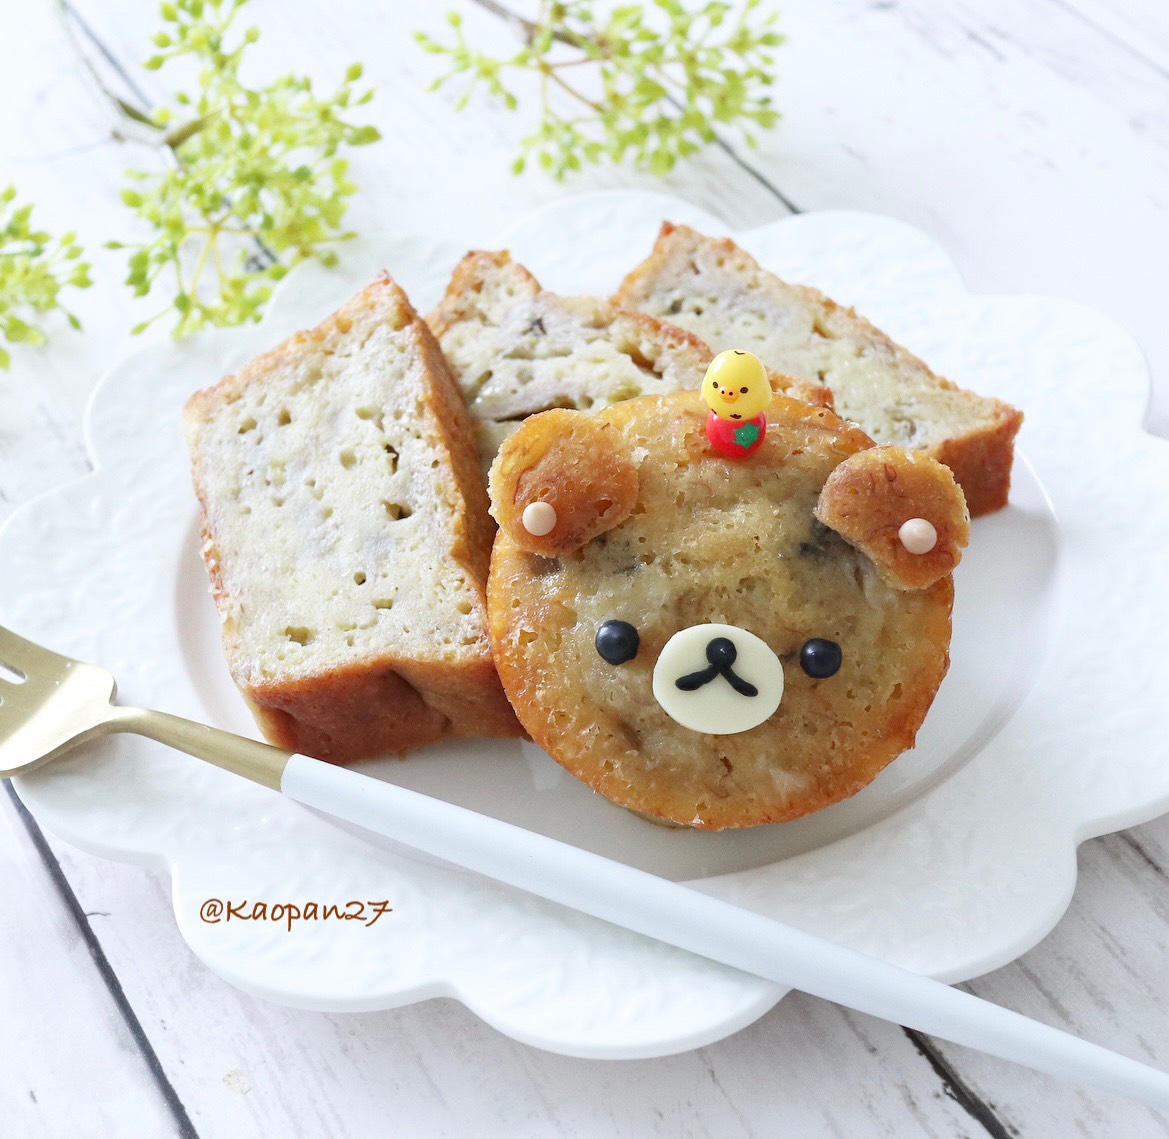
Leave to cool and use the edge of the pound cake tin to cut ears. Finish by using a chocolate pen to draw on Rilakkuma’s face.
Kaori invites you into her world of character-themed food dishes in her recipe series. Be sure to check out her Instagram where she has uploaded many pictures of her character dishes!
Kaori Kubota (@kaopan27)
I live in Hokkaido and I love to make character themed foods, desserts and pastries♡
I want to see my family smile, so I enjoy putting in a bit of effort to make character foods and changing food into something cute♡
You can see more of my character foods and character bento boxes on my Instagram page → @kaopan72
-
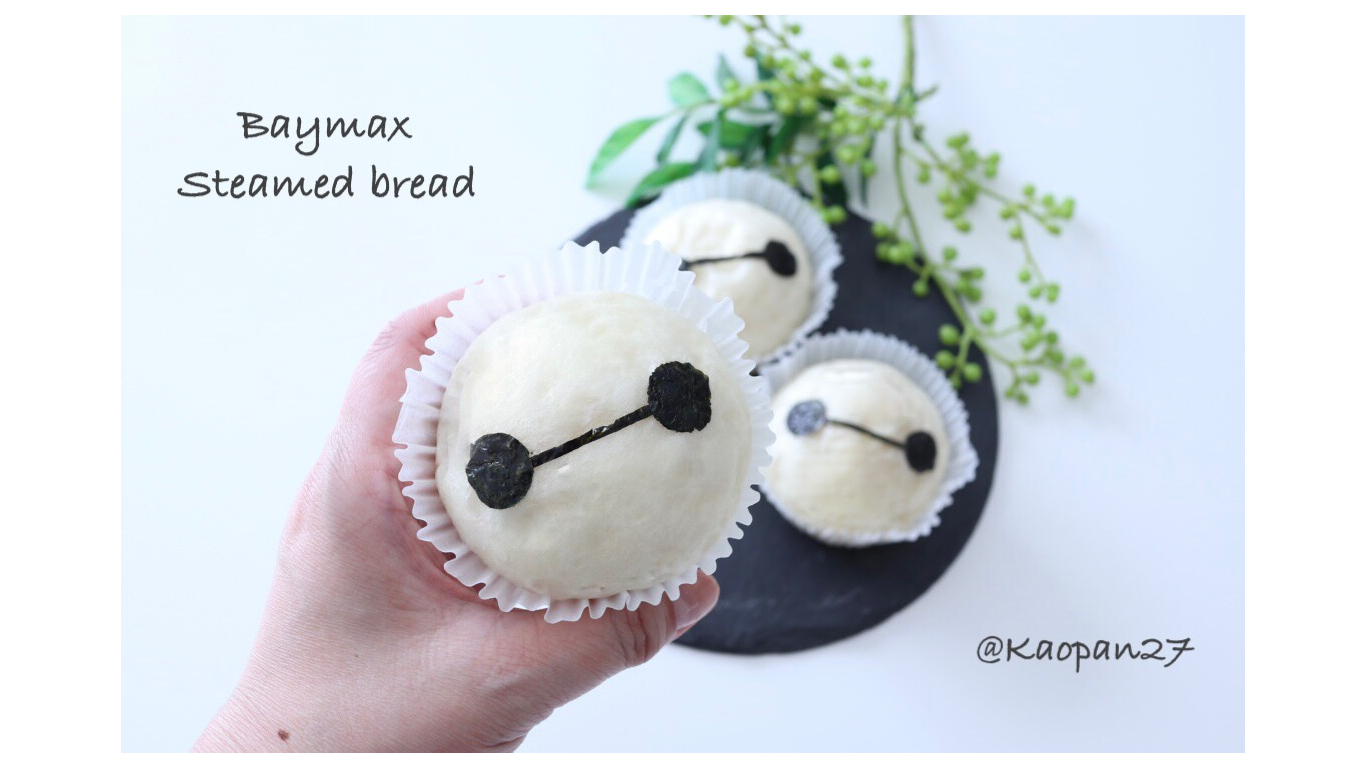
With just a small bit of ingenuity, turn everyday food into something cute using Kaori’s Easy Recipe! With a few simple ideas, an ordinary recipe magically transforms into a cute dish.
Today, I’ll teach you how to make Baymax mushi-pan steamed bread.
Ingredients
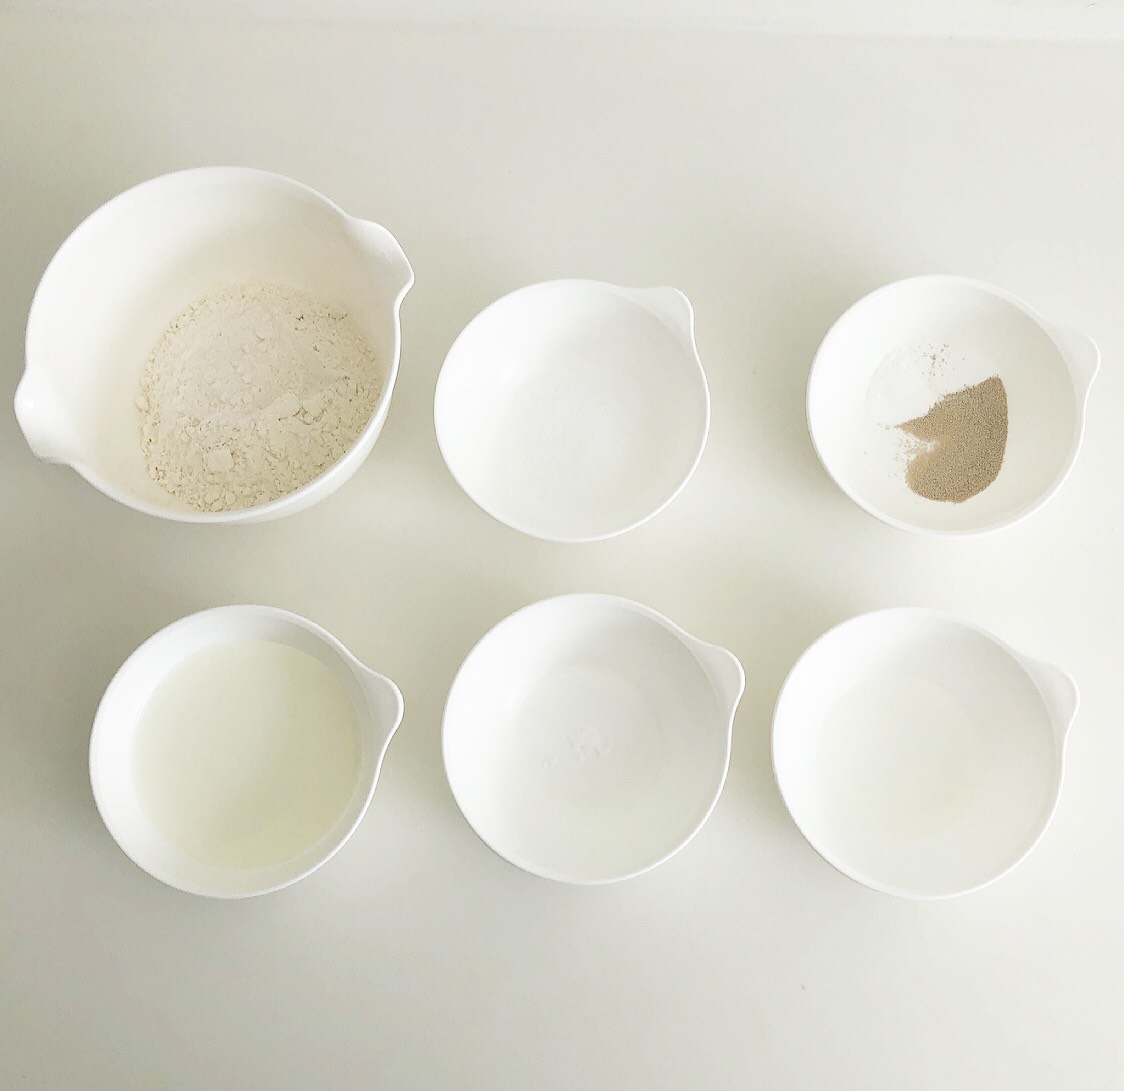
This recipe makes 5 portions
140g strong flour
20g granulated sugar
Pinch of salt
3g dry yeast
3g baking powder
5g vegetable oil
85ml-90ml milk (room temperature)
1
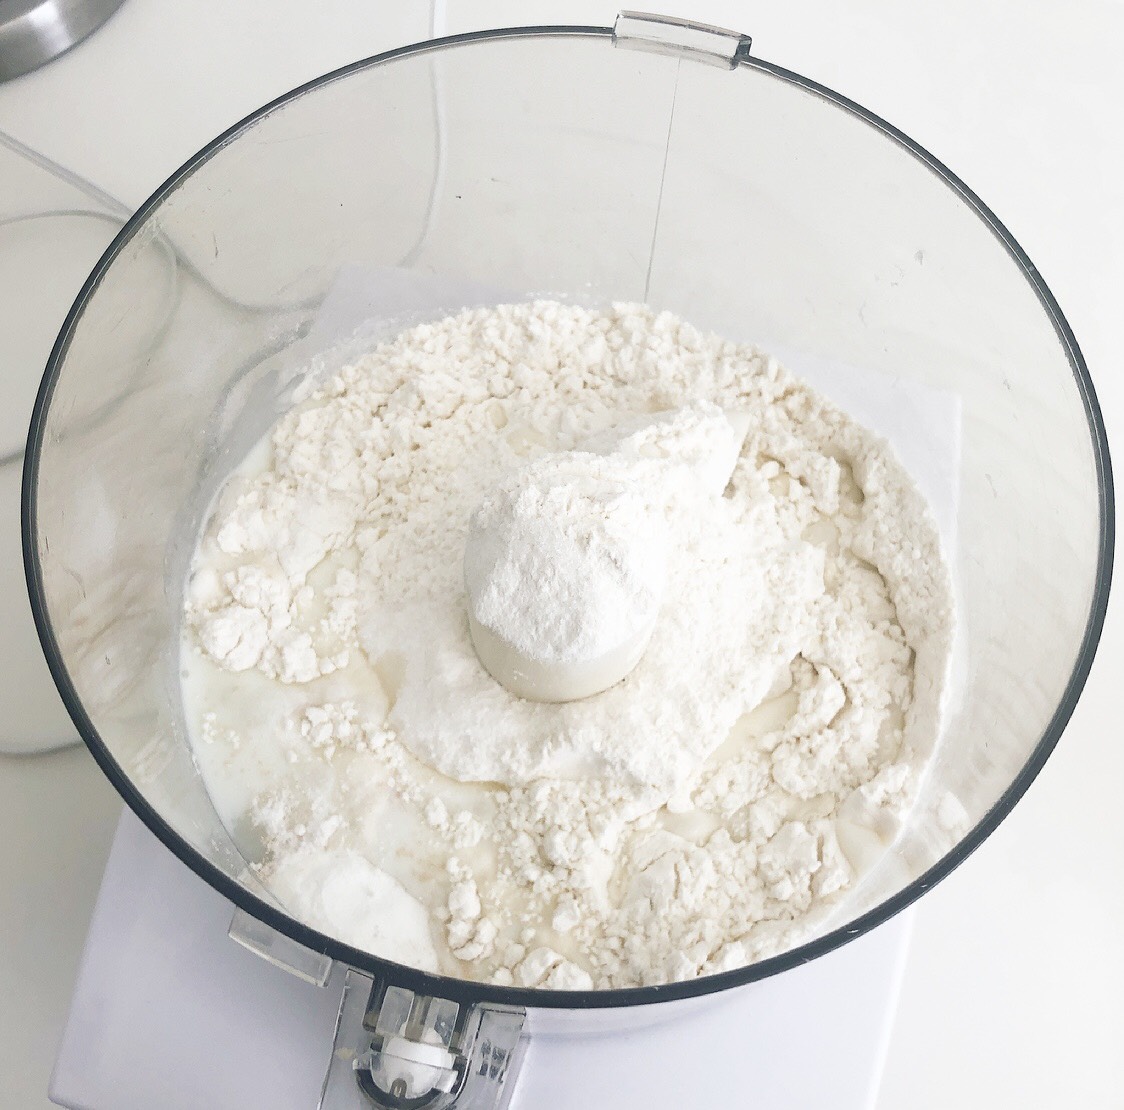
Mix everything together in a food processor. If you don’t have a food processor, you can also knead the ingredients well by hand.
2
Ferment at 40℃ for 40 minutes. If you don’t have a fermentation machine, leave in a warm environment.
3
Once the dough has doubled in size, divide into five portions and put into separate cups. If using paper cups, rub a little bit of oil inside.
4
Bake in the oven at 40℃ for 20-25 minutes.
5
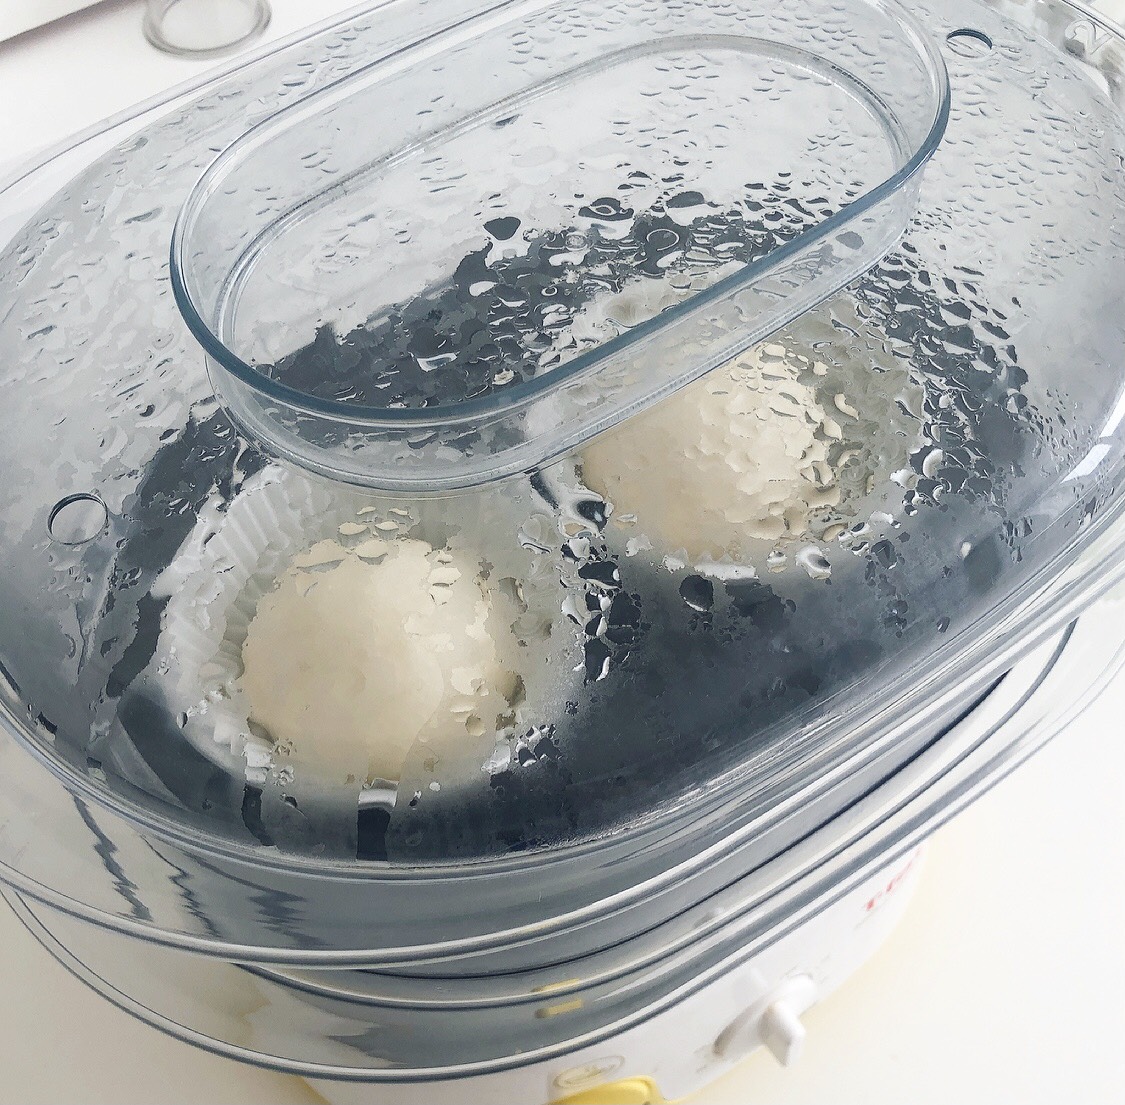
After baking, steam in a steamer for 12-13 minutes. If you don’t have a steamer, put into a frying pan or large pot with a little bit of water and cover.
6
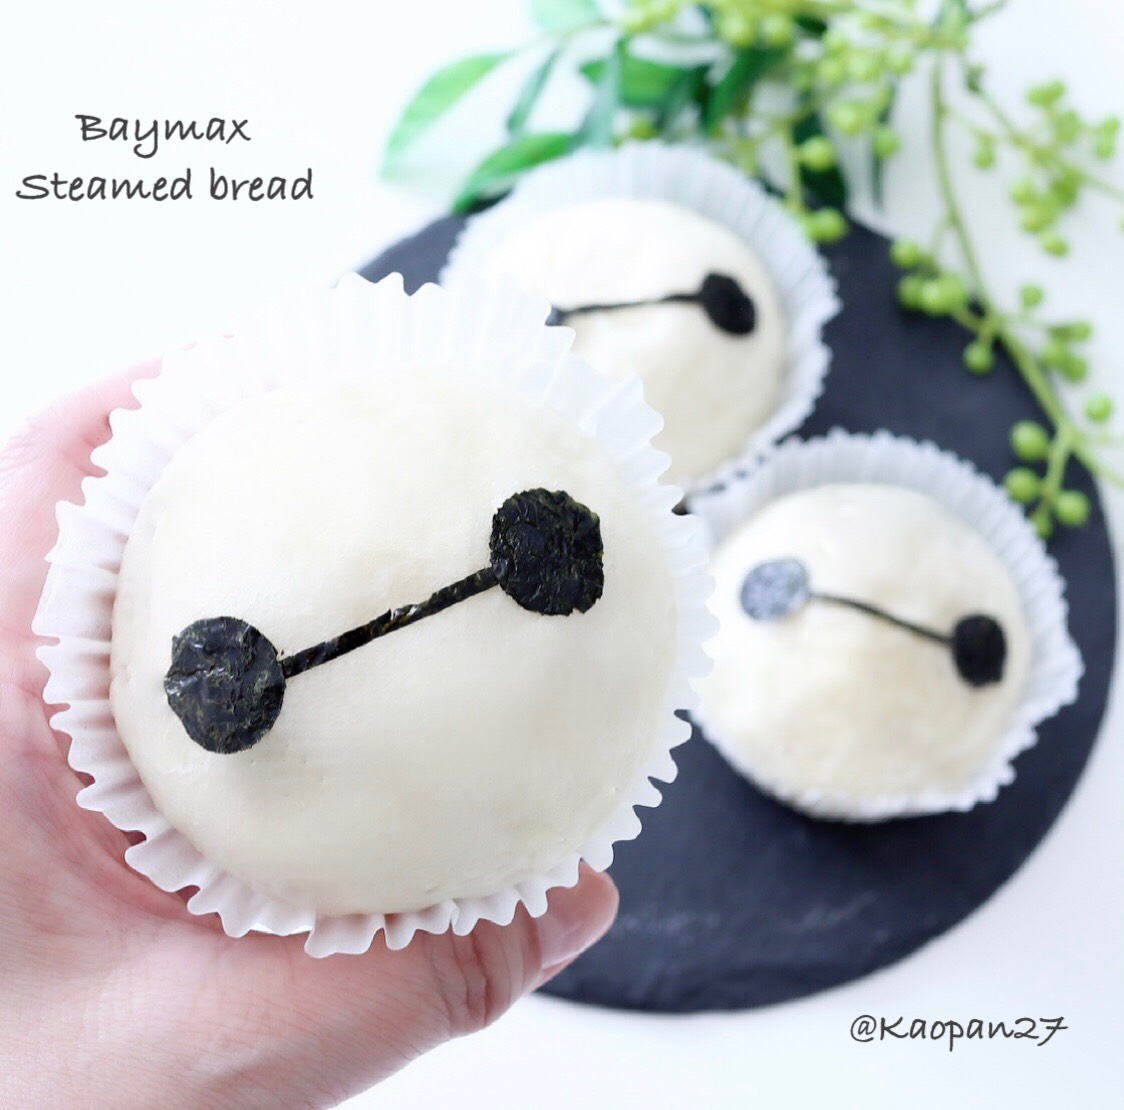
Once cooled, use some nori seaweed to make Baymax’s face and you’re done!
Kaori Kubota (@kaopan27)
I live in Hokkaido and I love to make character themed foods, desserts and pastries♡
I want to see my family smile, so I enjoy putting in a bit of effort to make character foods and changing food into something cute♡
You can see more of my character foods and character bento boxes on my Instagram page → @kaopan72
-
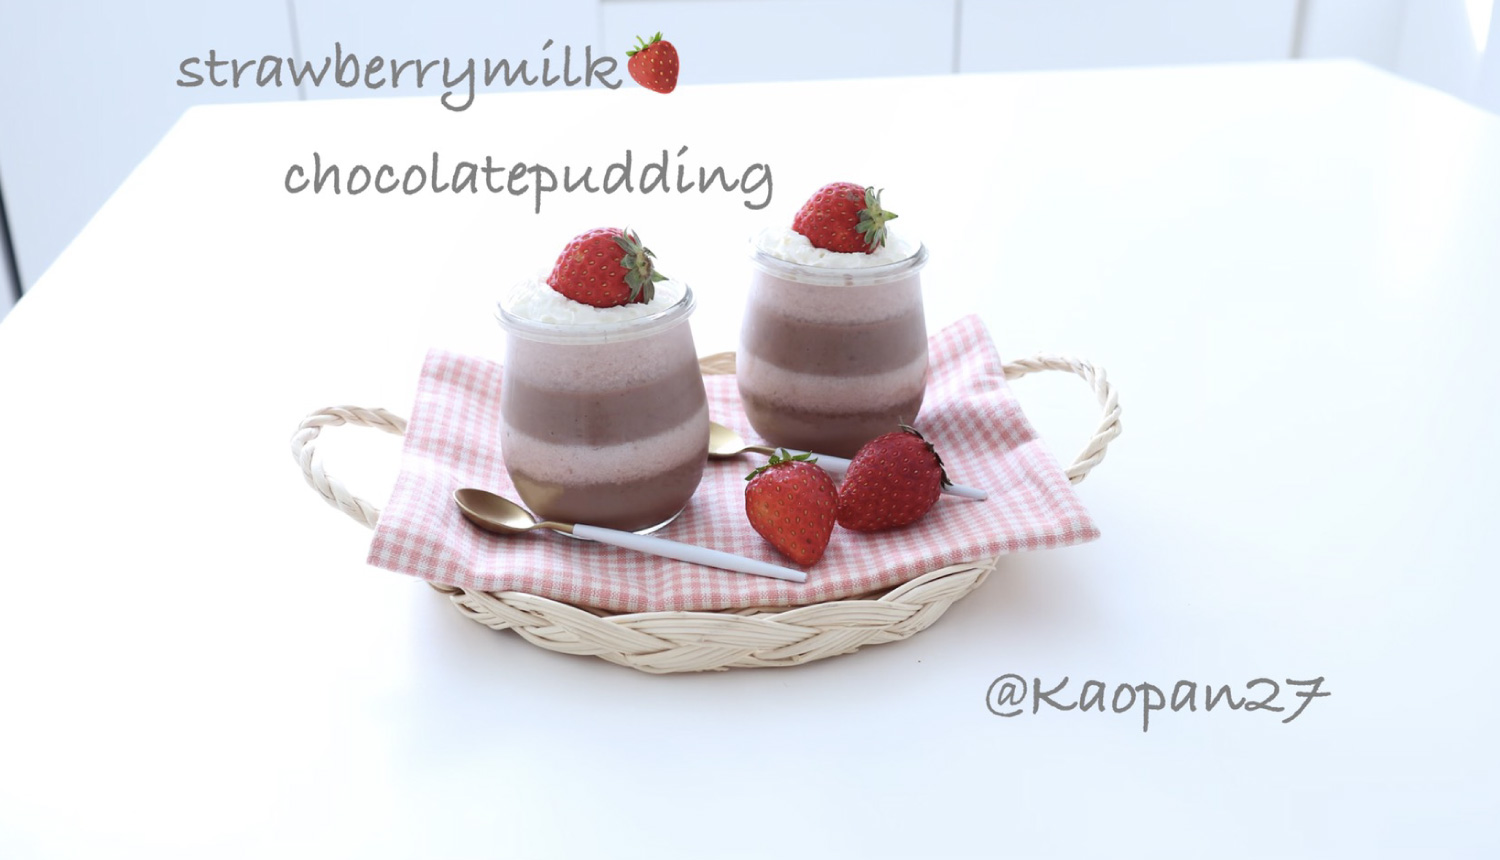
With just a small bit of ingenuity, turn everyday food into something cute using Kaori’s Easy Recipe! With a few simple ideas, an ordinary recipe magically transforms into a cute dish.
Today, I’ll be showing you how to make Strawberry Milk Chocolate Pudding, a delicious recipe whipped up with love for Valentine’s Day.
Ingredients
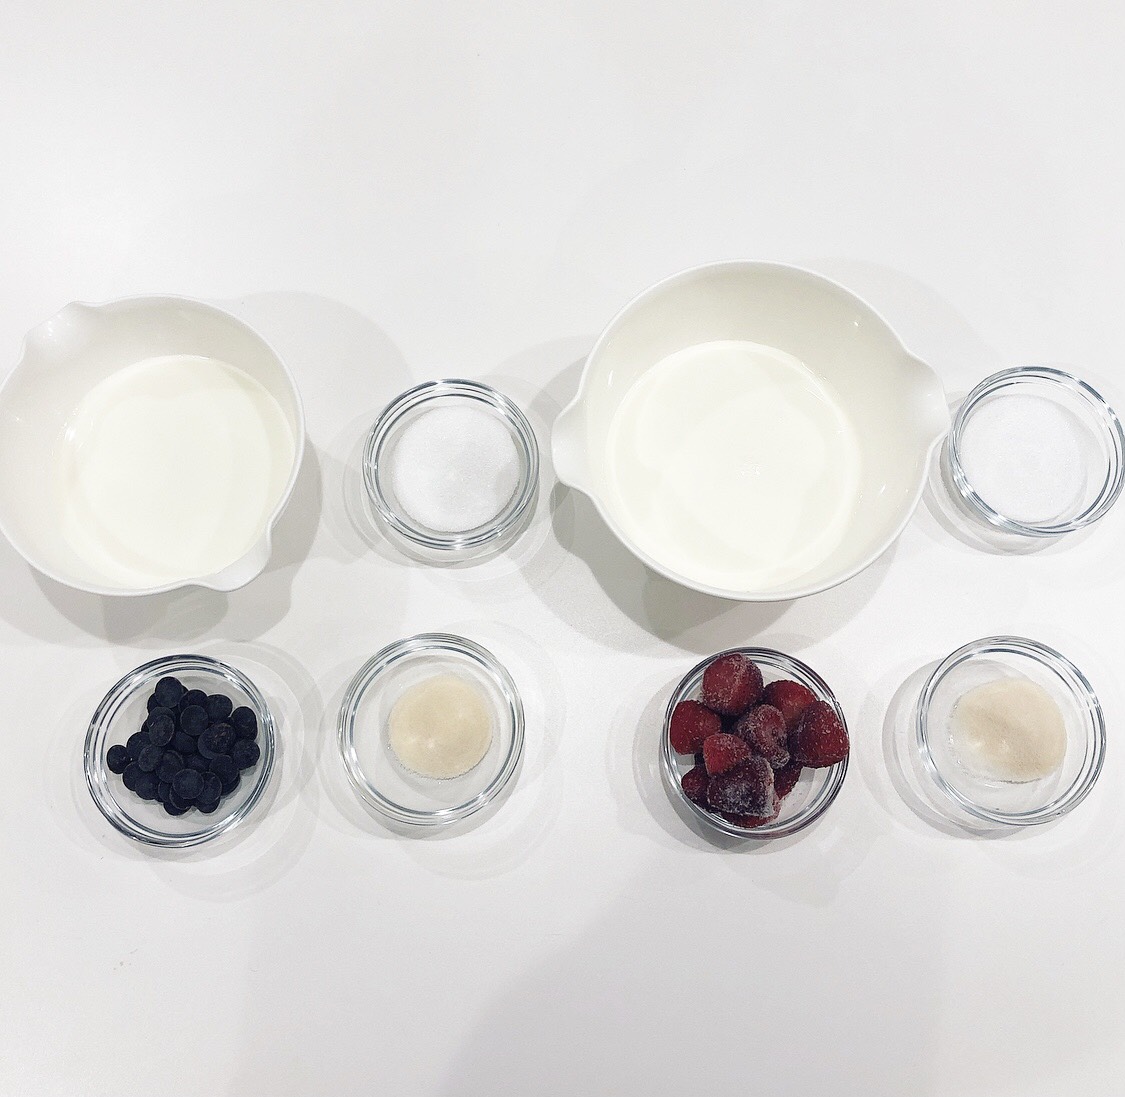
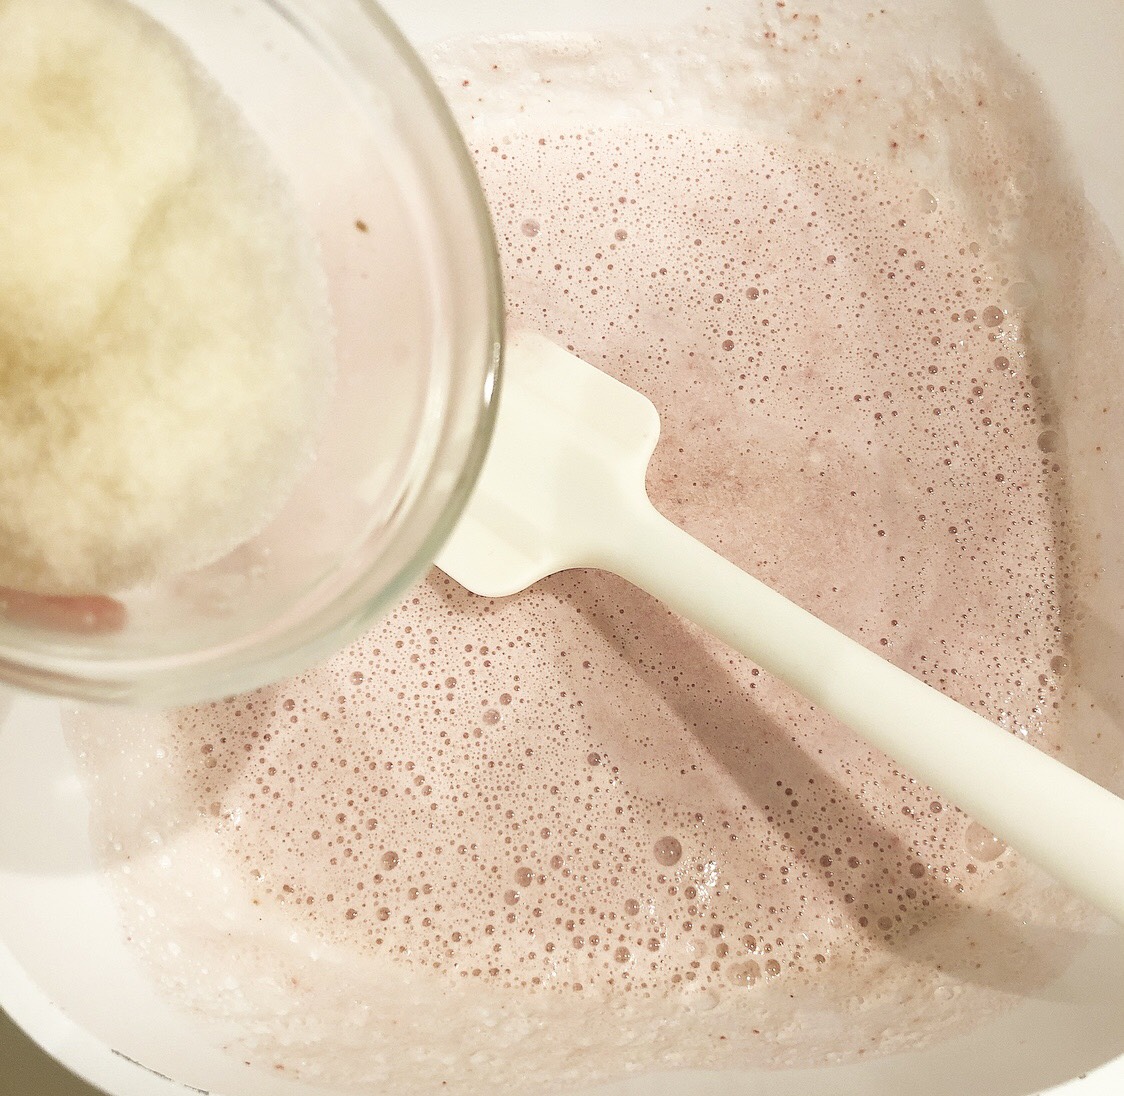
✩Ingredients For Chocolate Pudding
35g chocolate
300ml milk
30g-35g granulated salt
5g gelatine (dissolved in 1 tbsp water)✩Ingredients For Strawberry Pudding
100g strawberries (fresh or frozen)
350ml milk
30g-35g granulated salt
5g gelatine (dissolved in 1 tbsp water)Weck jars for the dessert.
1

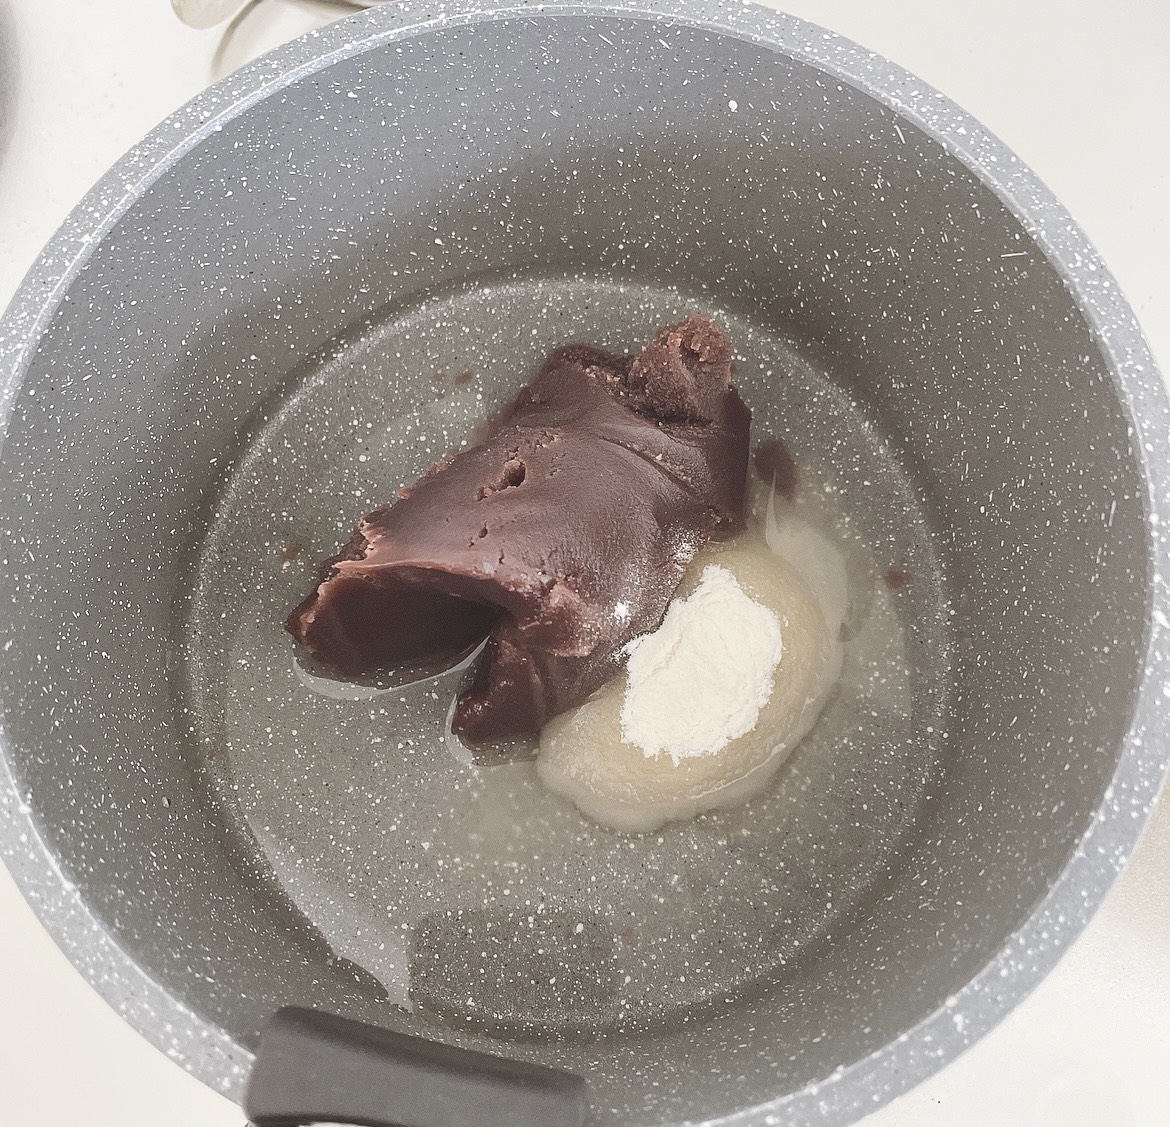
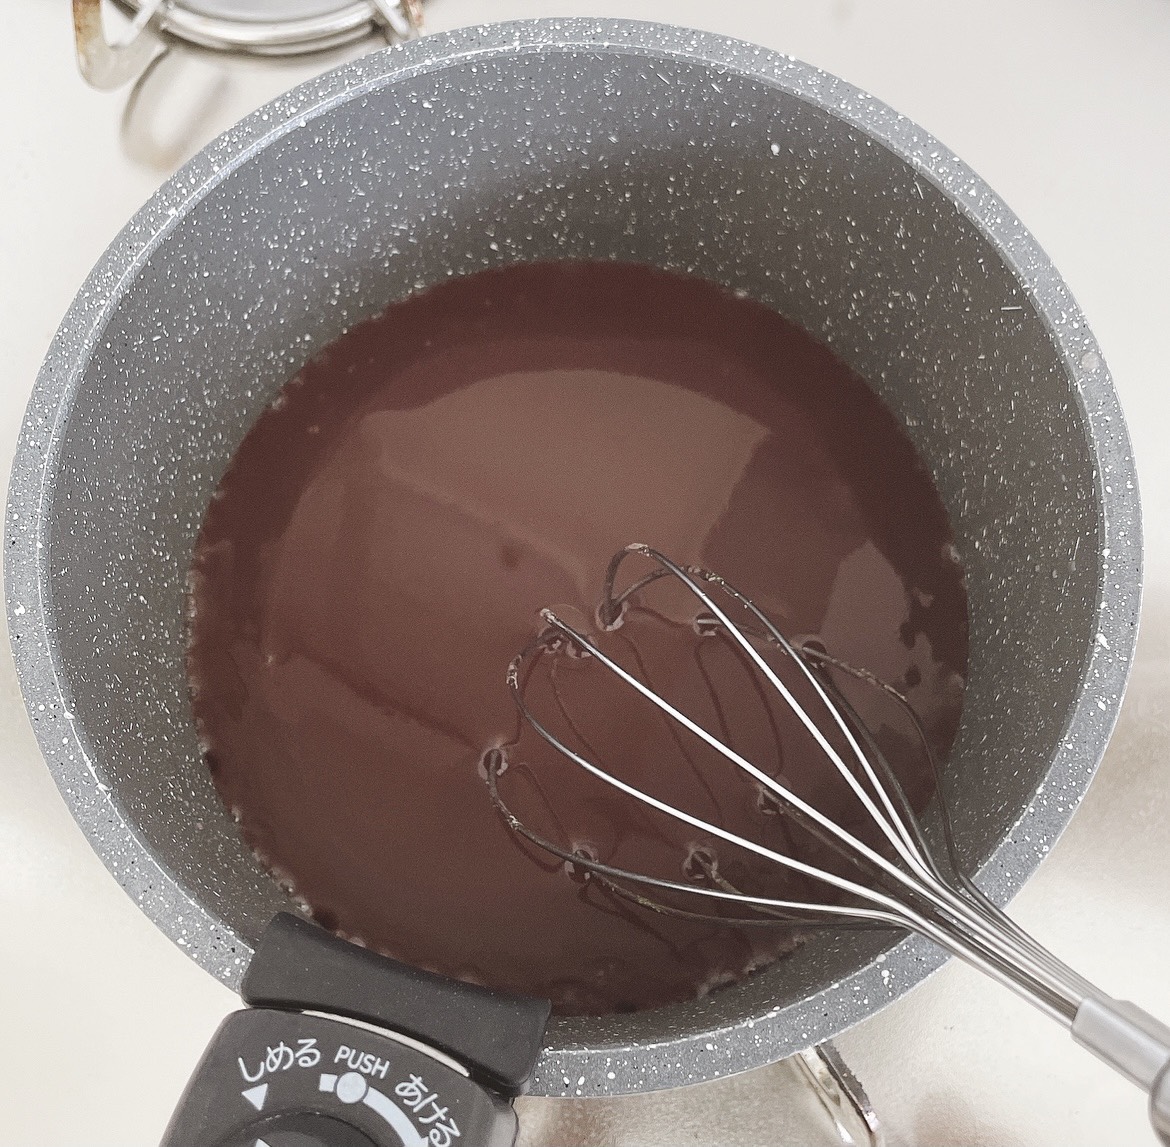
First, we’ll make the chocolate pudding.
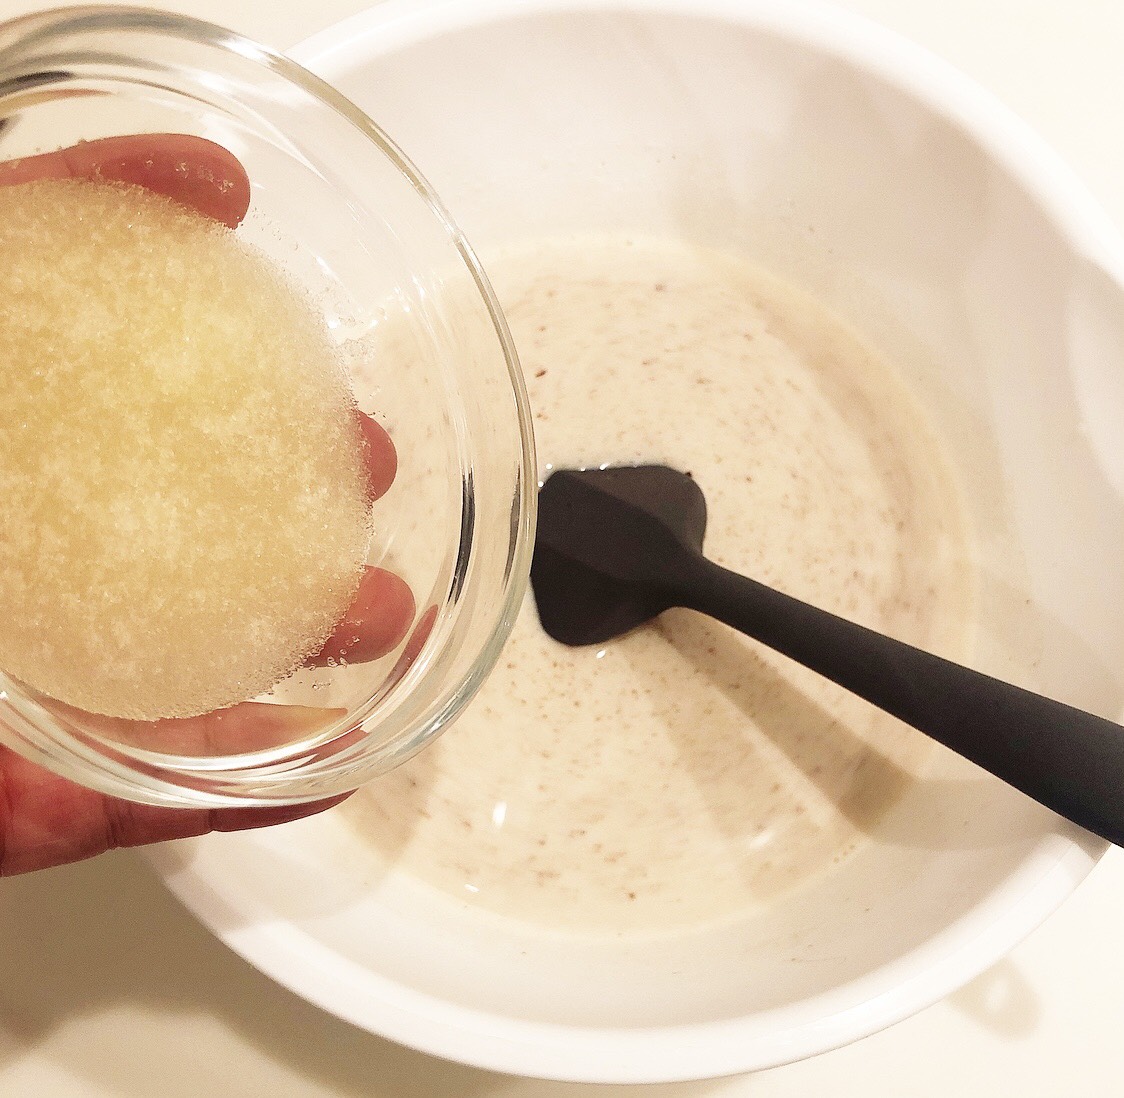
Put the milk and granulated sugar into a pot and heat on the hob until the sugar melts. Turn the heat off, throw in the chocolate, and allow to fully melt. Once melted and the mixture is cooled, add the gelatine to dissolve.
2
Now, we’ll make the strawberry pudding.
Put the milk and granulated sugar into a pot and heat on the hob until the sugar melts.
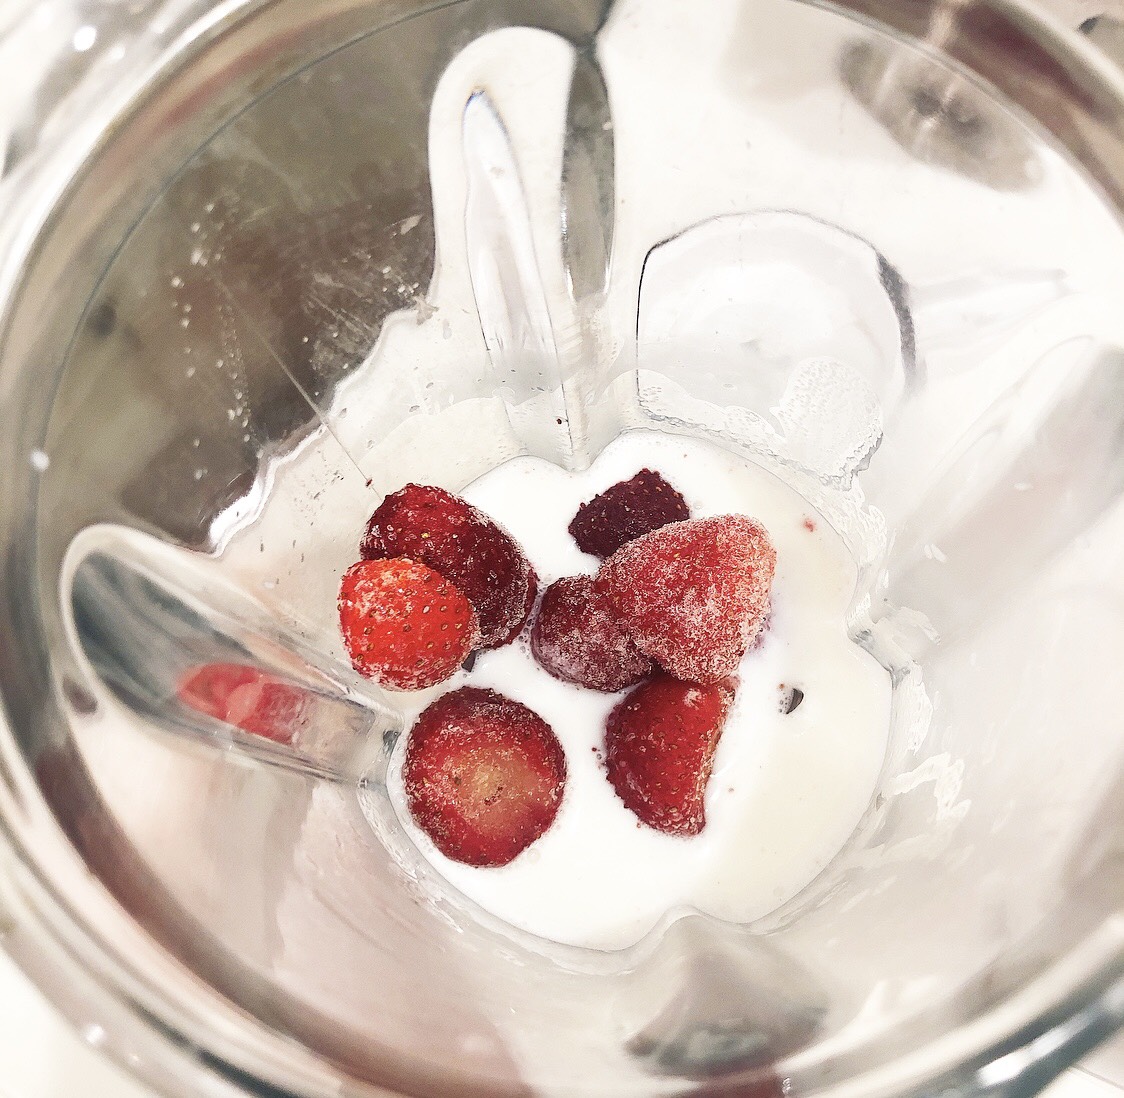
Add the mix to a blender with the strawberries and blitz. Add back onto the hob and heat through slightly. Allow the mixture to cool then add the gelatine to dissolve.
3
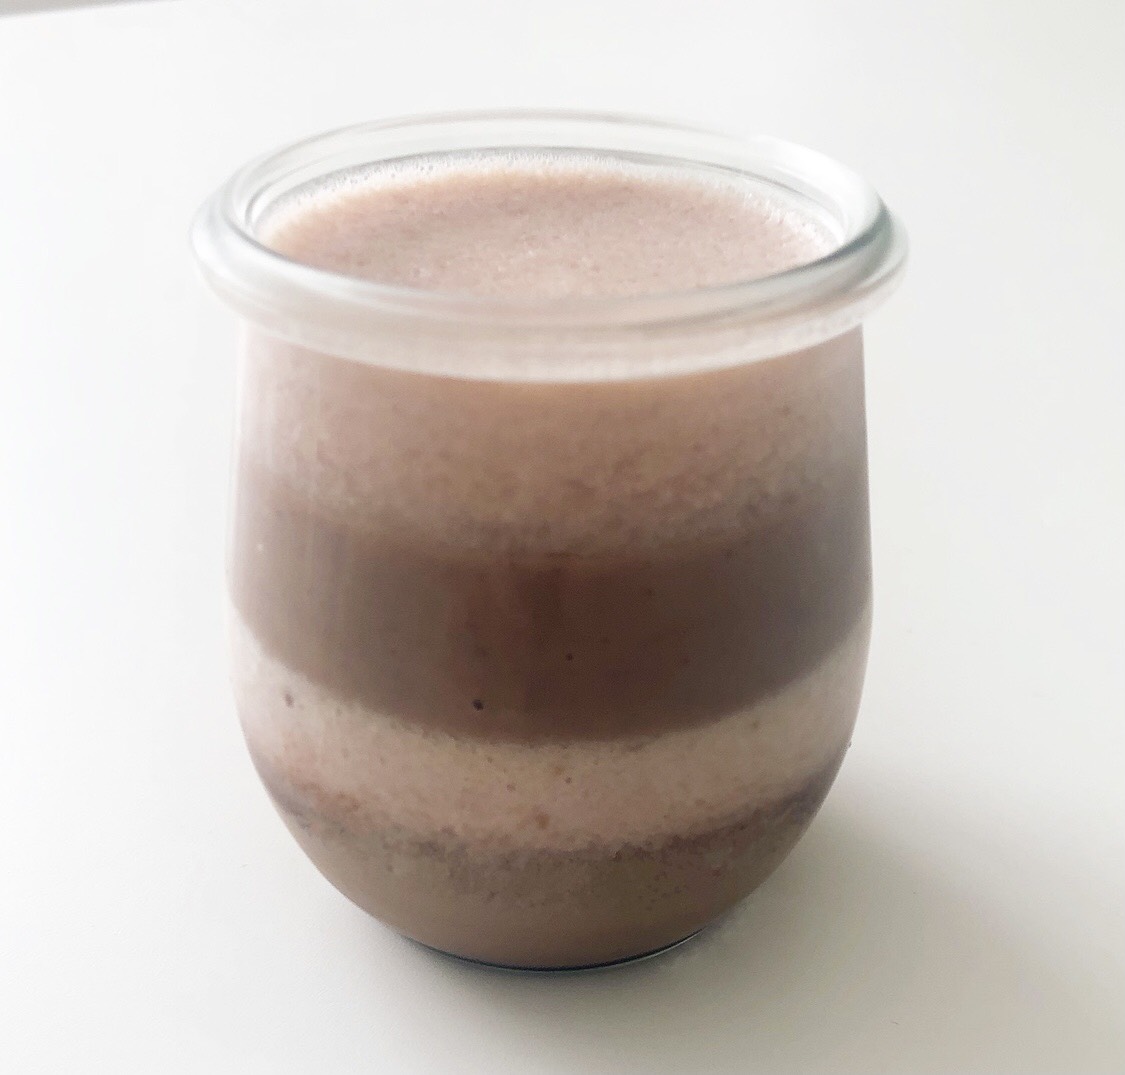
Once both mixtures are completely cooled, add them to the jars in an alternating pattern and chill until set.
⚠️Make sure the dessert is completely set and not runny before serving. About an hour each in the refrigerator should be sufficient.
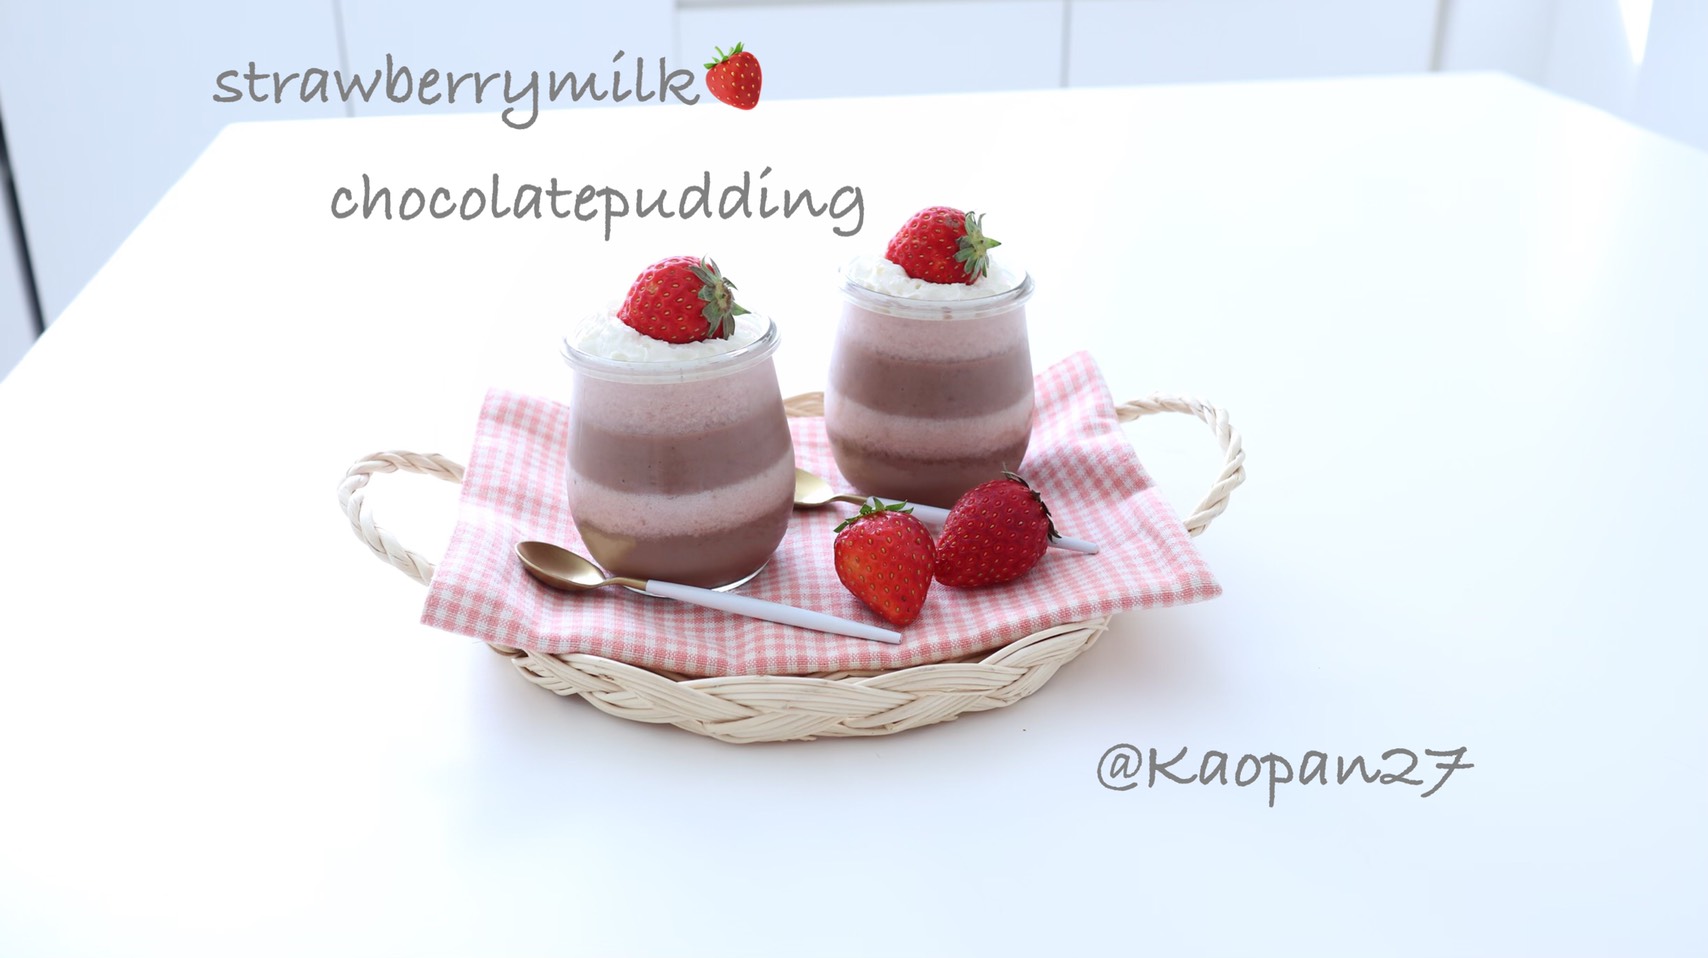
Top with cream and strawberries and enjoy!
Kaori Kubota (@kaopan27)
I live in Hokkaido and I love to make character themed foods, desserts and pastries♡
I want to see my family smile, so I enjoy putting in a bit of effort to make character foods and changing food into something cute♡
You can see more of my character foods and character bento boxes on my Instagram page → @kaopan72
-
With just a small bit of ingenuity, turn everyday food into something cute using Kaori’s Easy Recipe! With a few simple ideas, an ordinary recipe magically transforms into a cute dish.
Today, I’ll be showing you a simple recipe for Valentine’s Day made with ingredients bought entirely from the 100 yen store Seria. I call it the “Rilakkuma Hot Chocolate Stick.”
Ingredients
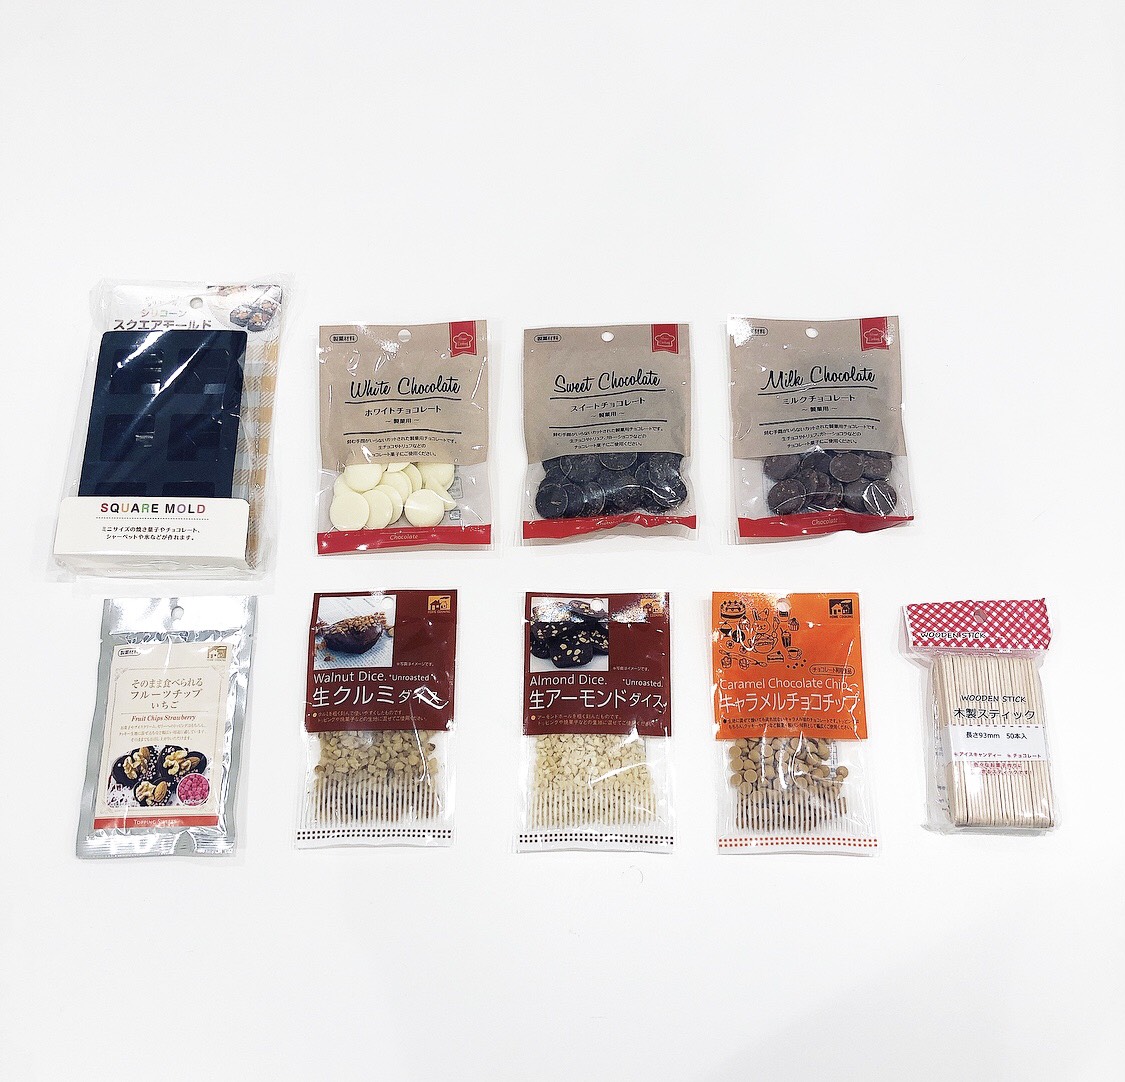
Square mould from Seria (makes six sticks)
1 bag of milk chocolates1 bag of white chocolates
1 bag of dark chocolates
Toppings of your choice (I used caramel chocolate chips and walnuts)
1
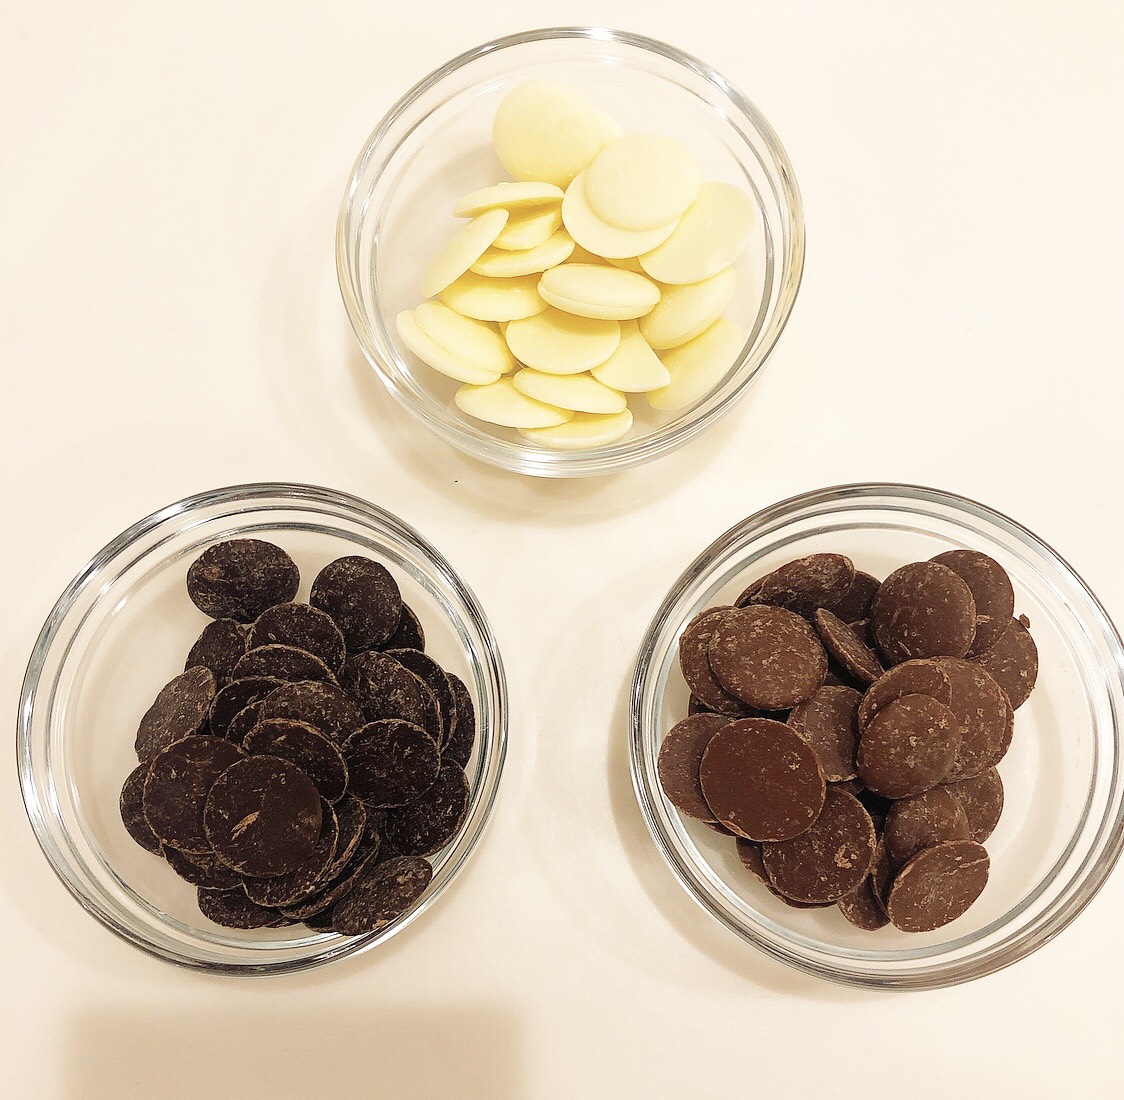
Melt all the chocolates separately over a bain-marie.
2
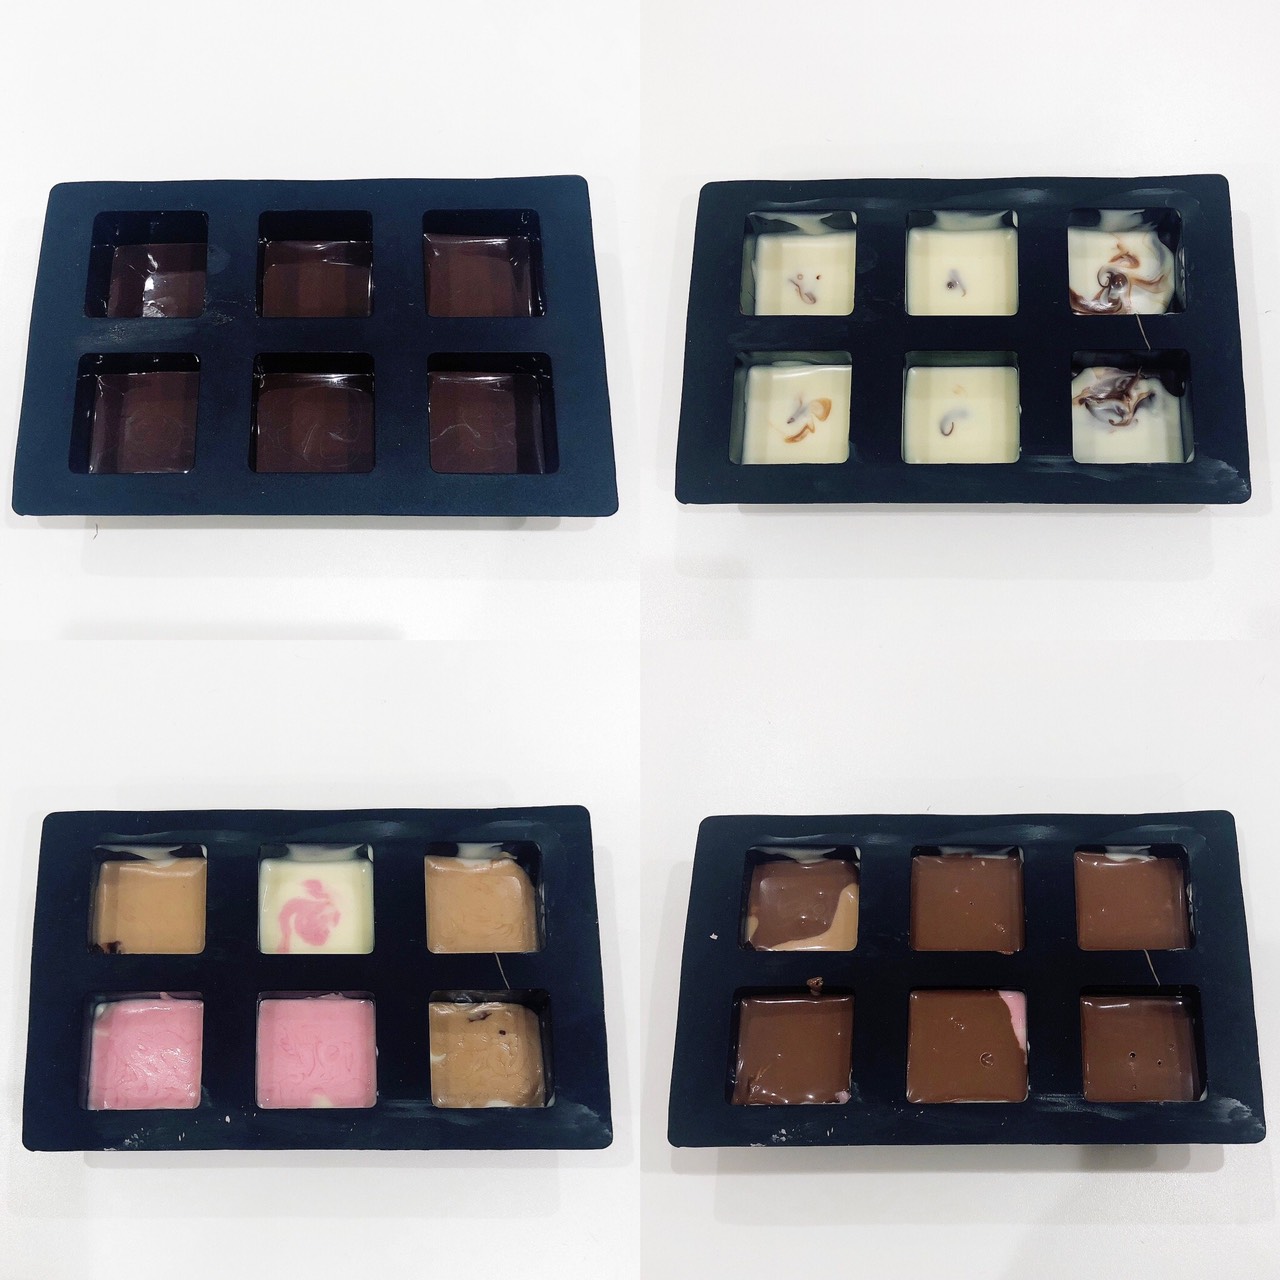
Create layers with each chocolate type. Pick your first choice and pour into the mould and wait for it to set lightly before adding the next chocolate. For this recipe, I went ahead and added the chocolate a little before layers had finished setting to create a marbling effect.
✩I also added some strawberry chocolate I had left over from my Rilakkuma chocolates.
3
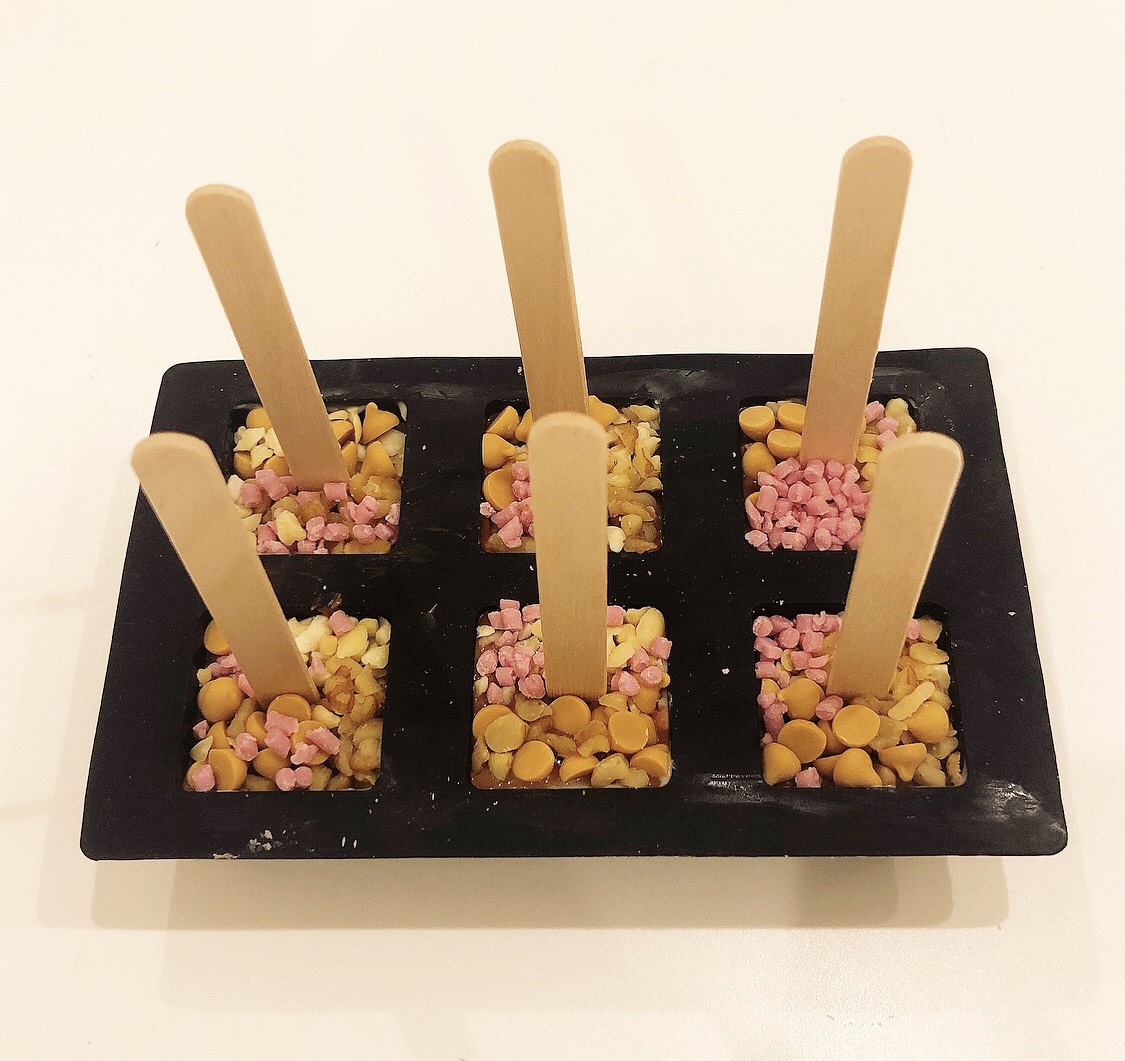
Once all your chocolate is in the mould, stick in some lollipops and add toppings of your choice making sure they don’t overflow. This will ensure they set together with the chocolate.
4
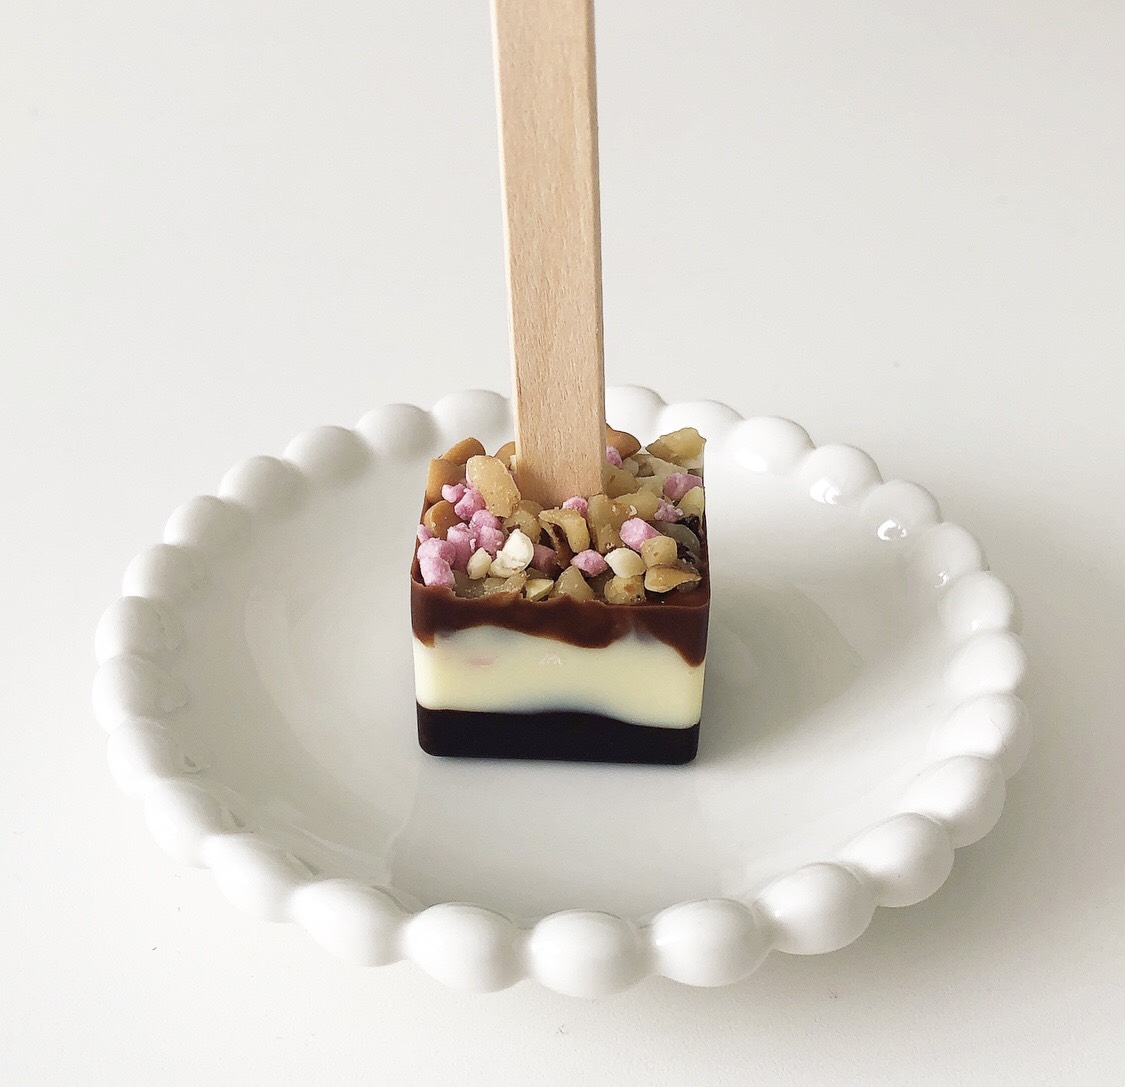
Allow to set overnight and your chocolate stick is ready.
5
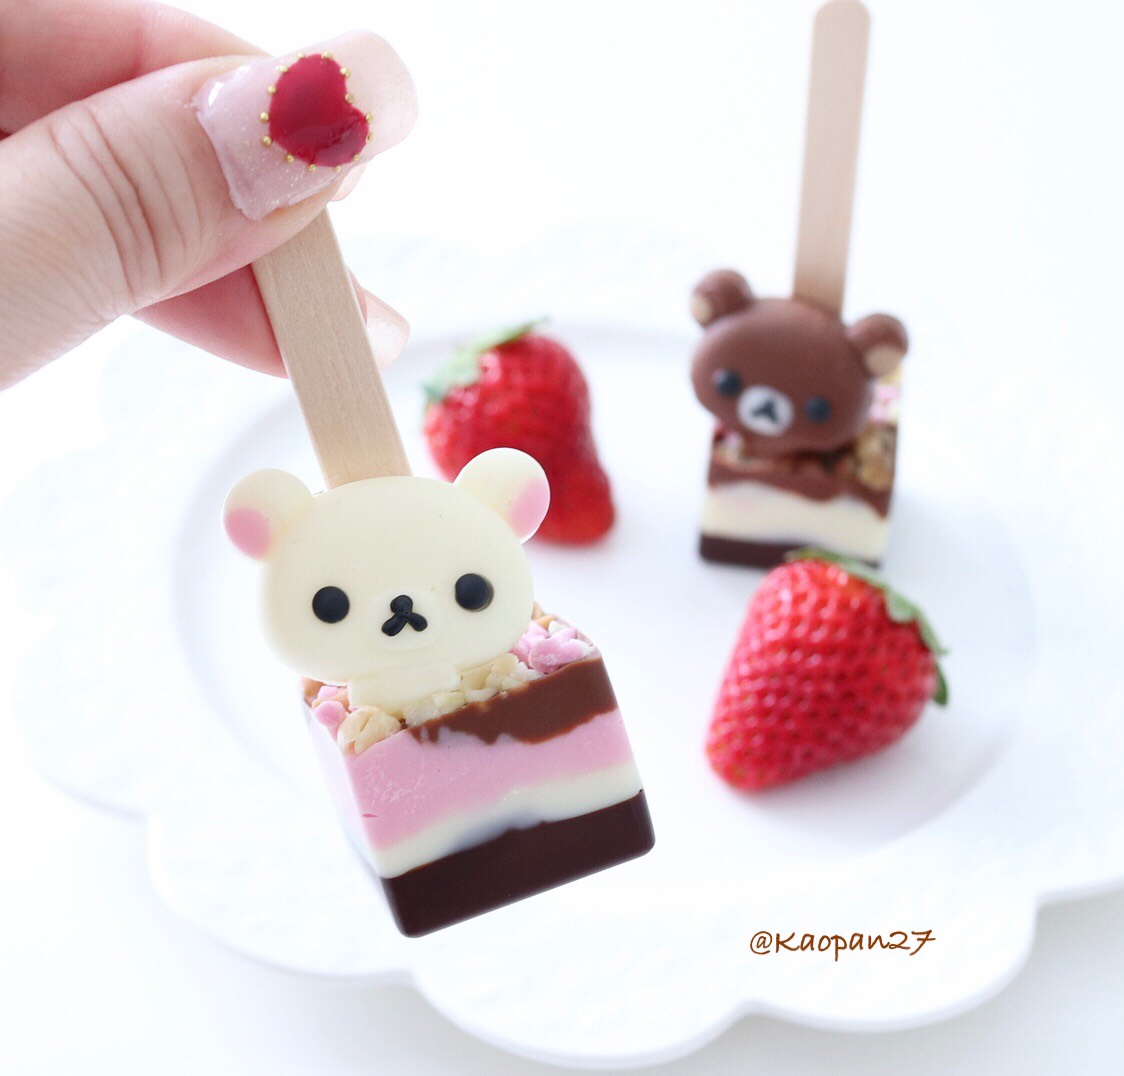
I made Rilakkuma chocolates from scratch and added those to the sticks to finish.
Kaori invites you into her world of character-themed food dishes in her recipe series. Be sure to check out her Instagram where she has uploaded many pictures of her character dishes!
Kaori Kubota (@kaopan27)
I live in Hokkaido and I love to make character themed foods, desserts and pastries♡
I want to see my family smile, so I enjoy putting in a bit of effort to make character foods and changing food into something cute♡
You can see more of my character foods and character bento boxes on my Instagram page → @kaopan72
-
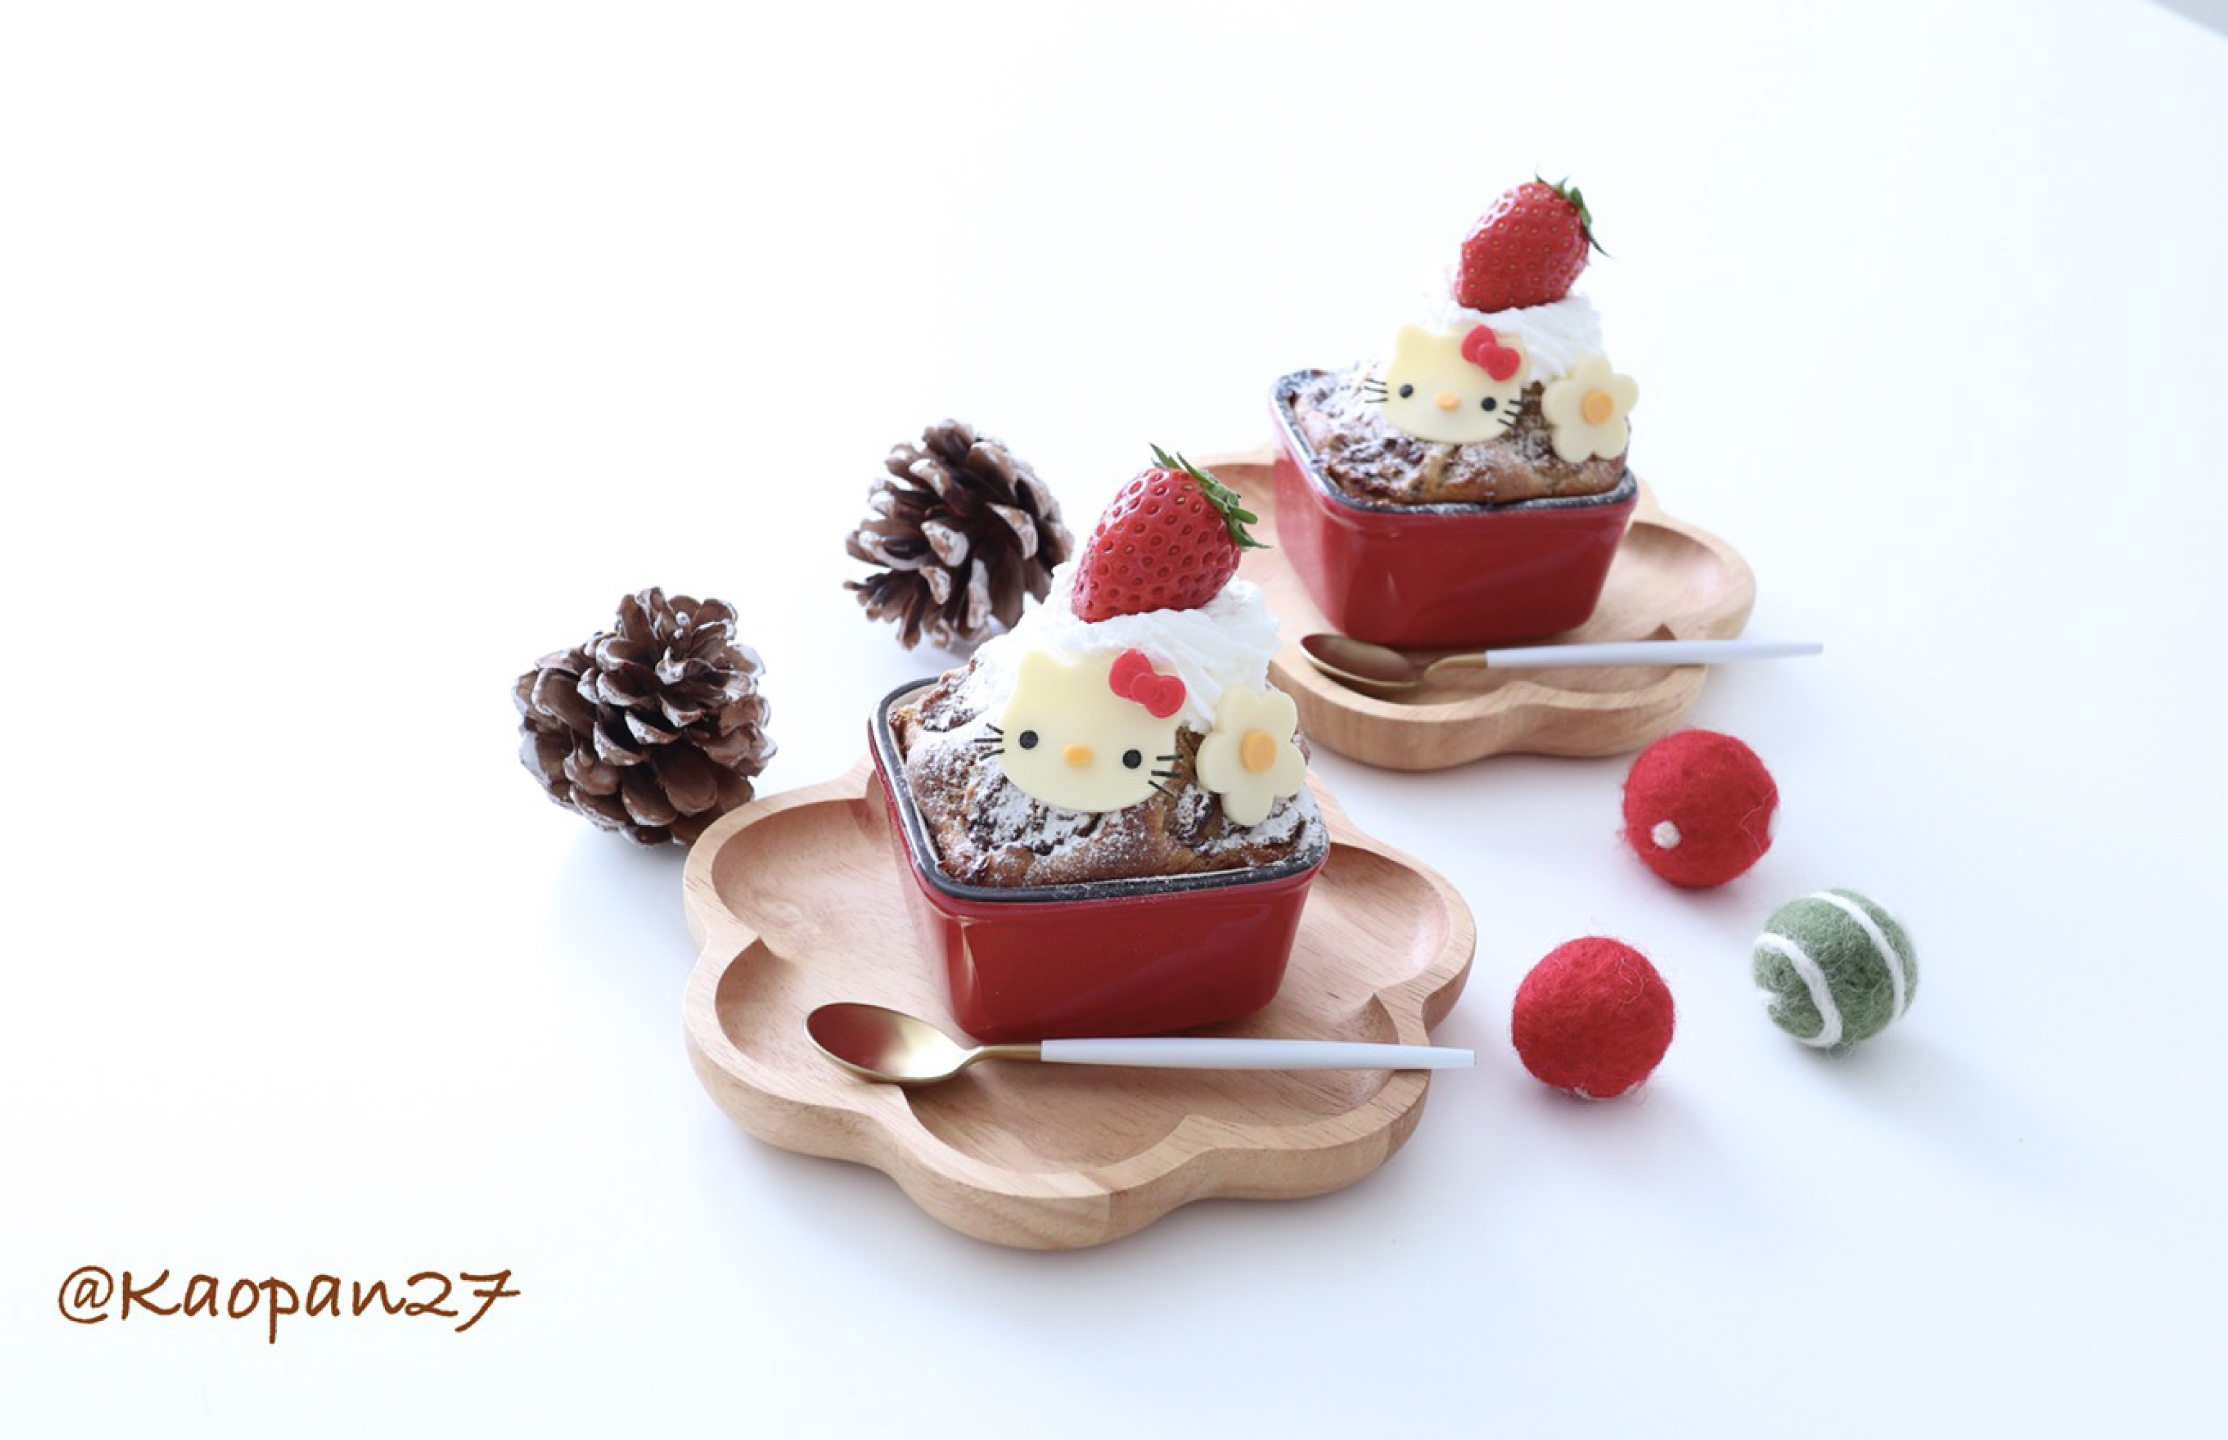
With just a small bit of ingenuity, turn everyday food into something cute using Kaori’s Easy Recipe! With a few simple ideas, an ordinary recipe magically transforms into a cute dish.
Today, I’ll be showing you a super simple dessert made using hotcake mix. I decorated the muffins with strawberries and a dusting of icing sugar to give them that Christmas feel.
Ingredients
1 bag of hotcake mix (150g)
1 large egg
20g sugar
25ml vegetable oil
30ml milk
2 ripe bananas
1 tbsp black tea leaves
*If you don’t have loose black tea leaves you can use the leaves from inside of a black tea bag1
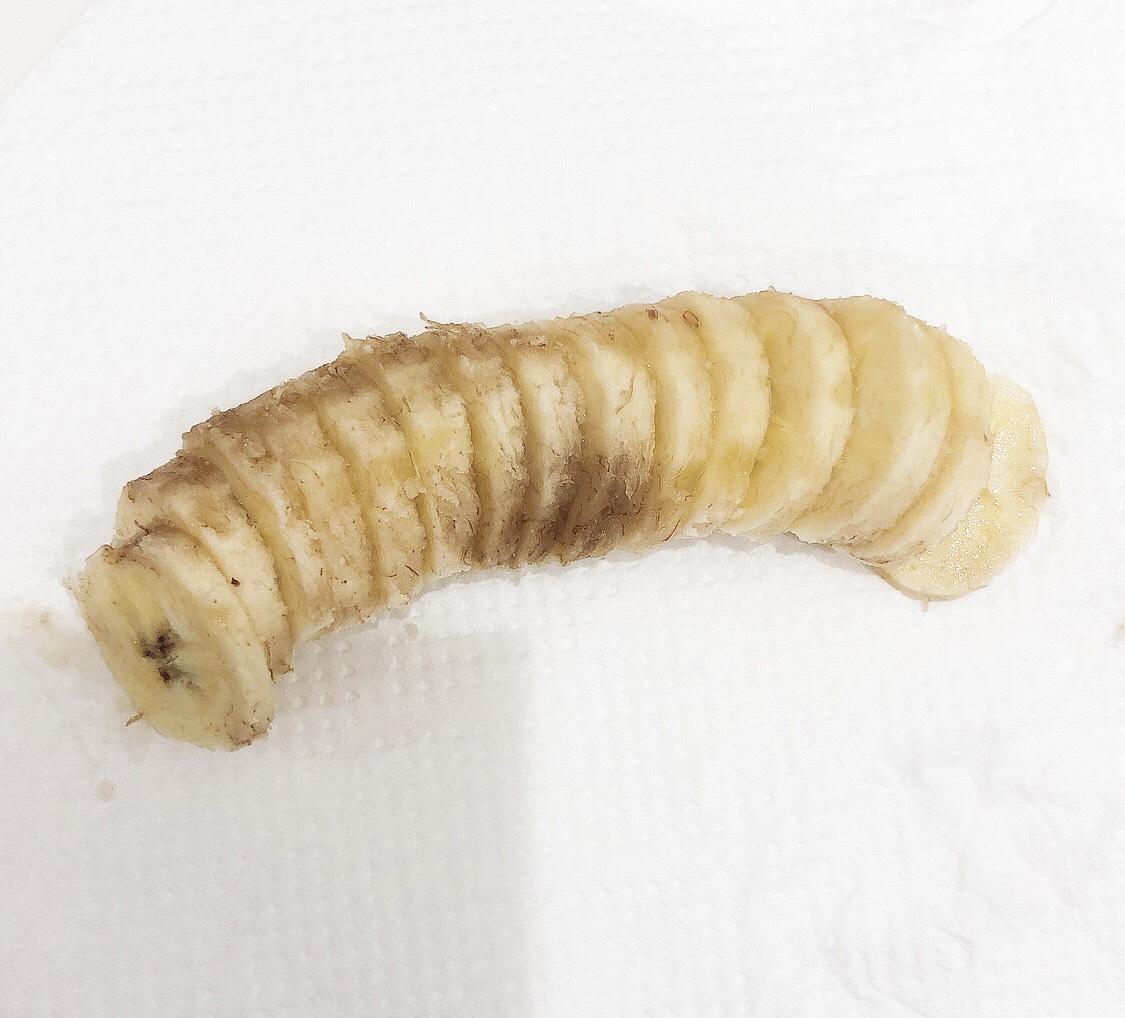
Slice half of one banana for topping later. Mash the remaining one and a half in a bowl with a fork or potato masher.
2
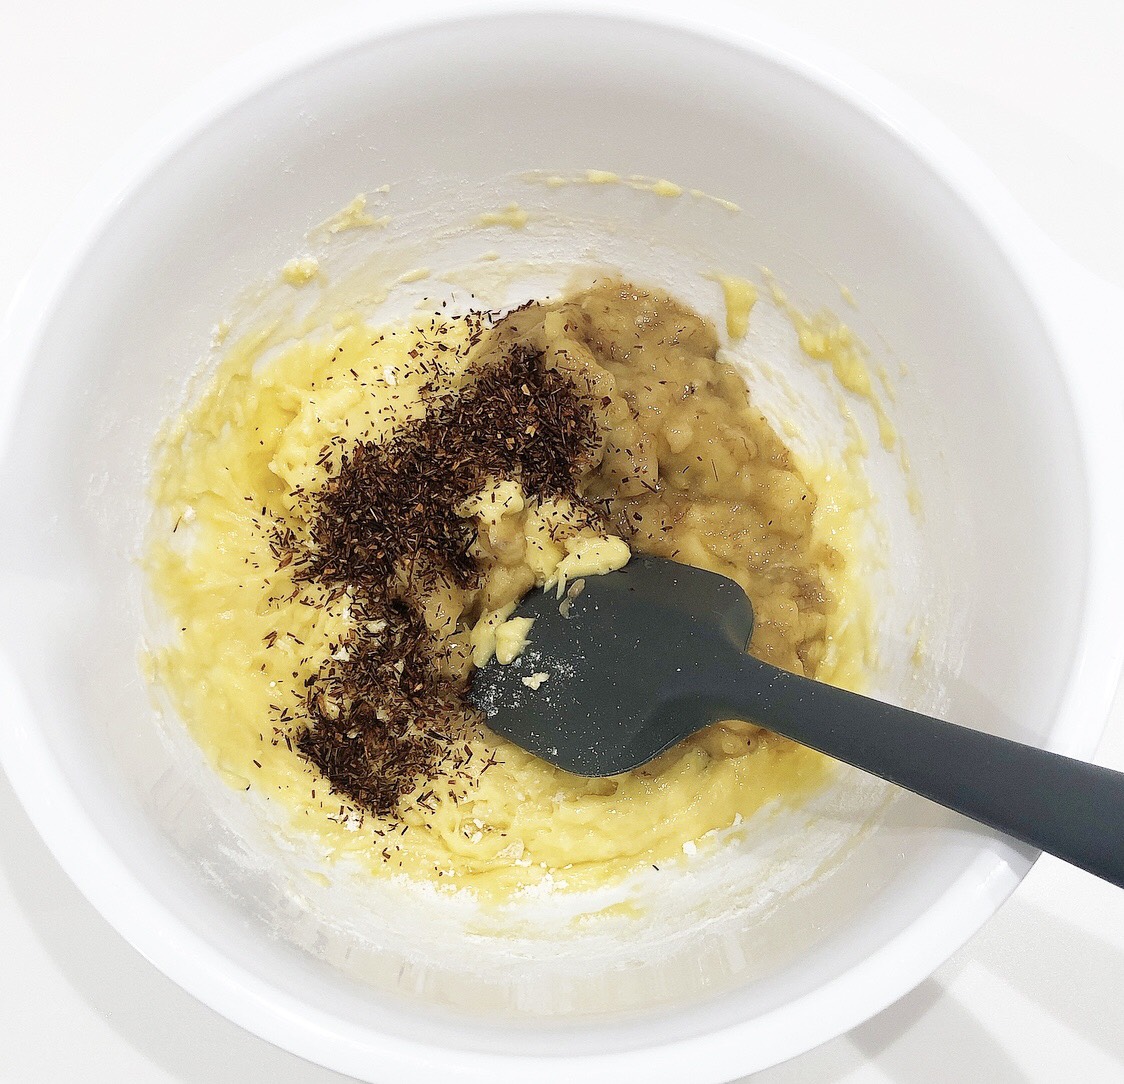

In a different bowl, add all of the ingredients and mix together. Once mixed, add the mashed banana and mix again to combine.3
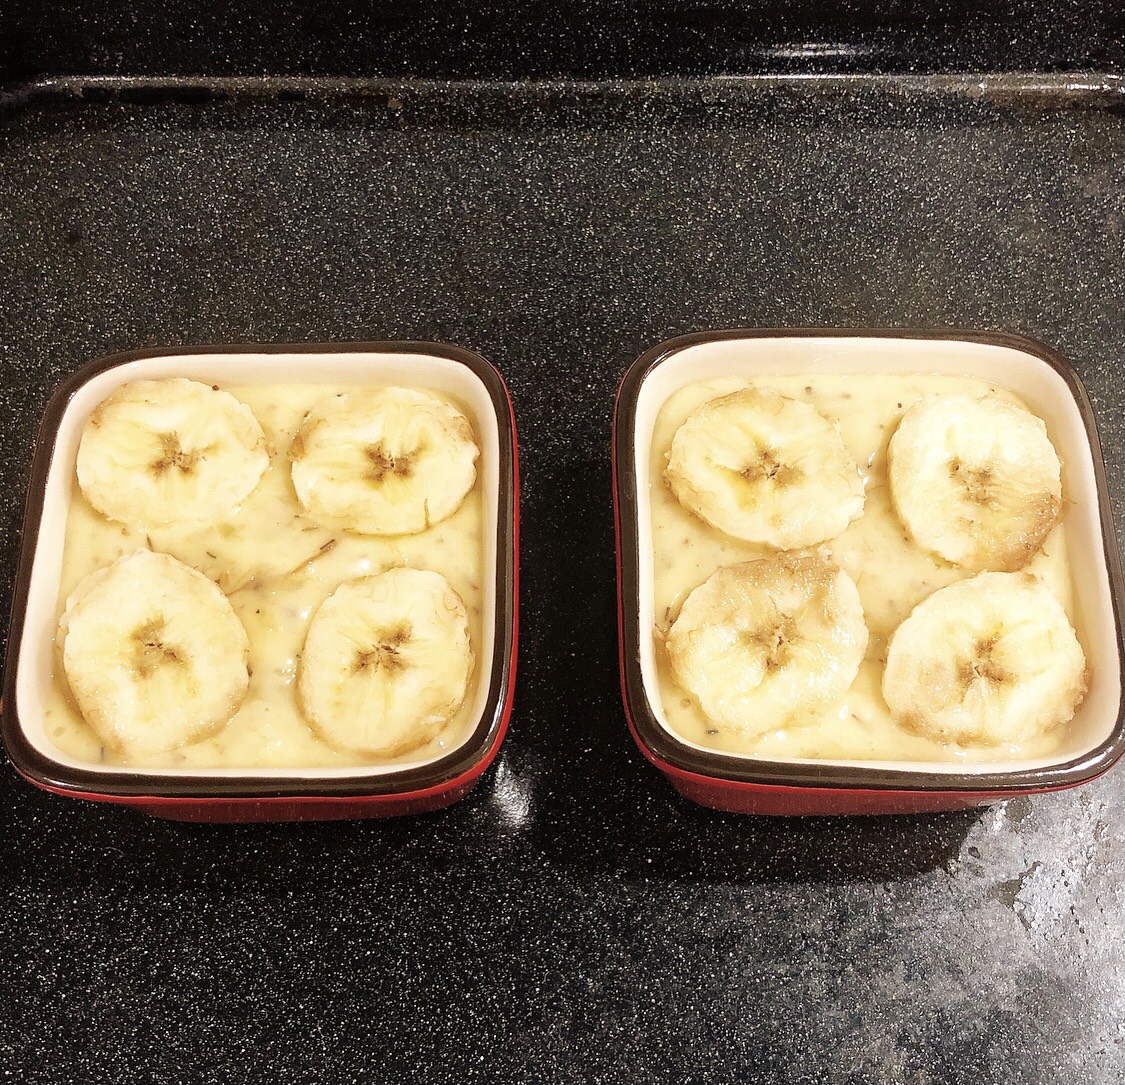
Add the mix to muffin tins. The muffins will rise quite a bit so you may want to use less mix. Finish by adding the sliced bananas from Step 1 on top.
上に1でスライスしておいたバナナをトッピングする。4
Bake at 180℃ on the middle shelf for 25 minutes.5
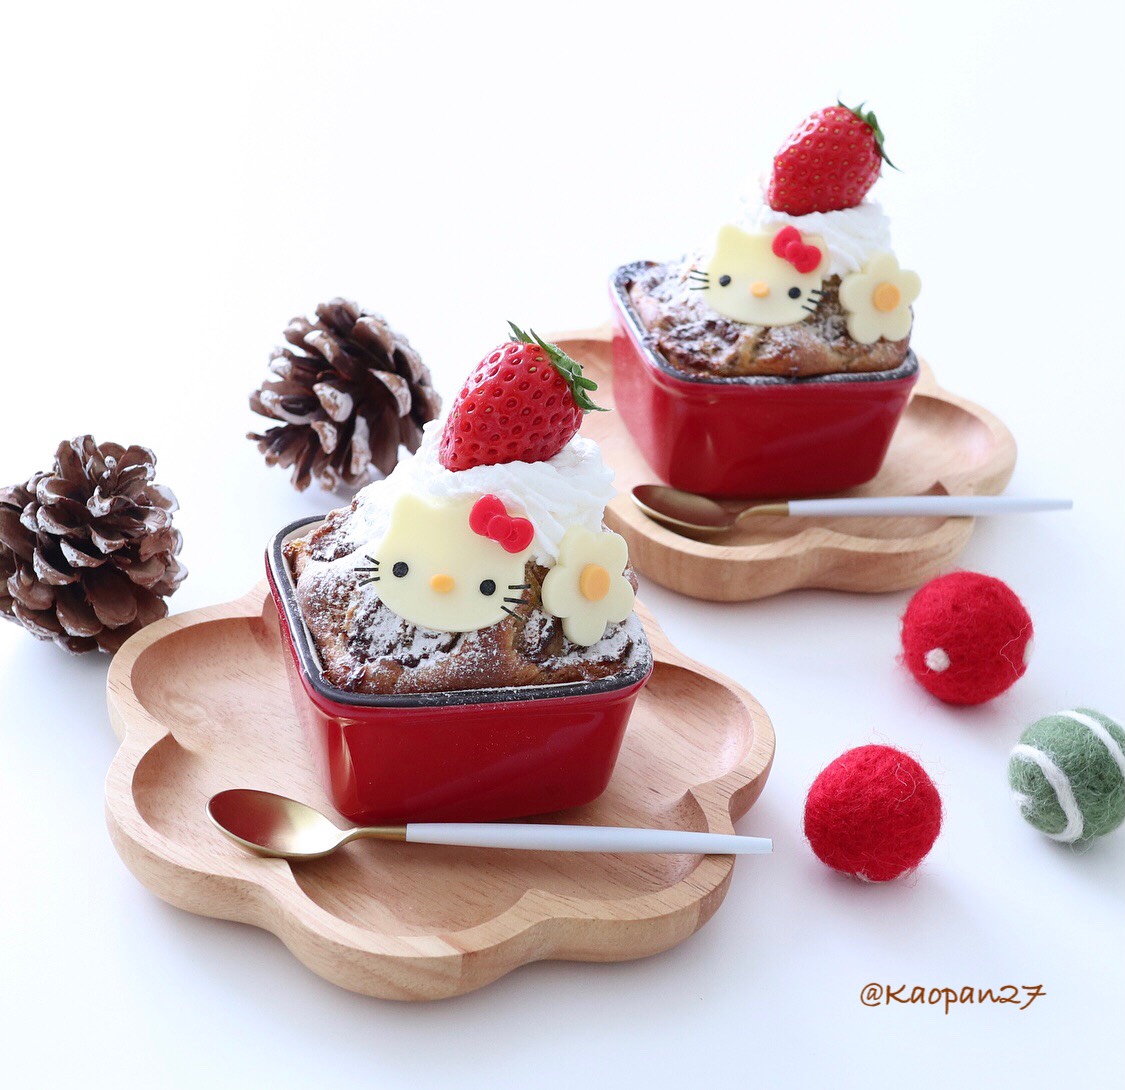
Complete your muffins by dusting with icing sugar, fresh cream, and strawberries. I added a chocolate Hello Kitty on mine!Kaori invites you into her world of character-themed food dishes in her recipe series. Be sure to check out her Instagram where she has uploaded many pictures of her character dishes!
Kaori Kubota (@kaopan27)
I live in Hokkaido and I love to make character themed foods, desserts and pastries♡
I want to see my family smile, so I enjoy putting in a bit of effort to make character foods and changing food into something cute♡
You can see more of my character foods and character bento boxes on my Instagram page → @kaopan72
-
With just a small bit of ingenuity, turn everyday food into something cute using Kaori’s Easy Recipe! With a few simple ideas, an ordinary recipe magically transforms into a cute dish.
I have the perfect Halloween recipe for you this time. If we’re talking Halloween, then who else but Jack Skellington is the man for the job? Here’s my recipe to make Jack Skellington Stained Glass Cookies.
Ingredients
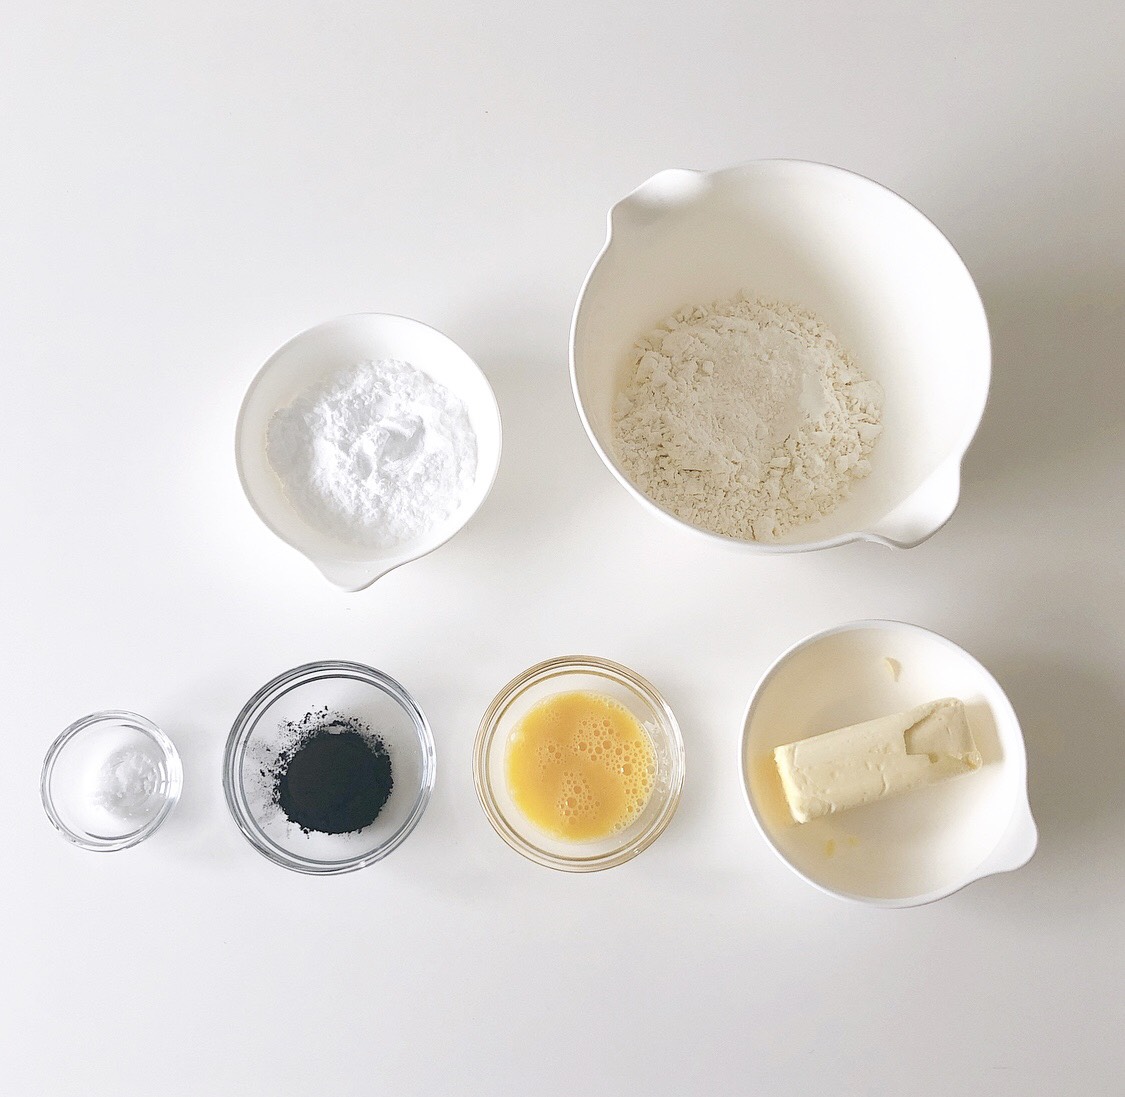
70g unsalted butter
50g icing sugar (or high quality white sugar if you don’t have)
A pinch of salt
30g egg
110g weak flour
10g black cocoa
1 white chocolate pen
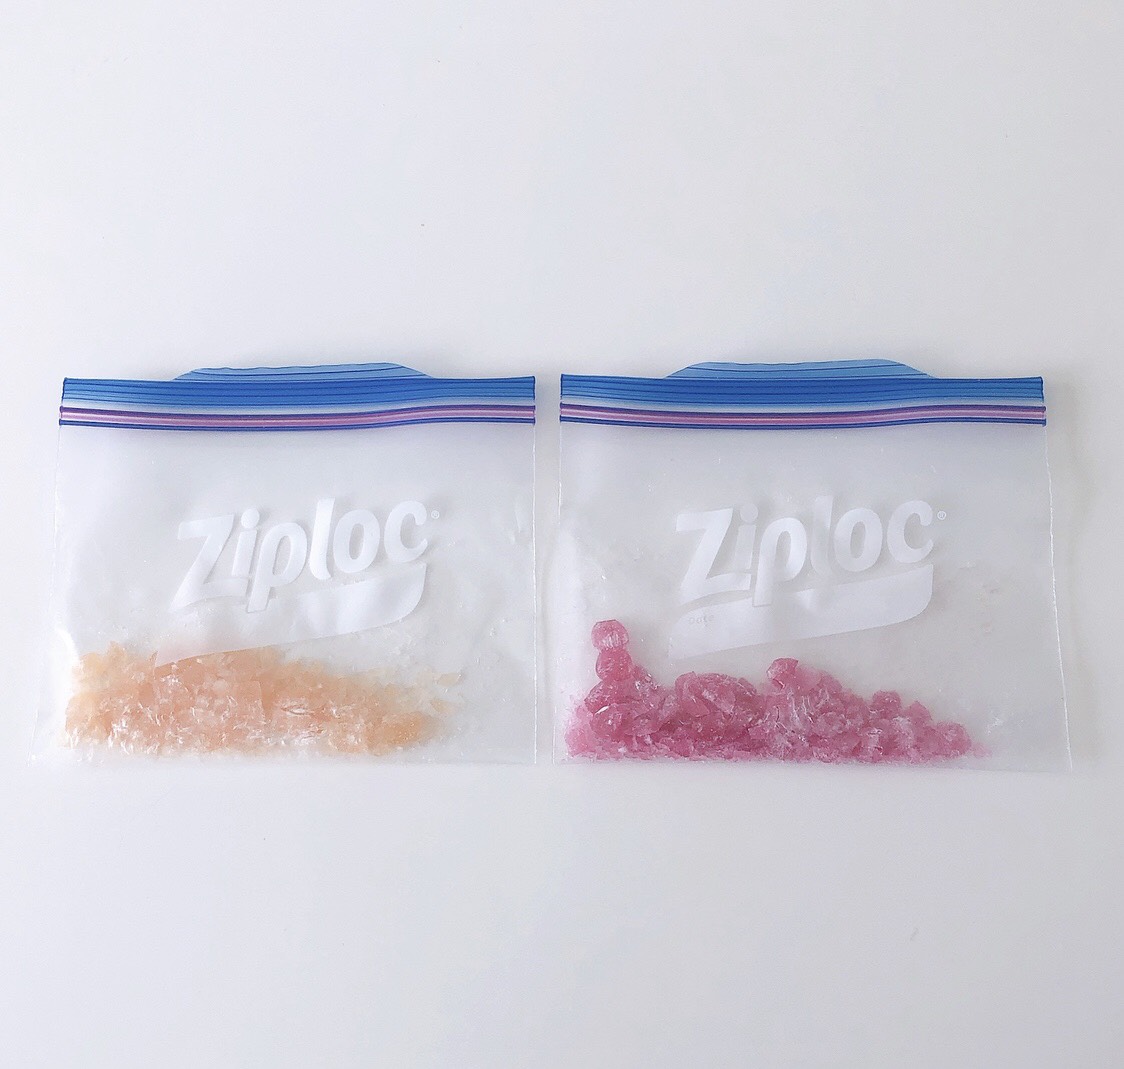
Hard candy of your choice crushed into small pieces*To crush the candy, you can put into a zip lock bag and use a rolling pin
1
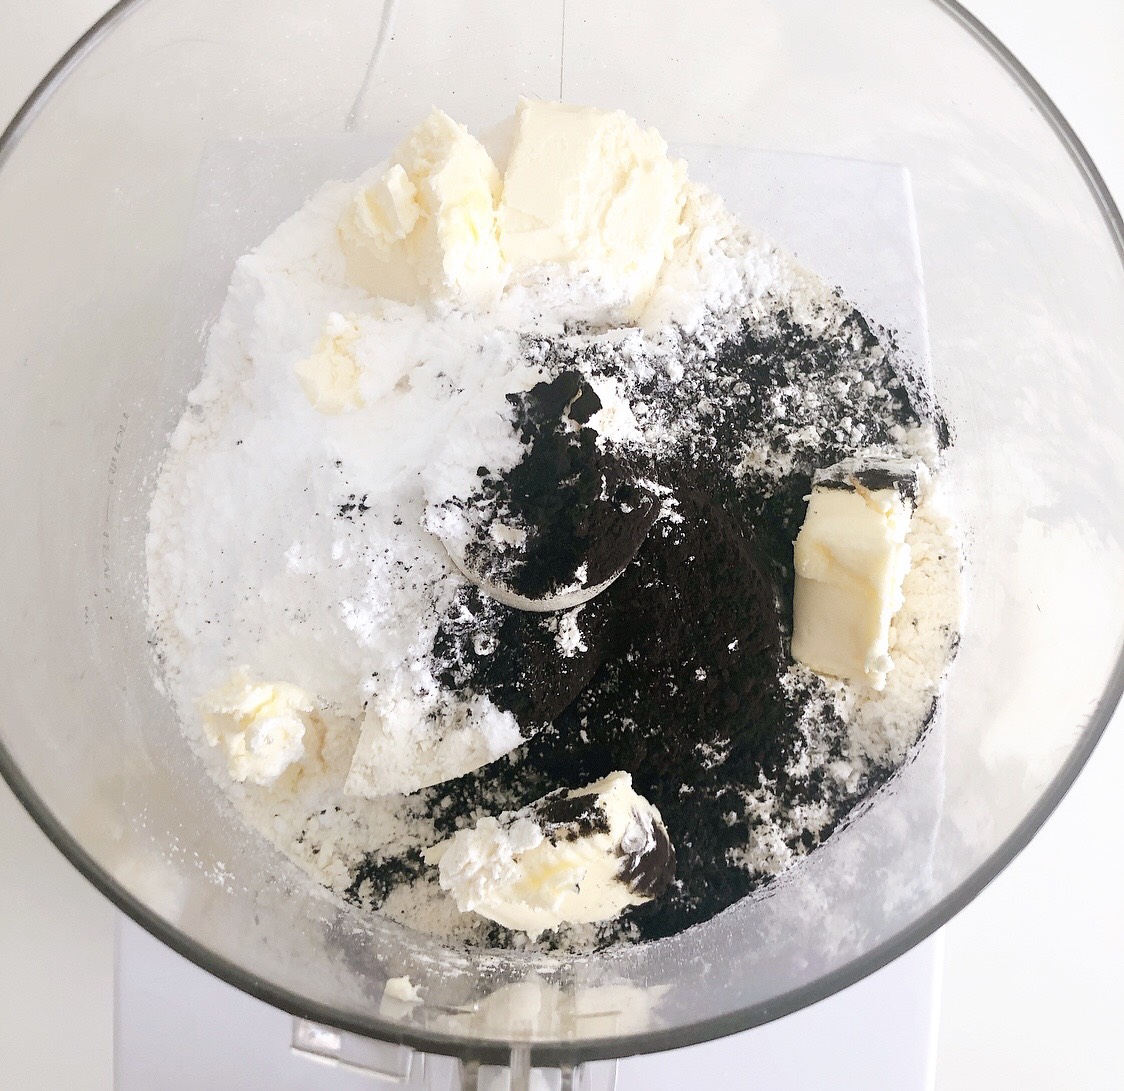
Place all ingredients except the egg into a food processor and blitz. After, place the egg into the blitzed mix and blitz once again. Once combined, wrap with cling film and place into the refrigerator for 1+ hours until set.2
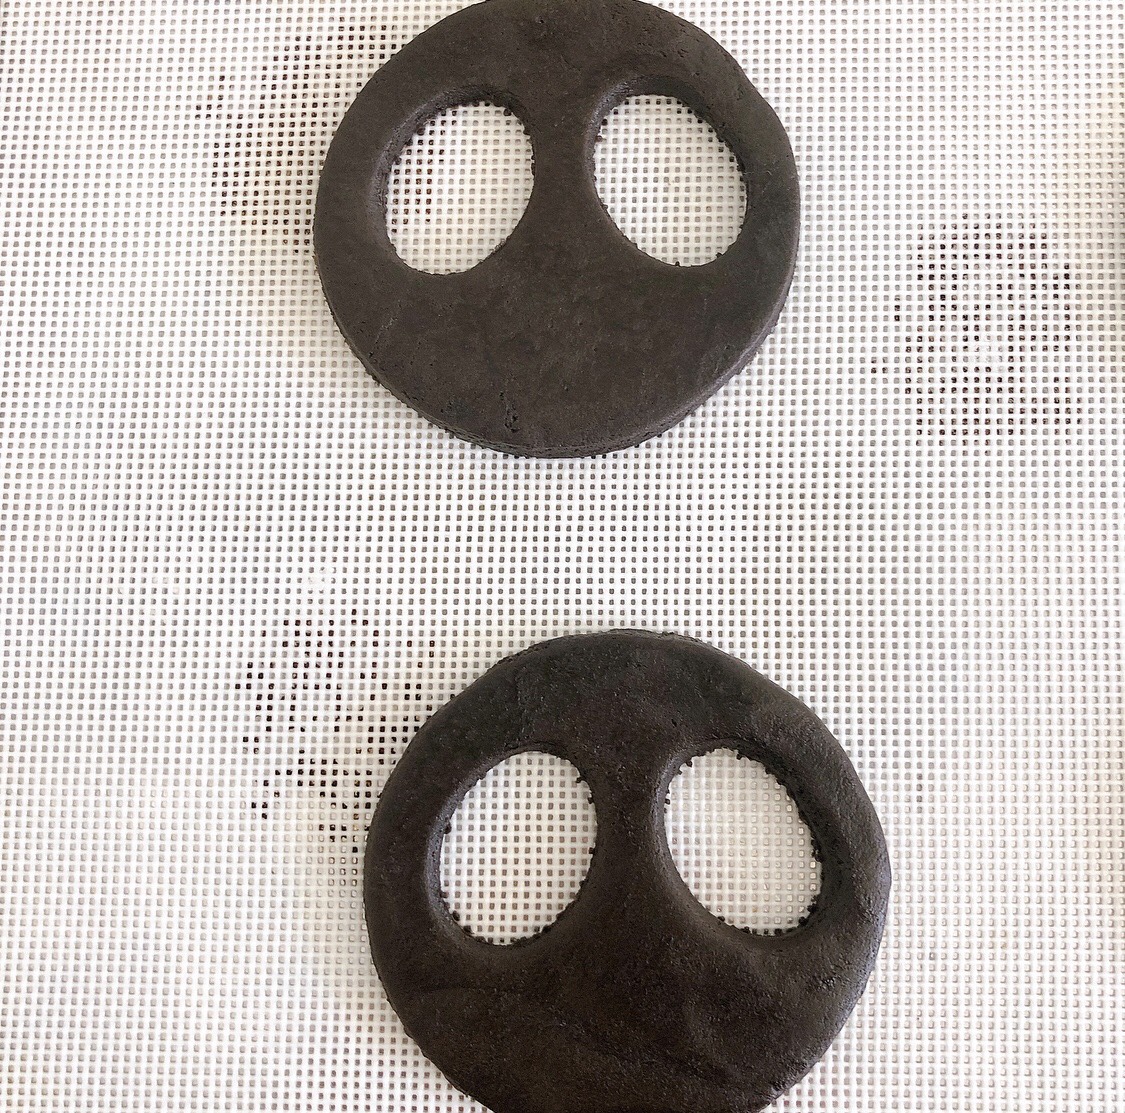
Use a rolling pin to roll out circles of equal thickness for Jack’s head. Use a cutter to cut out the eyes, and place into the refrigerator one more to set.3
Bake in the oven at 180°C for 10 minutes and take out again.
4
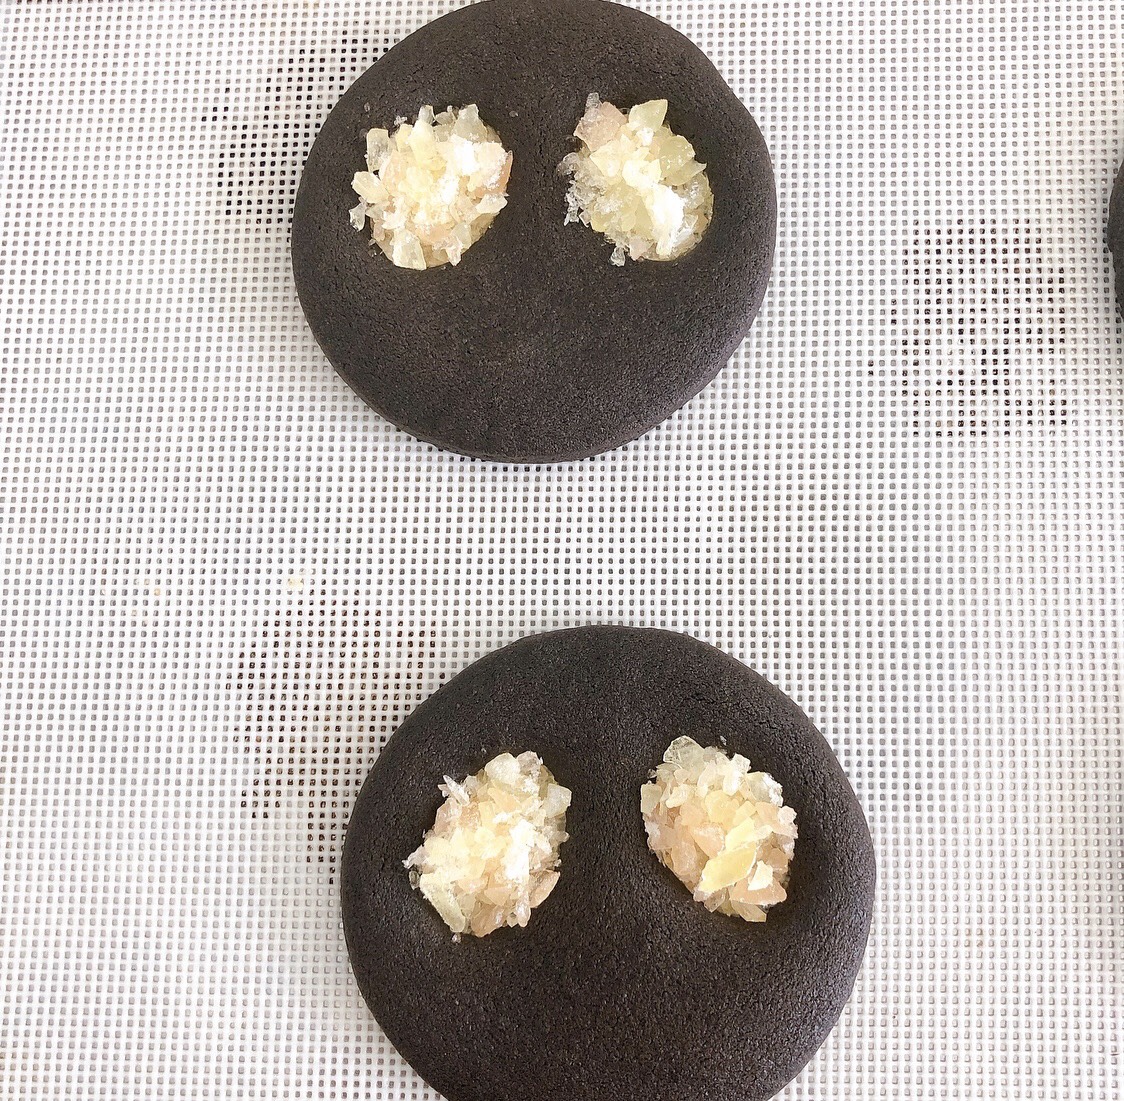
Place your crushed candy into the eye holes and bake for a further 5 minutes.
*The candy will melt into place and even out, so feel free to pile on the pieces*Be careful not to overcook the candy as it will turn brown
5
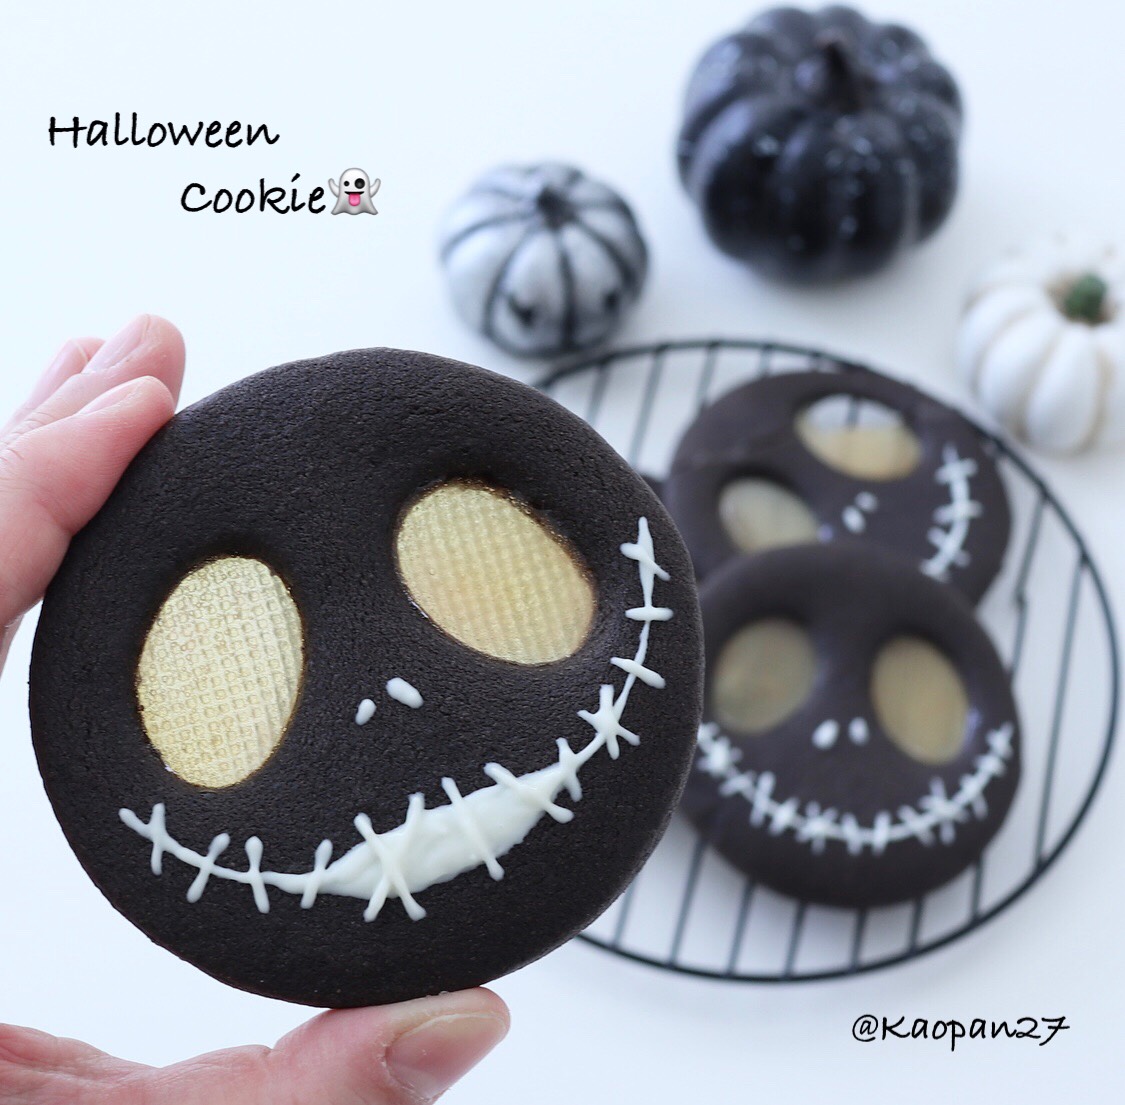
Allow to cool. Be very careful handling and placing down the cookies as the eyes will be delicate. Decorate Jack’s nose and mouth with the chocolate pen and he’s ready for your Halloween party!Kaori invites you into her world of character-themed food dishes in her recipe series. Be sure to check out her Instagram where she has uploaded many pictures of her character dishes!
Kaori Kubota (@kaopan27)
I live in Hokkaido and I love to make character themed foods, desserts and pastries♡
I want to see my family smile, so I enjoy putting in a bit of effort to make character foods and changing food into something cute♡
You can see more of my character foods and character bento boxes on my Instagram page → @kaopan72
-
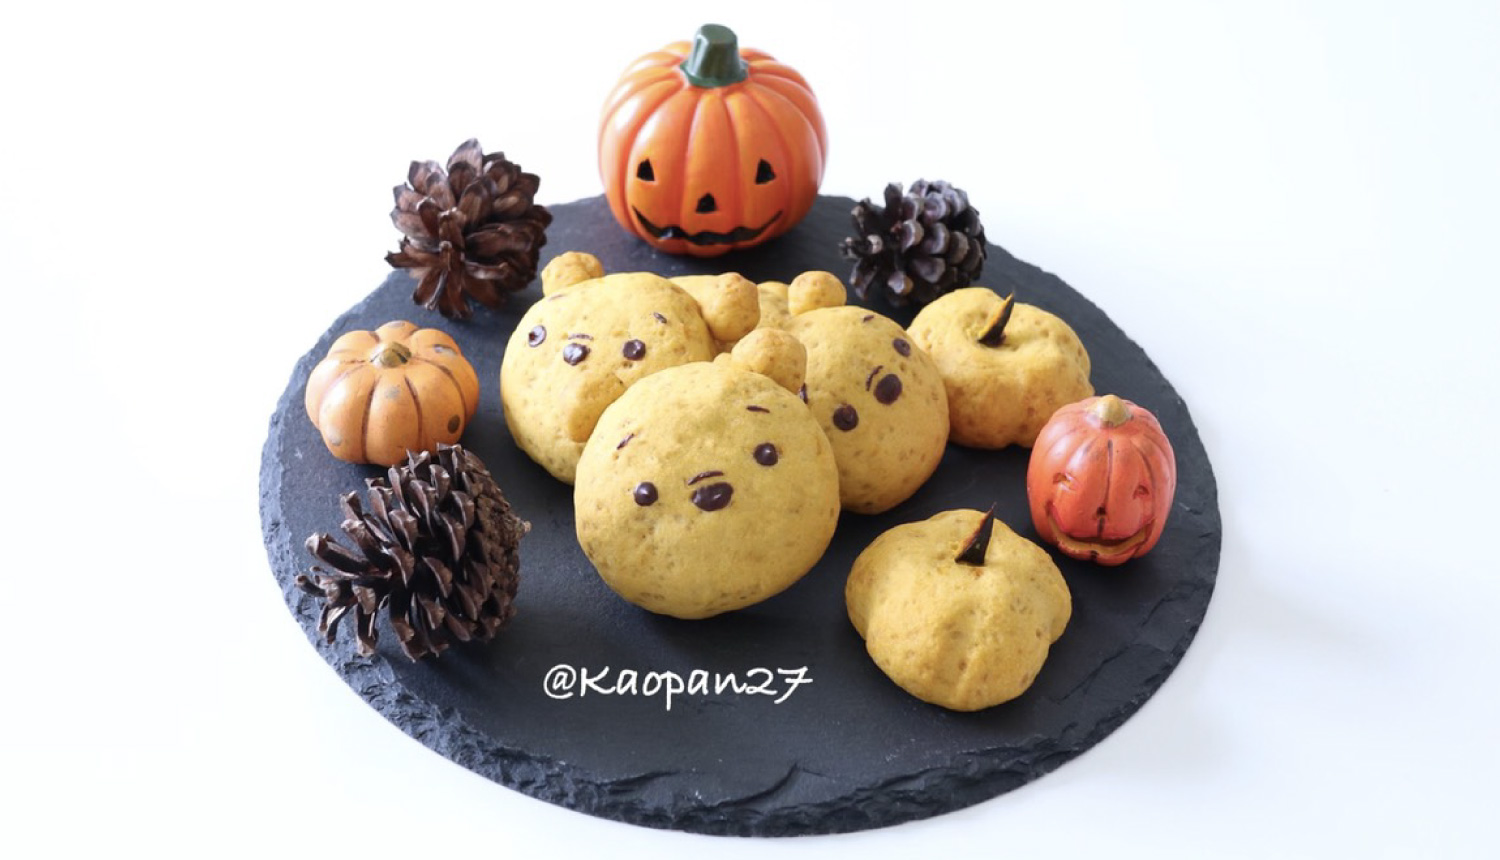
With just a small bit of ingenuity, turn everyday food into something cute using Kaori’s Easy Recipe! With a few simple ideas, an ordinary recipe magically transforms into a cute dish.
Halloween in closing in, so for this recipe I’ll be using pumpkin to make delicious cookies—crunchy on the outside and moist in the middle. This recipe rolls the dough into a ball, so it’s a great alternative for people who aren’t good with shaping or cutting cookies.
Ingredients
50g pumpkin (mashed and skin removed)
20g-25g sugar (I used sanonto sugar to bring out the sweetness of the pumpkin, but white sugar is fine too)
30g unsalted butter
A pinch of salt
60g weak flour
1
Combine and mix the steamed pumpkin, room temperature butter, and sugar. Then incorporate the salt and flour and mix again.
2
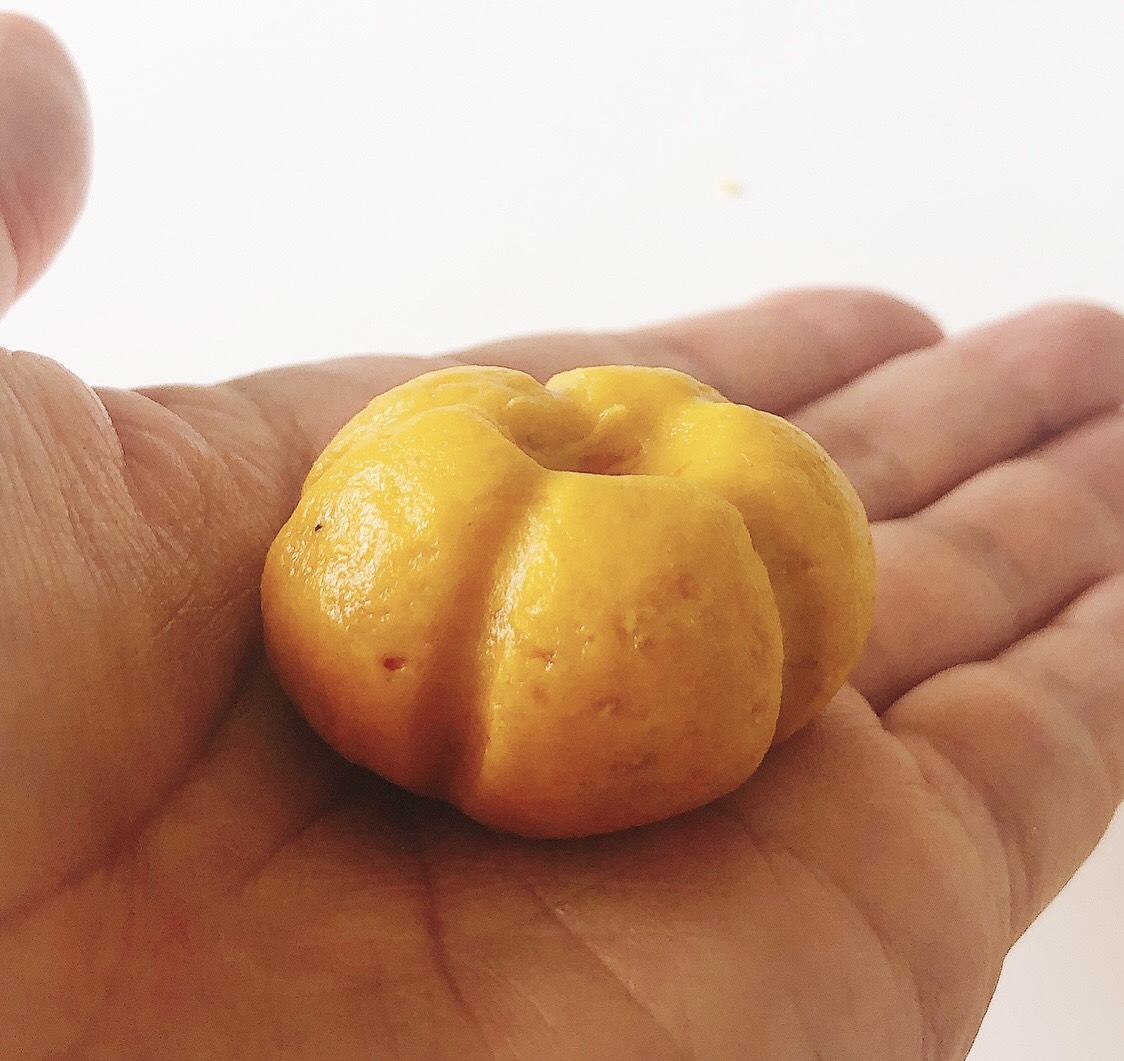
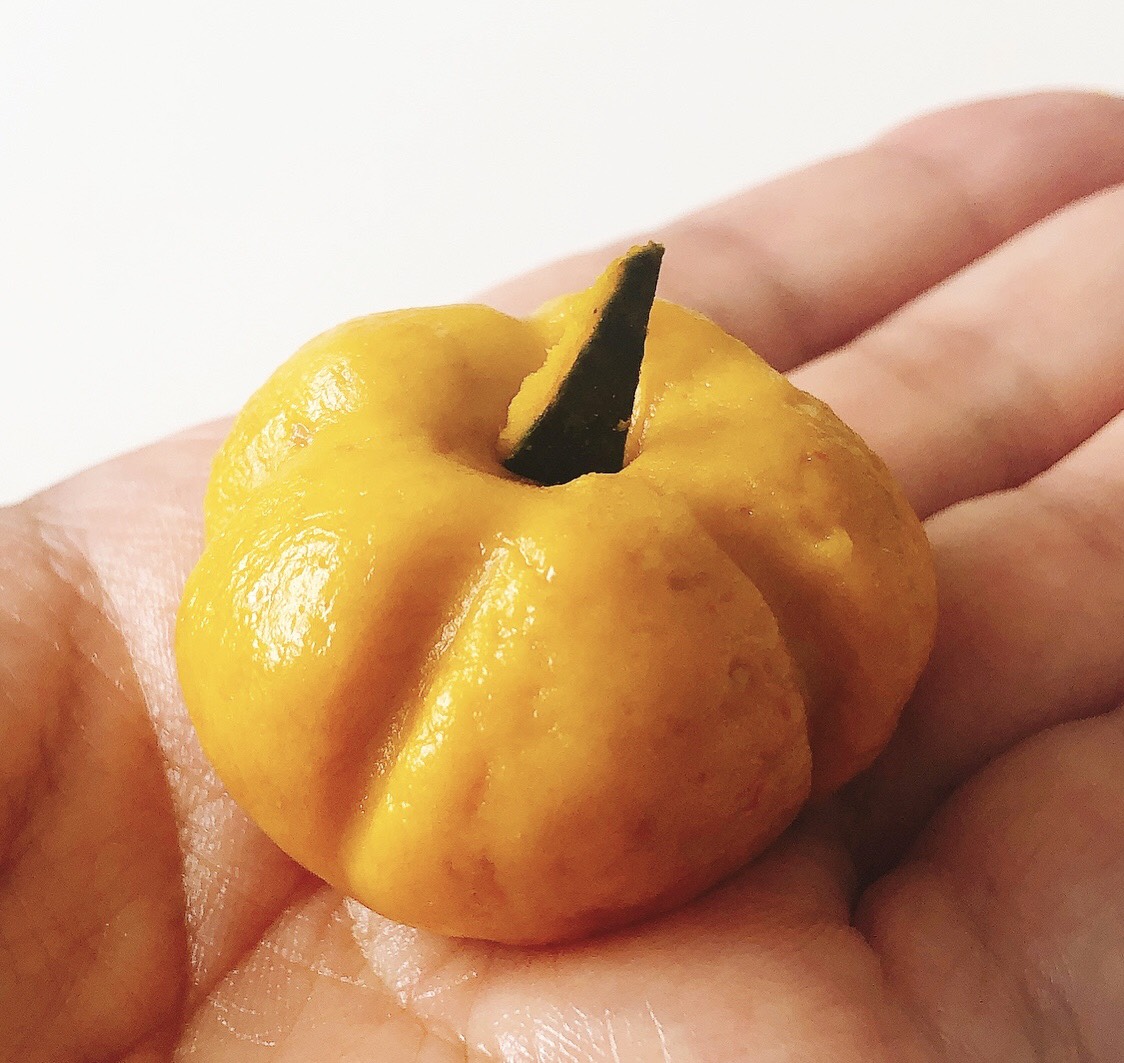
Now to shape everything. For pumpkin decorations, roll the pumpkin together and create a little depression in the top. Use a toothpick or something similar to create five indents around the outside as pictured above.
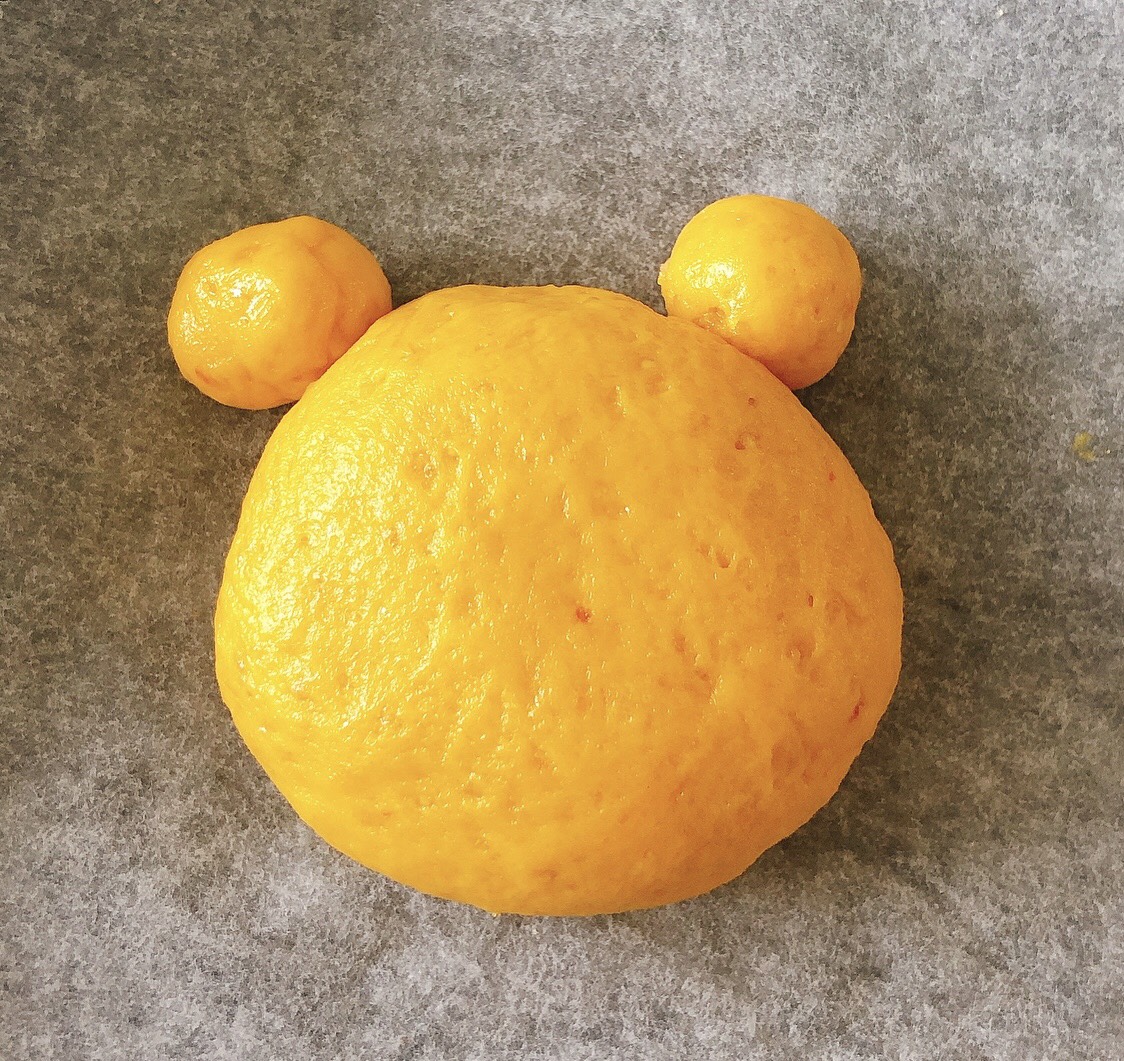
To make Pooh Bear, simply roll round and add the ears.
3
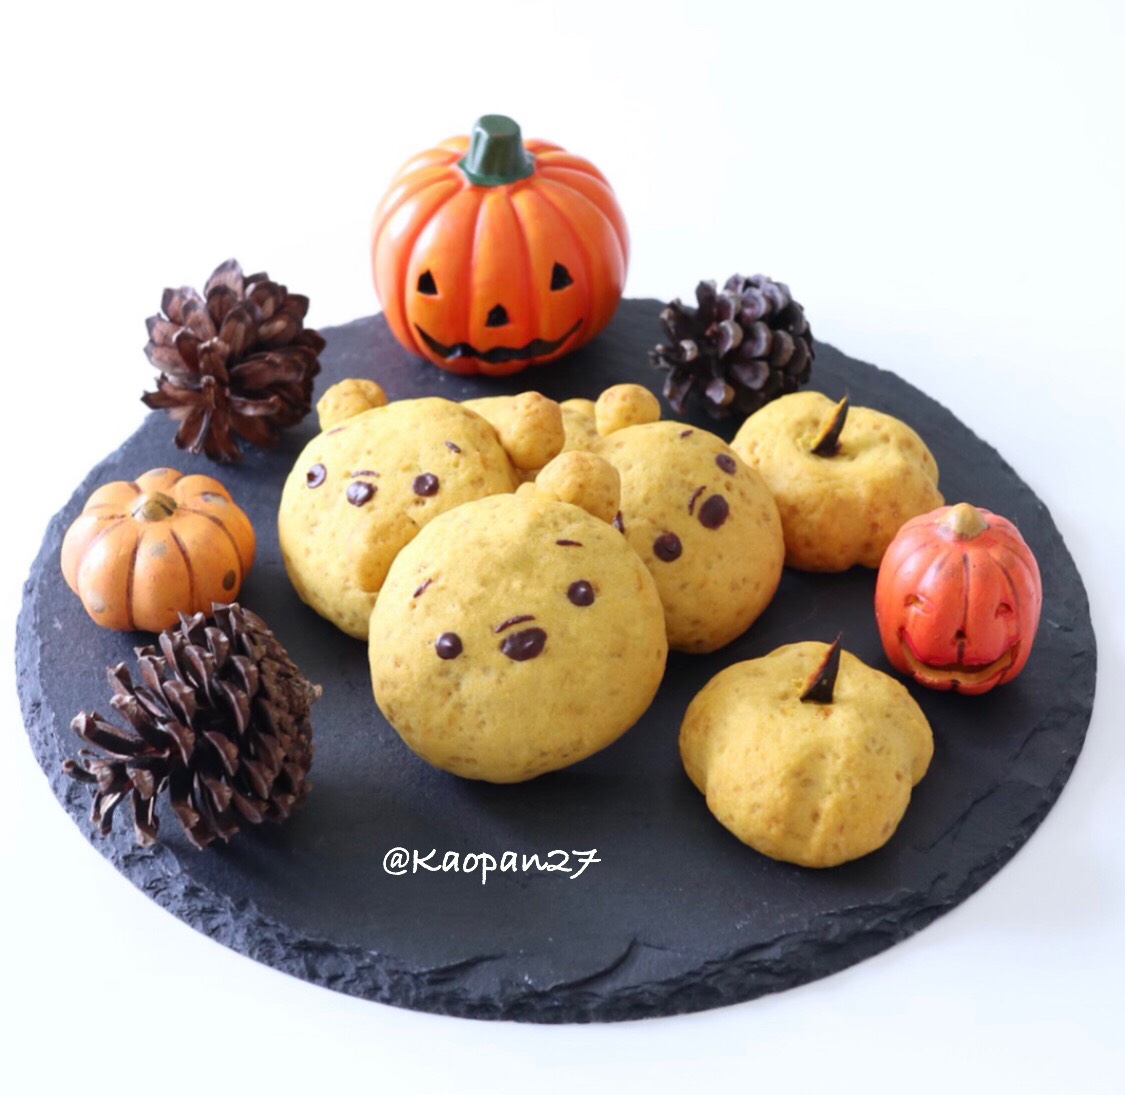
Bake at 150℃ for 20-25 minutes. Leave to cool, then decorate Pooh’s facial features with a chocolate pen.
Kaori invites you into her world of character-themed food dishes in her recipe series. Be sure to check out her Instagram where she has uploaded many pictures of her character dishes!
Kaori Kubota (@kaopan27)
I live in Hokkaido and I love to make character themed foods, desserts and pastries♡
I want to see my family smile, so I enjoy putting in a bit of effort to make character foods and changing food into something cute♡
You can see more of my character foods and character bento boxes on my Instagram page → @kaopan72
-
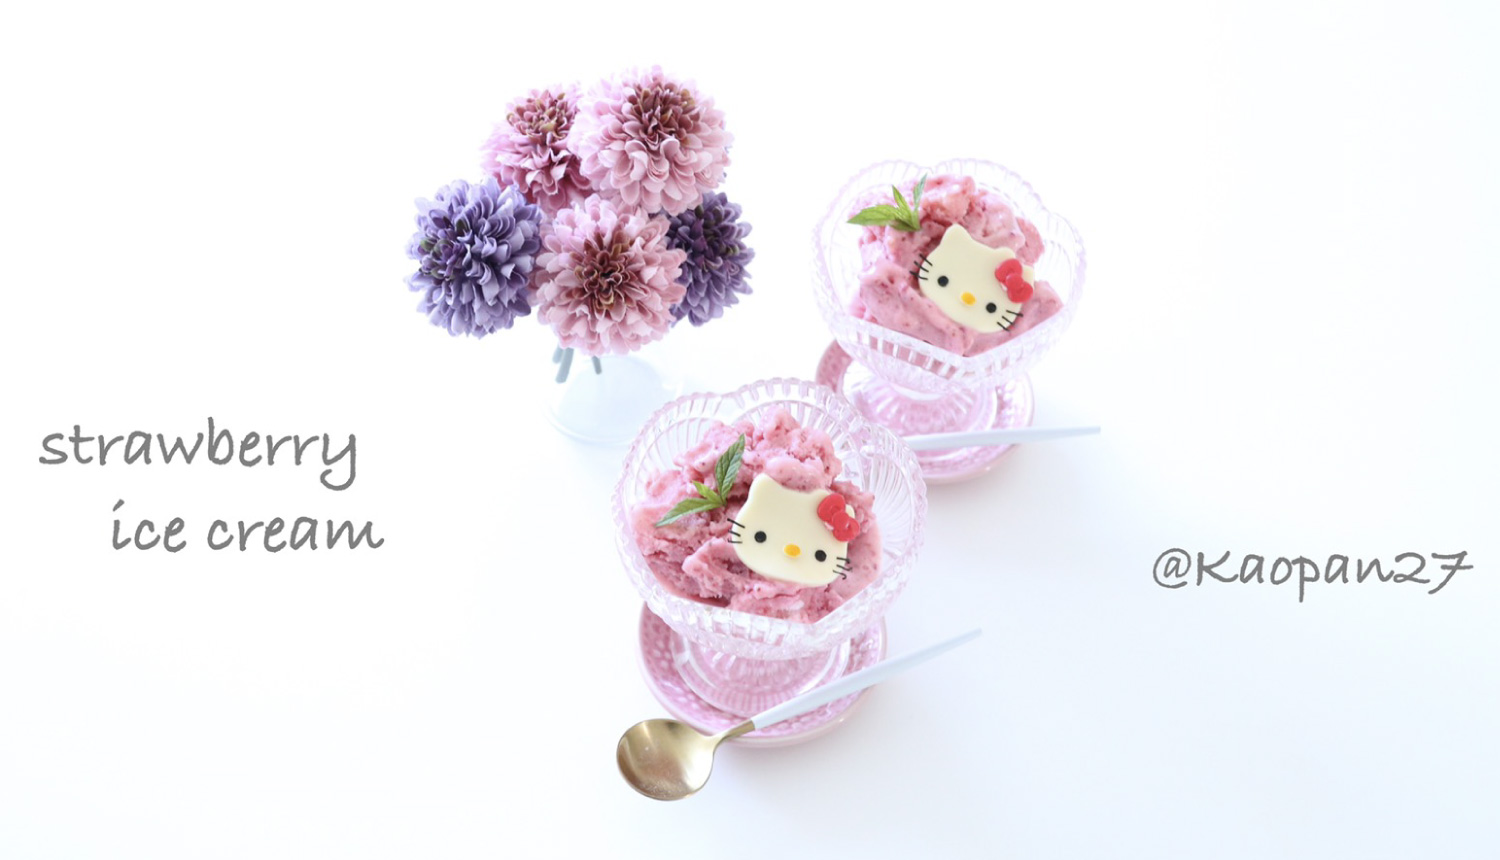
With just a small bit of ingenuity, turn everyday food into something cute using Kaori’s Easy Recipe! With a few simple ideas, an ordinary recipe magically transforms into a cute dish.
Today’s recipe will show you how to make a simple ice cream made with frozen strawberries and a blender.
Ingredients
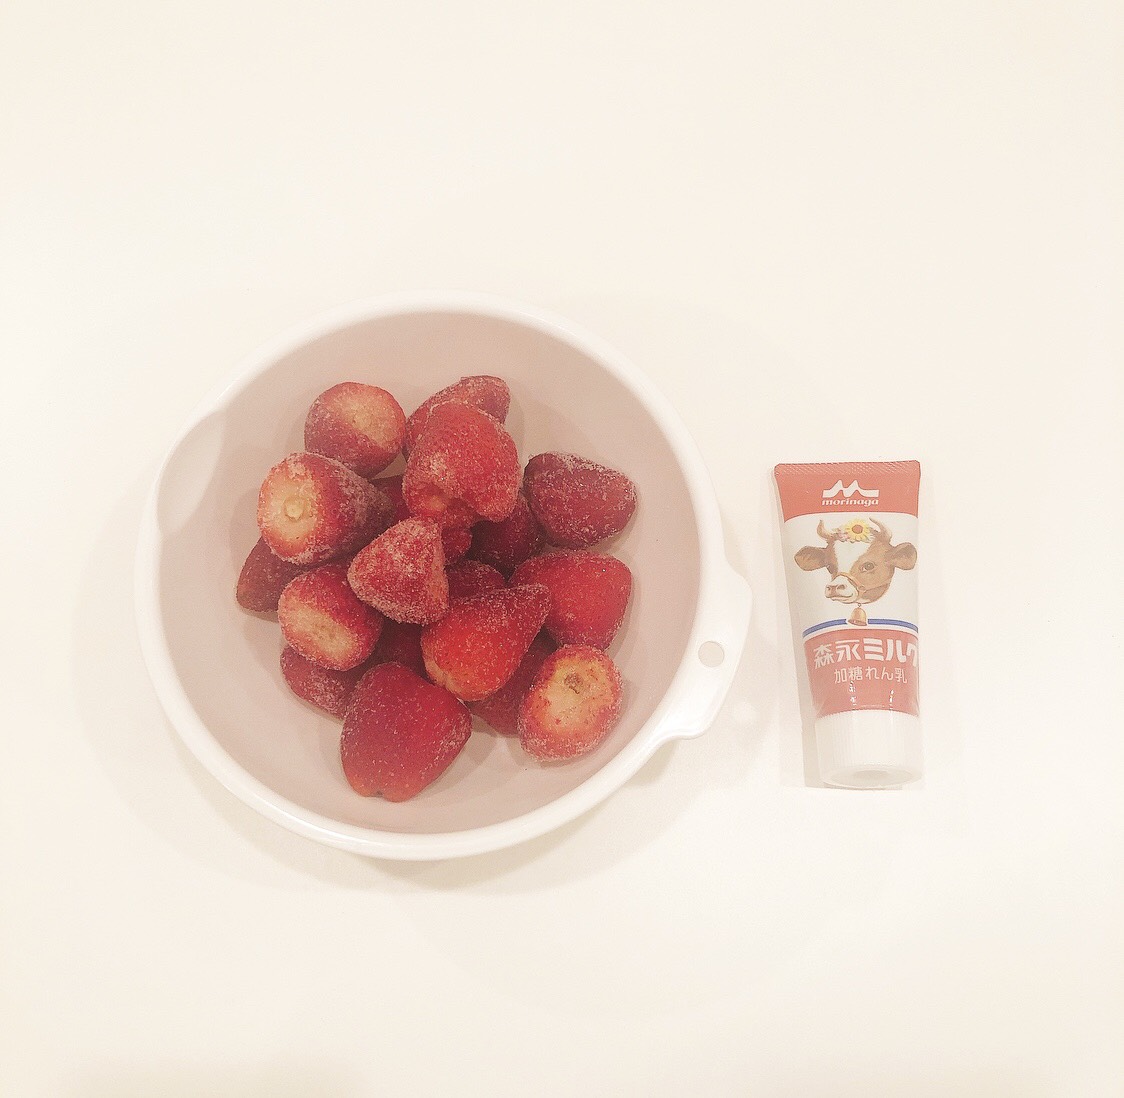
500g frozen strawberries (either store bought or self-frozen)120ml condensed milk
Sliced white chocolate to make Hello Kitty
1.
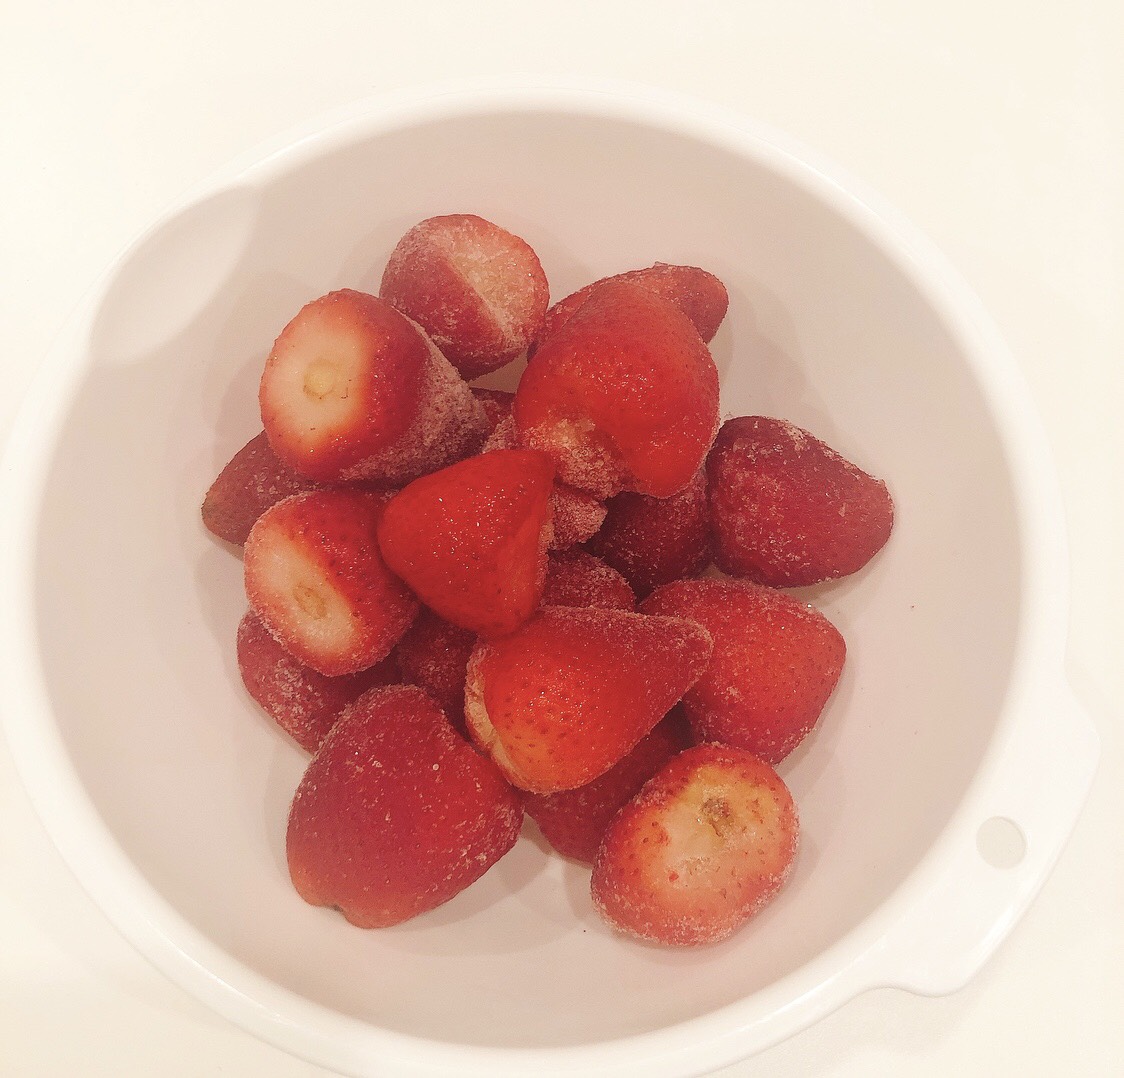
Defrost around 3/10 of the frozen strawberries until they are more soft than frozen, allowing them to be blended more easily.2.
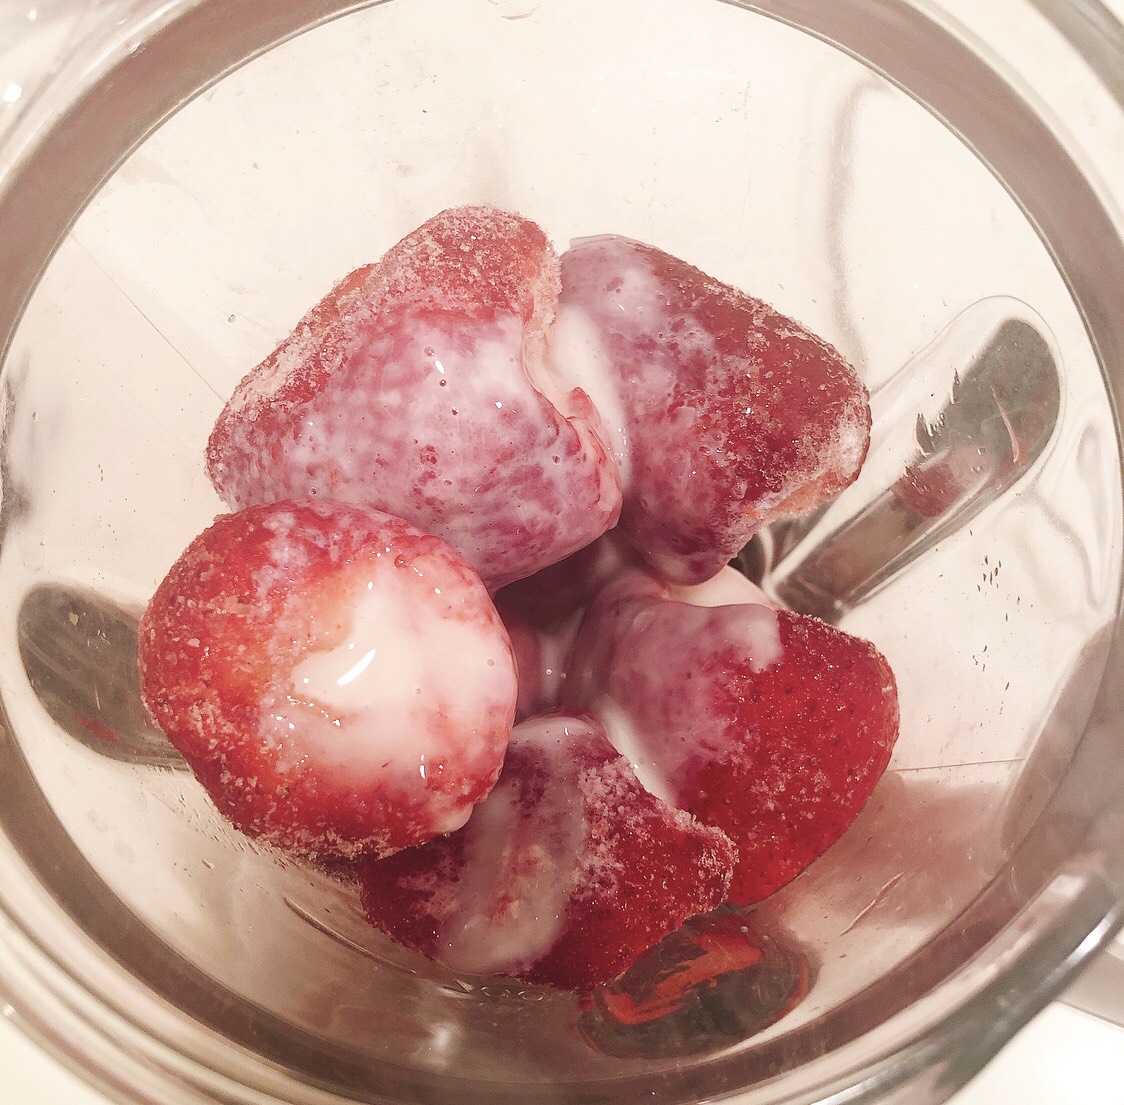
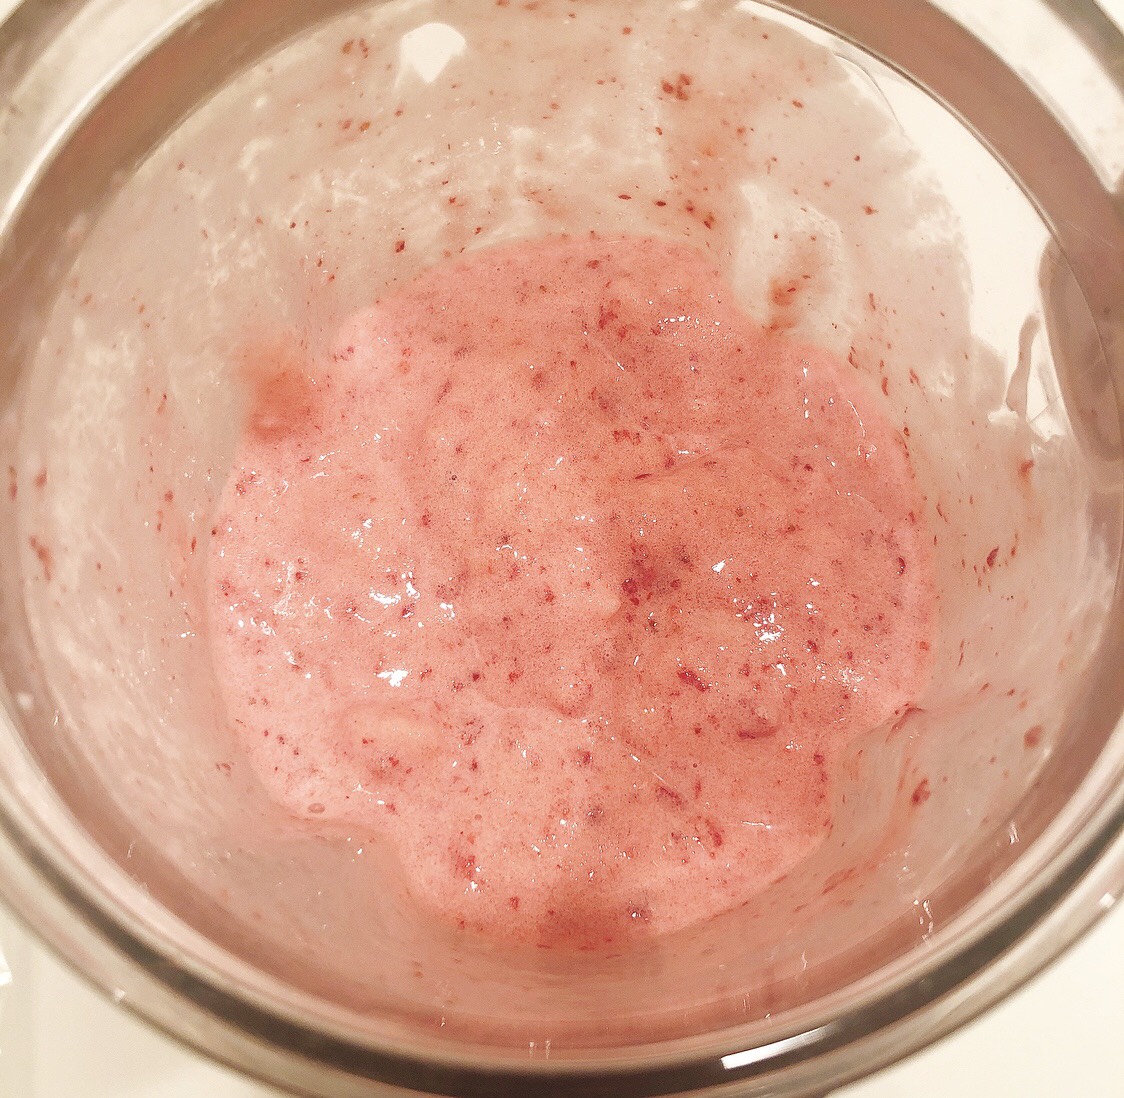
Throw the defrosted strawberries into a blender along with the condensed milk and blend.3.
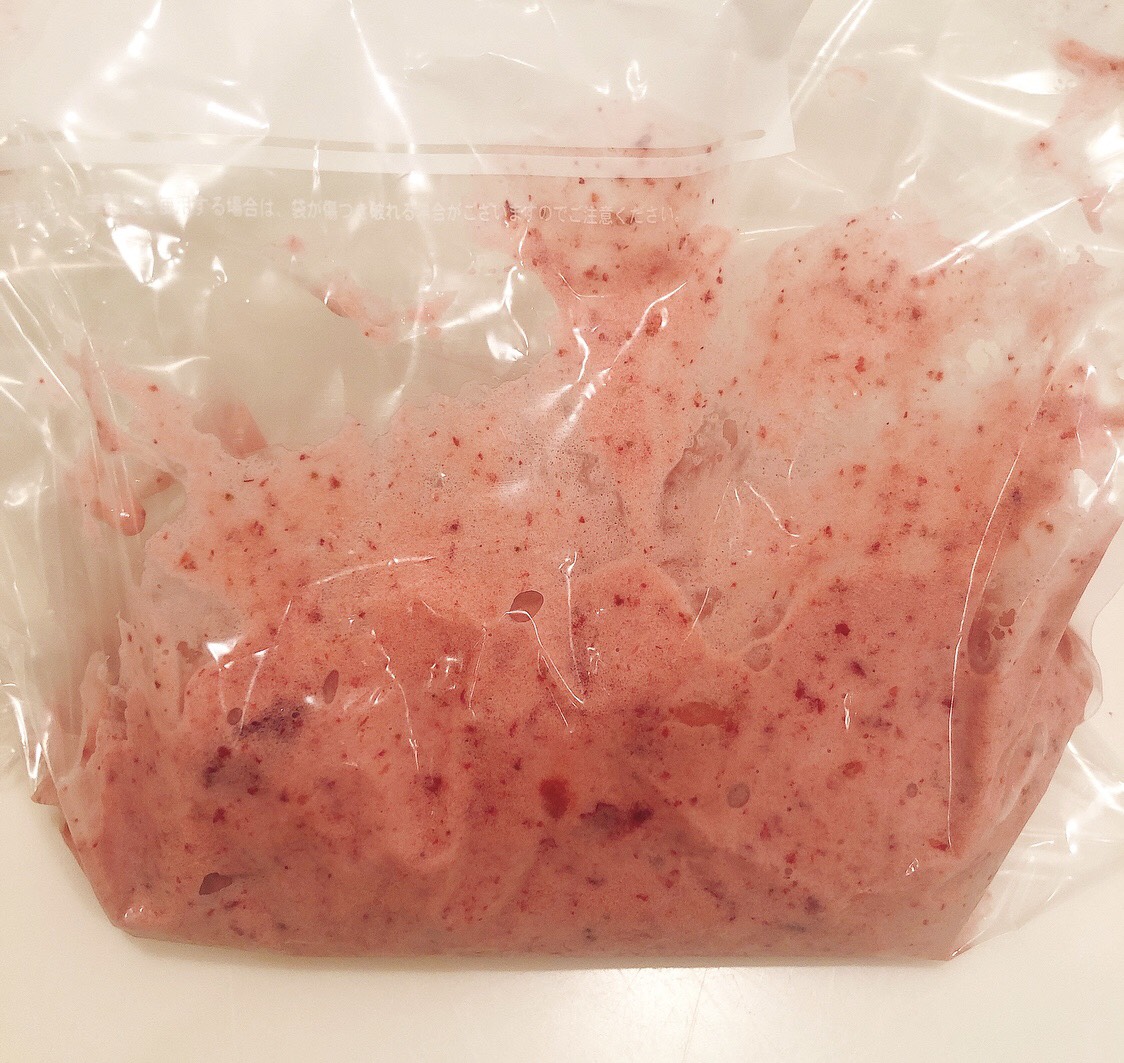
Place the blended mix into a ziplock bag and place into the freezer. After about an hour, massage the mix while it’s still inside the bag. Repeat this whole process 2-3 times. Doing this will make the ice cream tastier.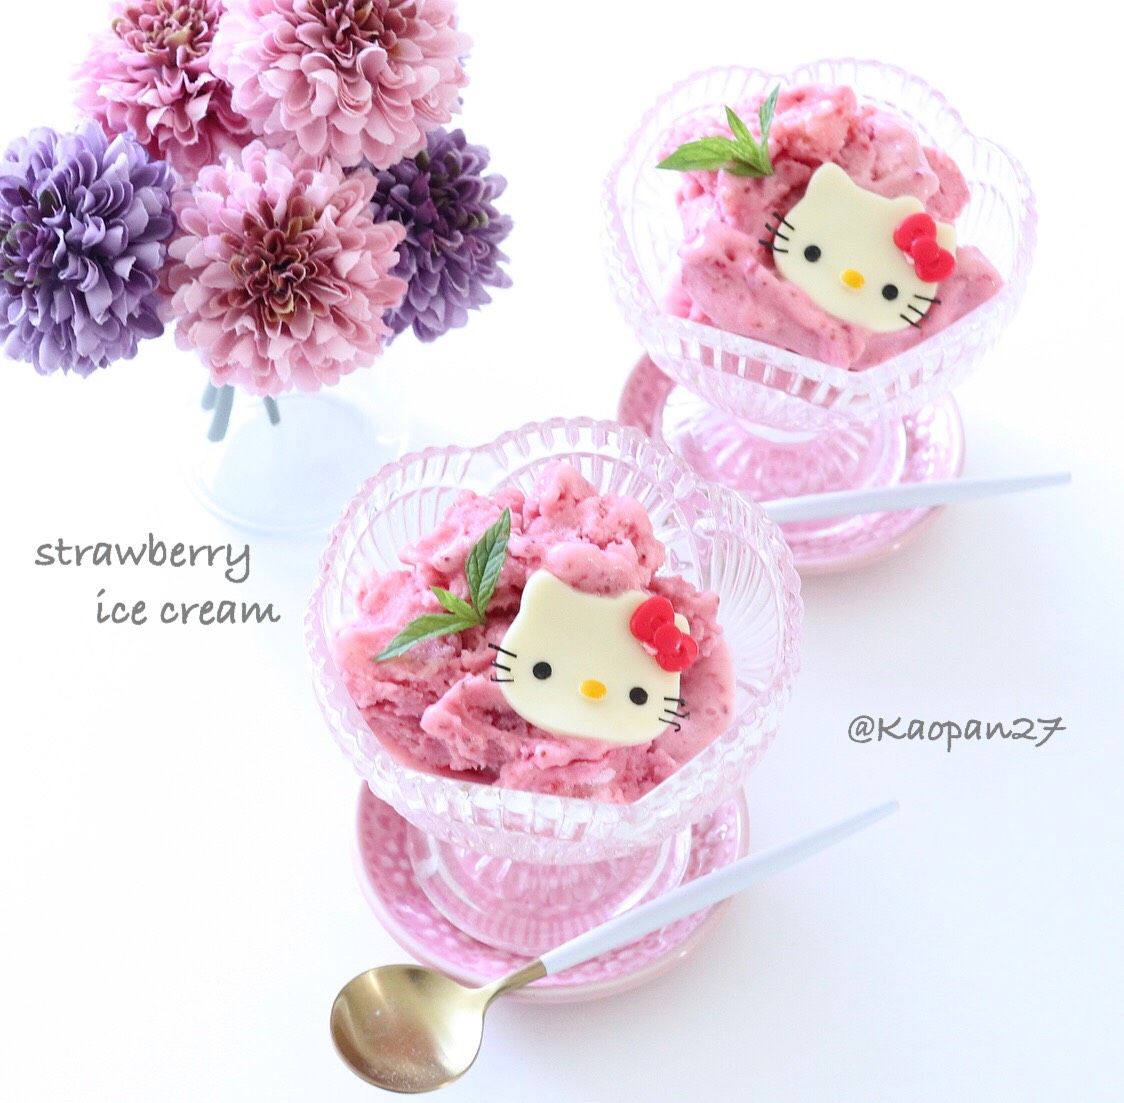
Once fully set, place into a serving cup of your choice, use sliced white chocolate to make your chocolate Hello Kitty, and serve!
Kaori invites you into her world of character-themed food dishes in her recipe series. Be sure to check out her Instagram where she has uploaded many pictures of her character dishes!
Kaori Kubota (@kaopan27)
I live in Hokkaido and I love to make character themed foods, desserts and pastries♡
I want to see my family smile, so I enjoy putting in a bit of effort to make character foods and changing food into something cute♡
You can see more of my character foods and character bento boxes on my Instagram page → @kaopan72
-
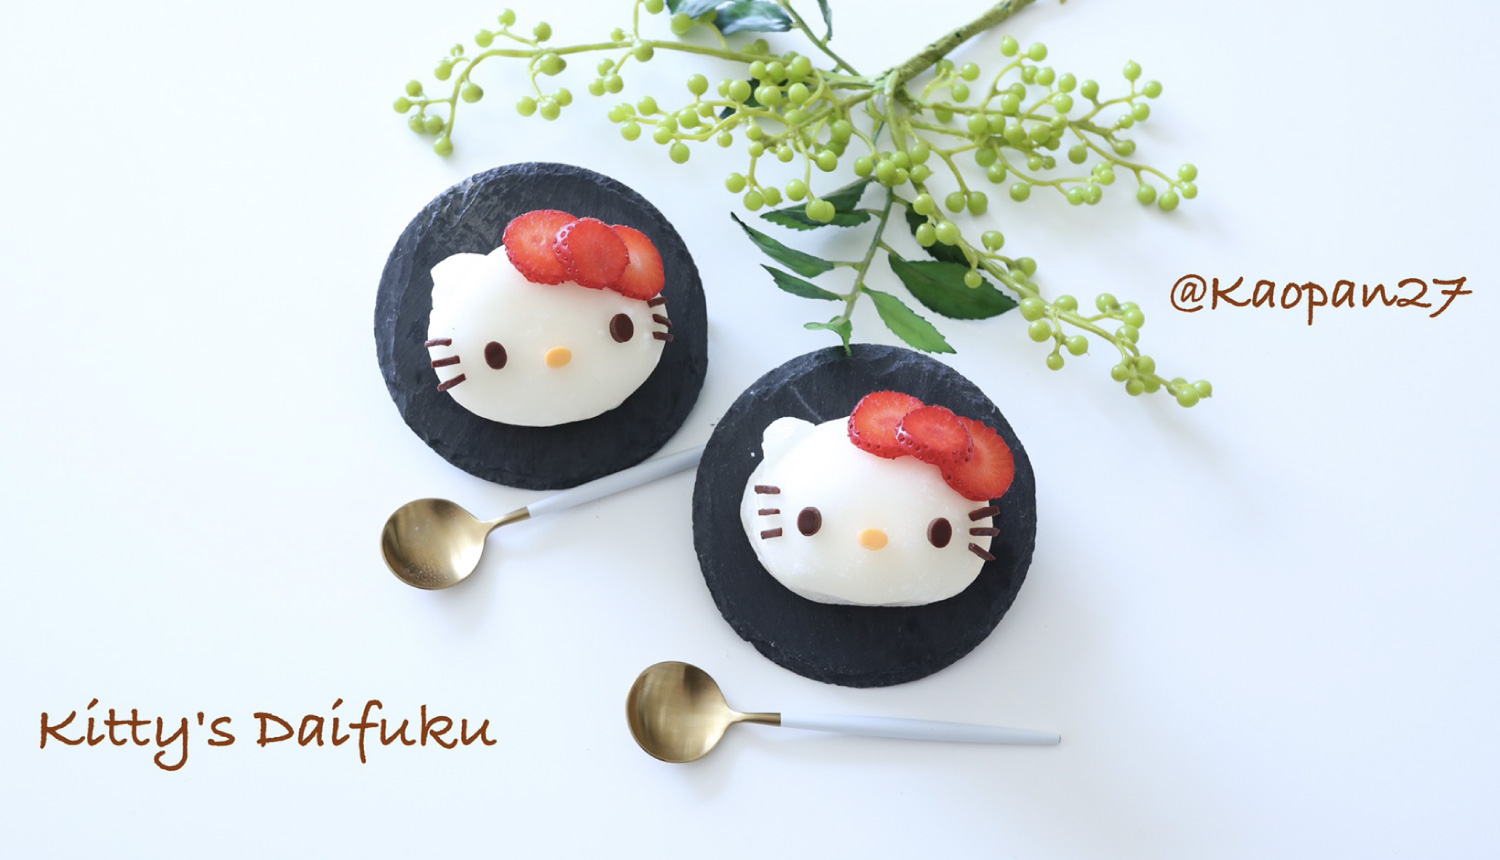
With just a small bit of ingenuity, turn everyday food into something cute using Kaori’s easy recipe! With a few simple ideas, an ordinary recipe magically transforms into a cute dish.
In this recipe, you’ll learn how to transform a store-bought roll cake into a kawaii Hello Kitty cake which contains gyūhi – a form of traditional Japanese sweet which is a variety of mochi.
Ingredients
50g refined rice flour
100ml water
70g sugar
potato starch
strawberries and whipped cream to your liking
sliced chocolate (for Hello Kitty’s face)1
First, make the gyūhi by mixing 50g of refined rice flour with 100ml of water. Mix well to avoid lumps.
Once this has been mixed, add 70g of sugar and mix again.2
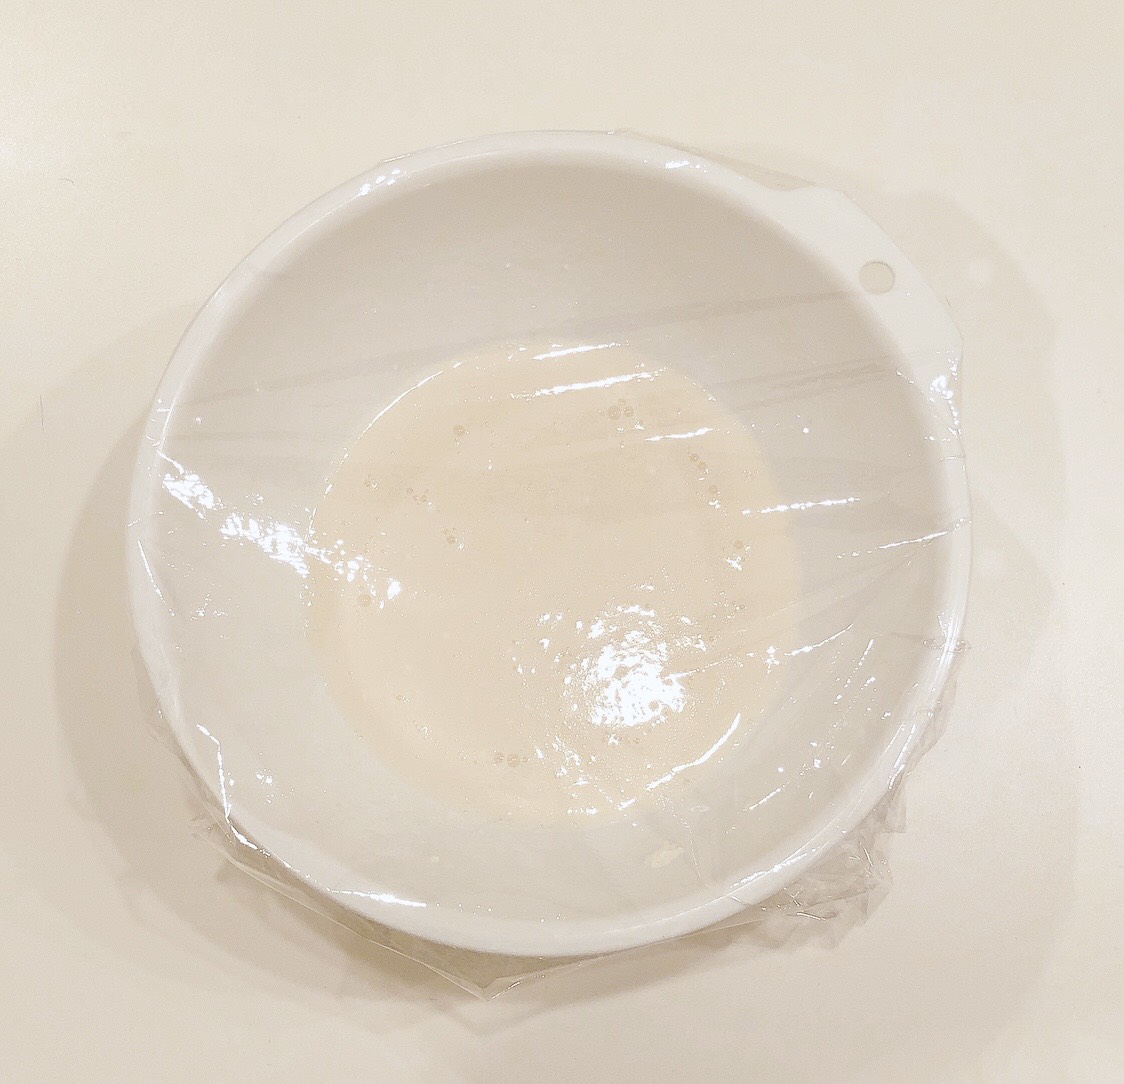
Cover the bowl with plastic wrap and microwave at 600W for 2 minutes.3
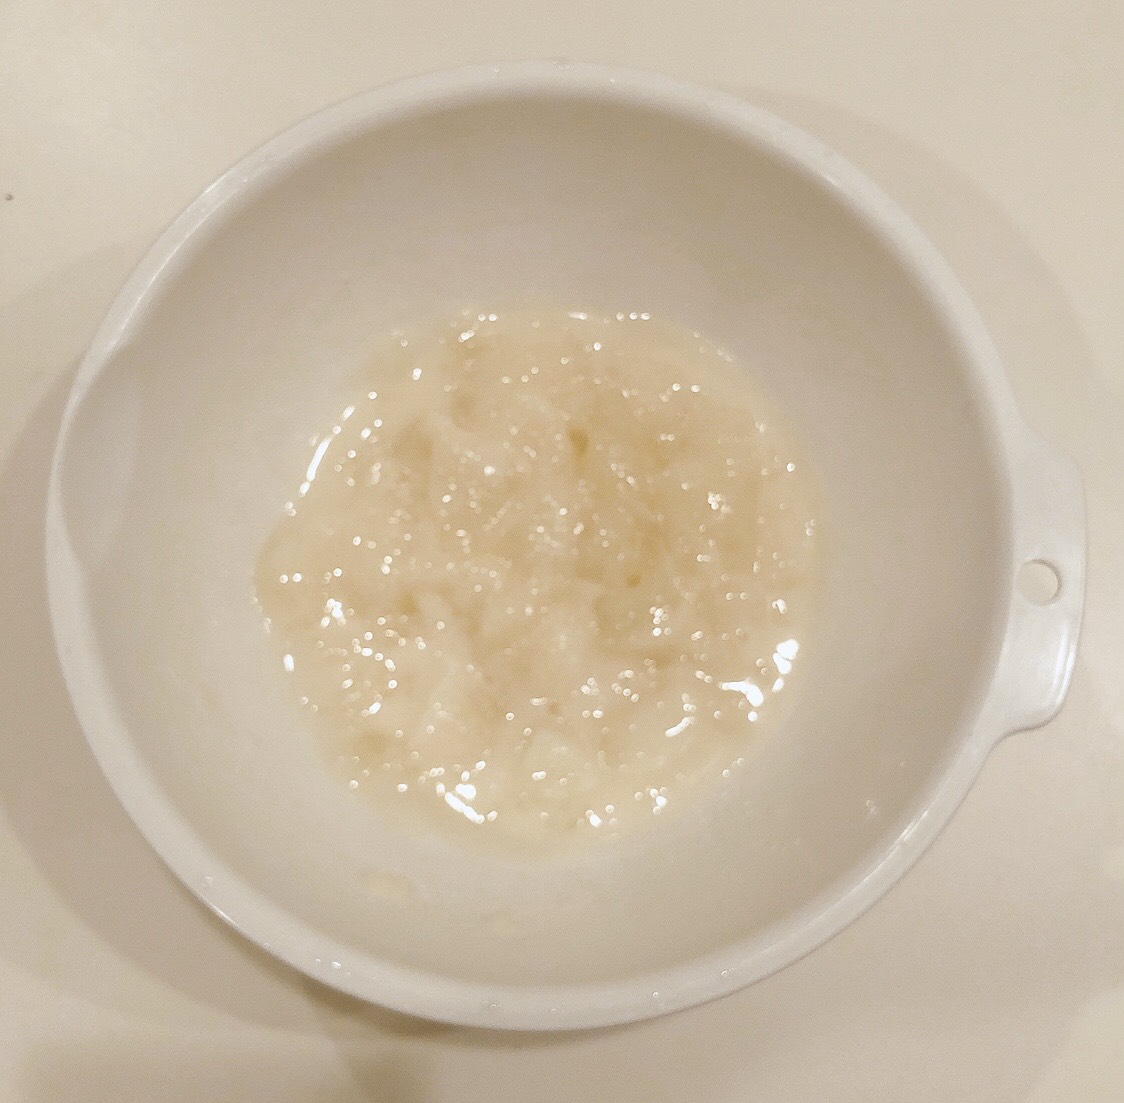
Stir the mixture with a rubber spatula and microwave again for one more minute at 600W.
4
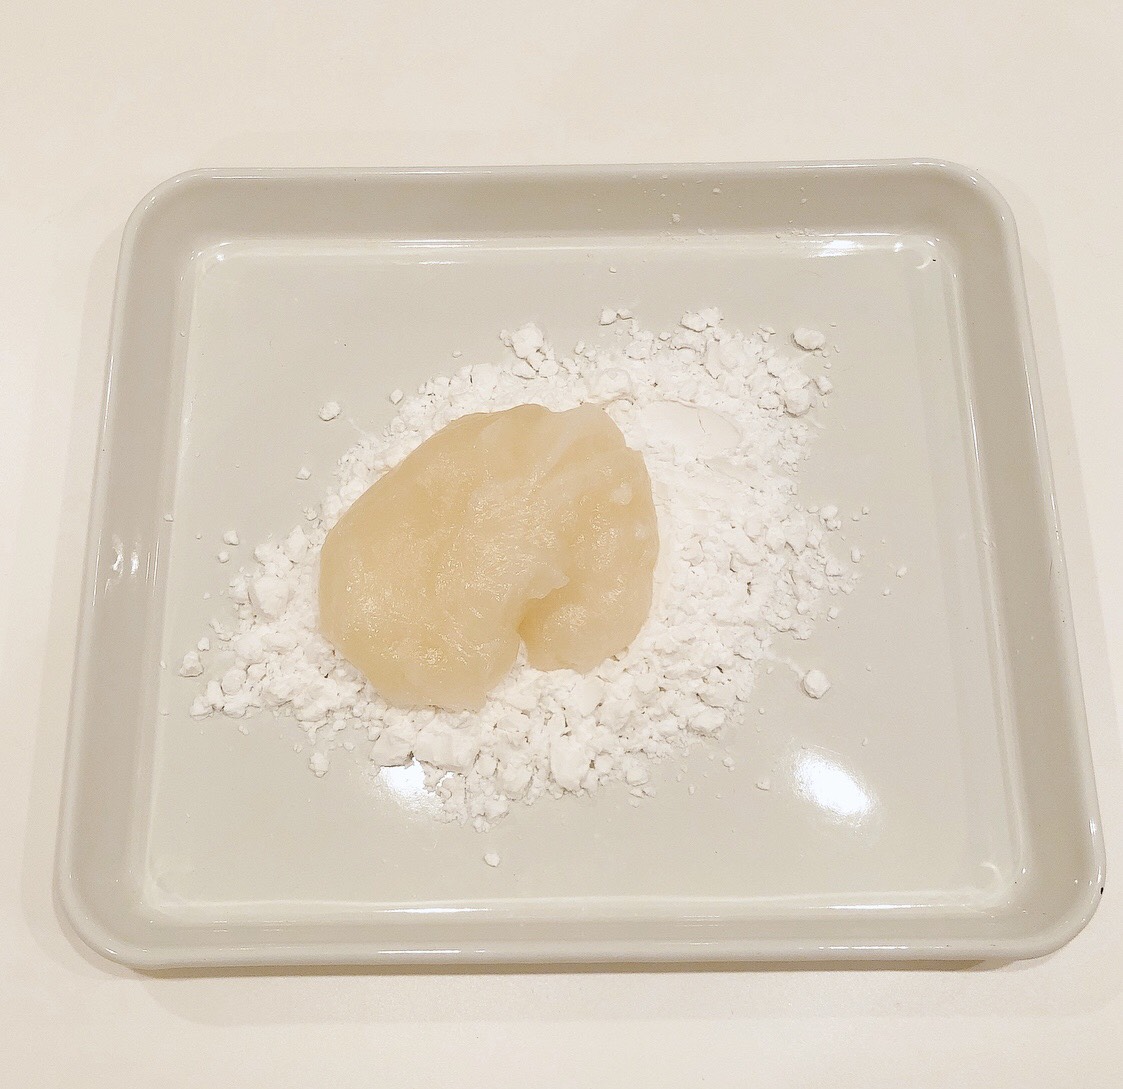
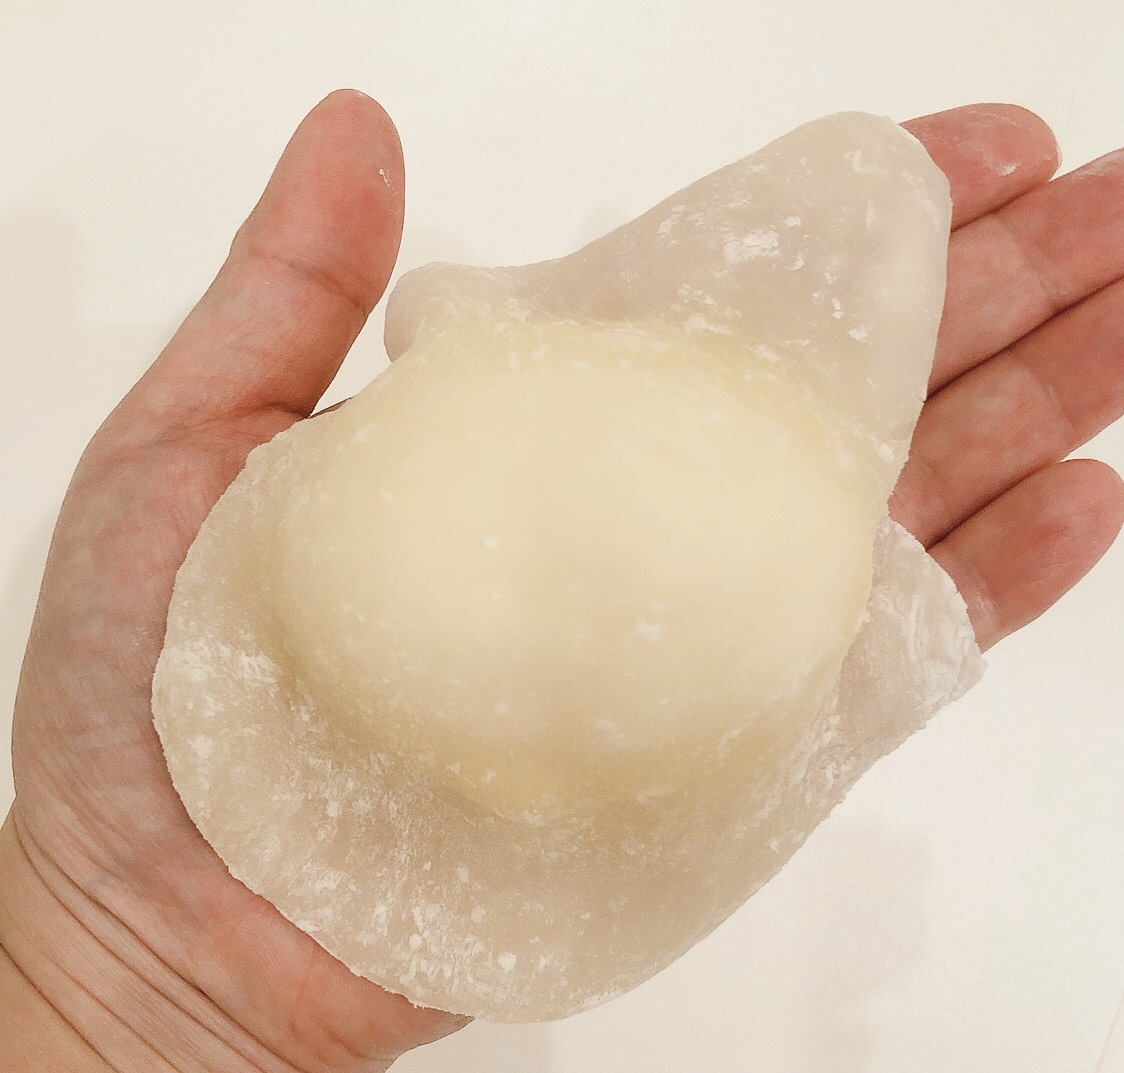
Use a rubber spatula to stir the mixture until it clumps together in one piece. Put a large portion of potato starch onto a tray and place your gyūhi on top.5
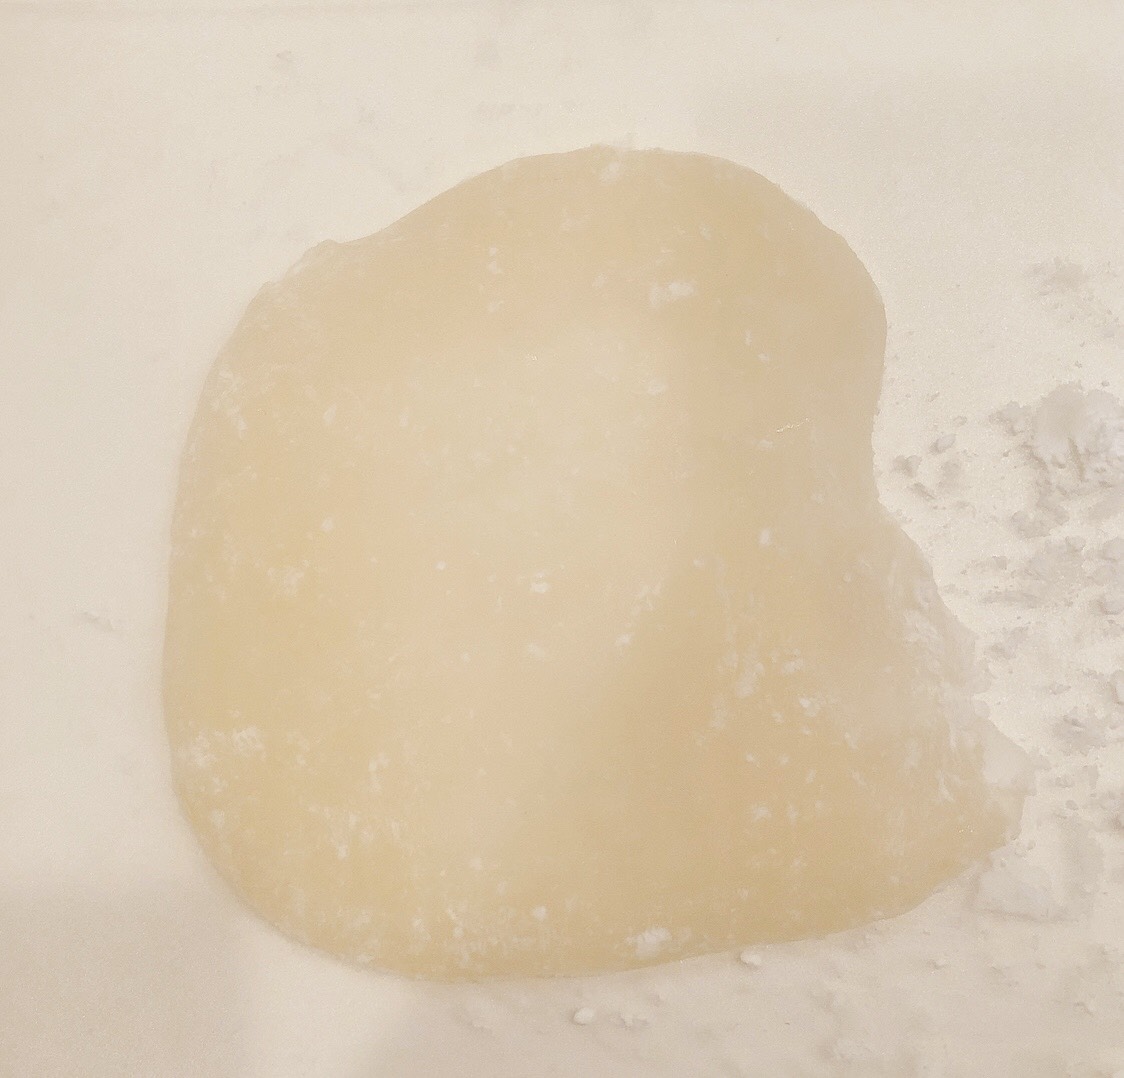
Once the gyūhi has cooled, cut it to the size of the palm of your hand and use a rolling pin to stretch it out into a flat shape.6
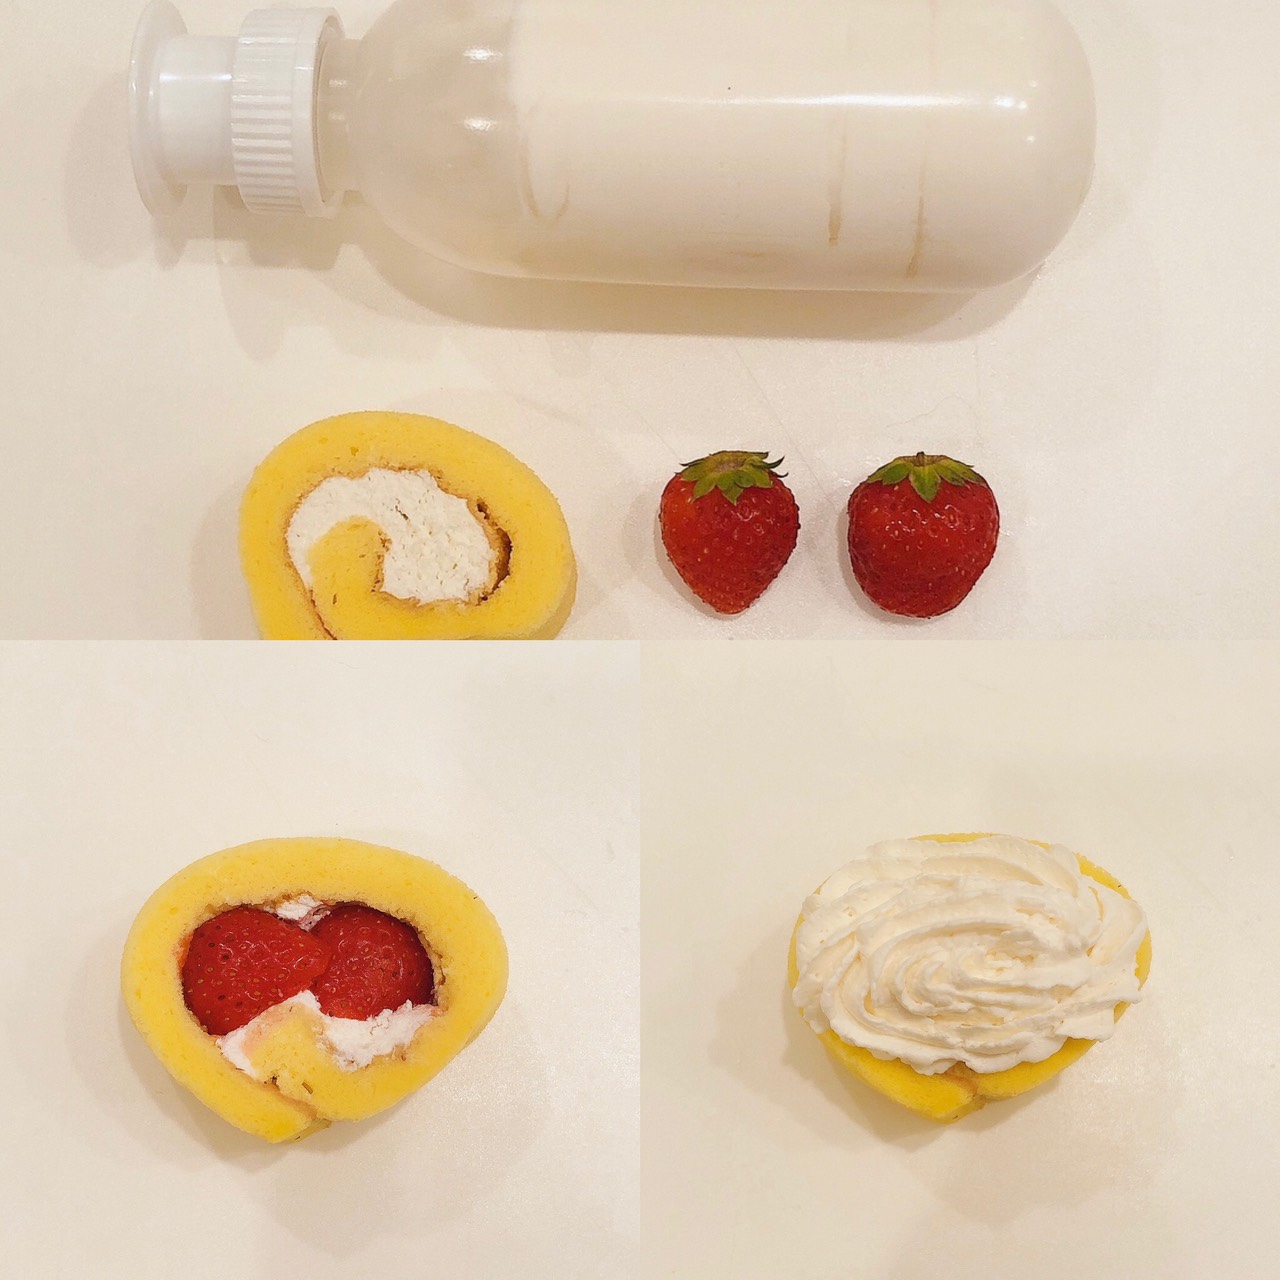
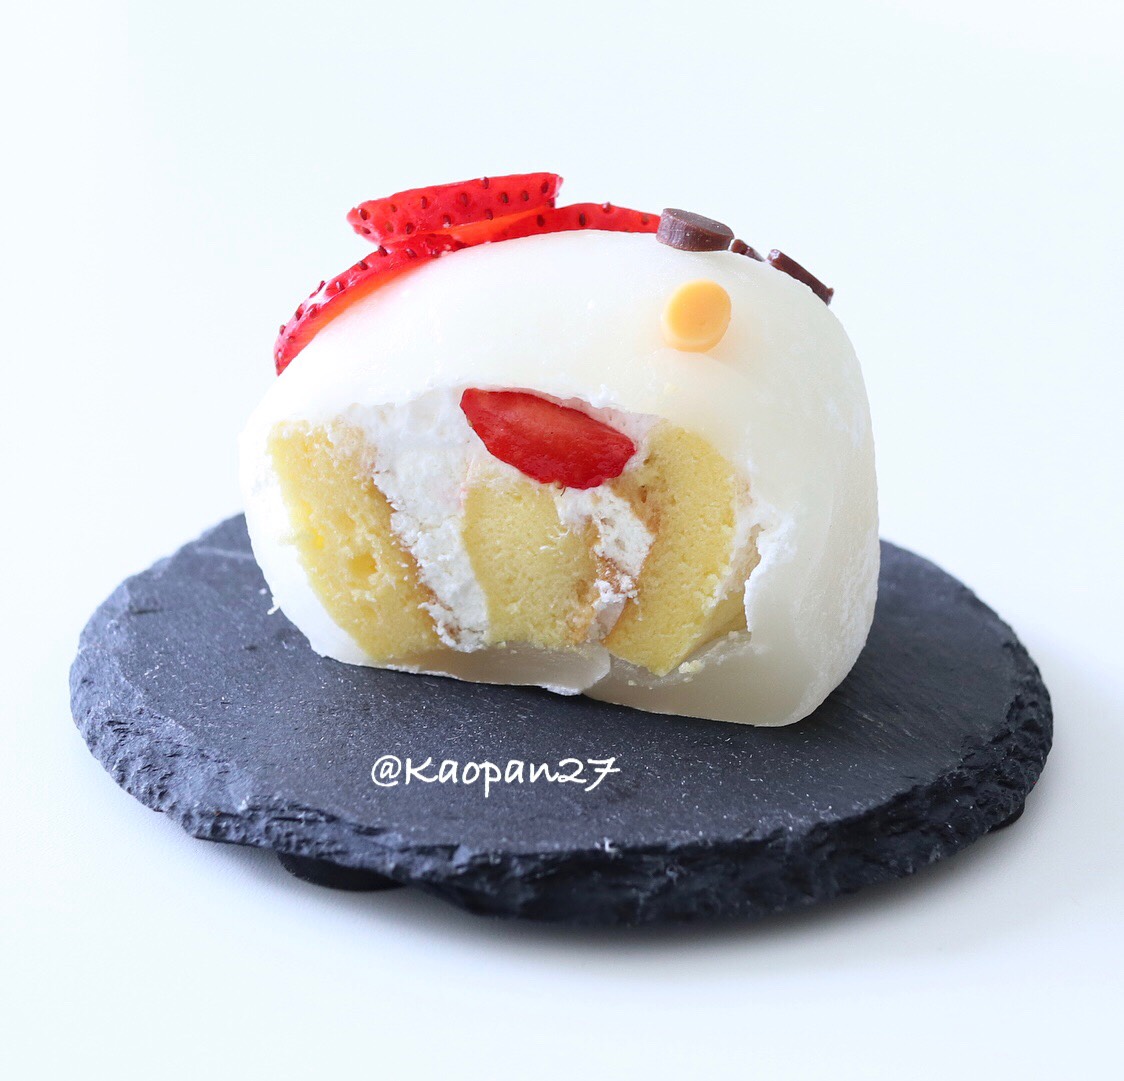
Leave your gyūhi to cool. In the meantime, bring out your store-bought roll cake piece and fill the inside with strawberries. When done, top your roll cake piece with whipped cream.
*If your forget to add the whipped cream, the strawberries underneath will be visible through the gyūhi layer!
7
Place the gyūhi layer on top of the roll cake and press the dough together at the bottom of the cake to seal it.8
Shape two pieces of remaining gyūhi dough into triangles and affix them to the top of the cake to create Hello Kitty’s ears. Use the sliced chocolate to create whiskers, eyes and a nose for Hello Kitty’s face and cut up a strawberry to make her bow.
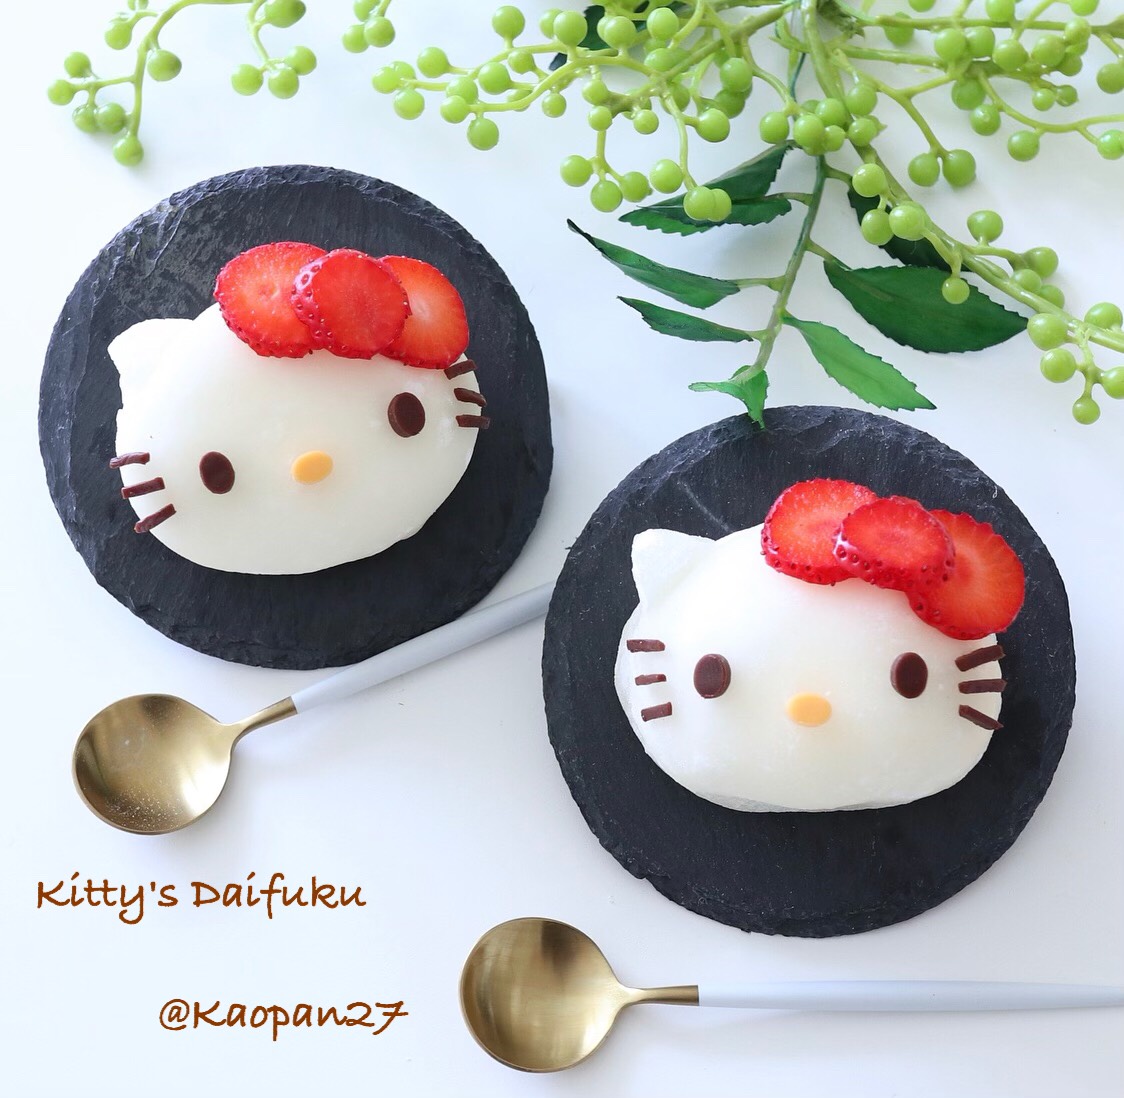
Once you have finished putting all the decorations in place, you’re done!
Kaori invites you into her world of character-themed food dishes in her recipe series. Be sure to check out her Instagram where she has uploaded many pictures of her character dishes!
Kaori Kubota (@kaopan27)
I live in Hokkaido and I love to make character themed foods, desserts and pastries♡
I want to see my family smile, so I enjoy putting in a bit of effort to make character foods and changing food into something cute♡
You can see more of my character foods and character bento boxes on my Instagram page → @kaopan72 -
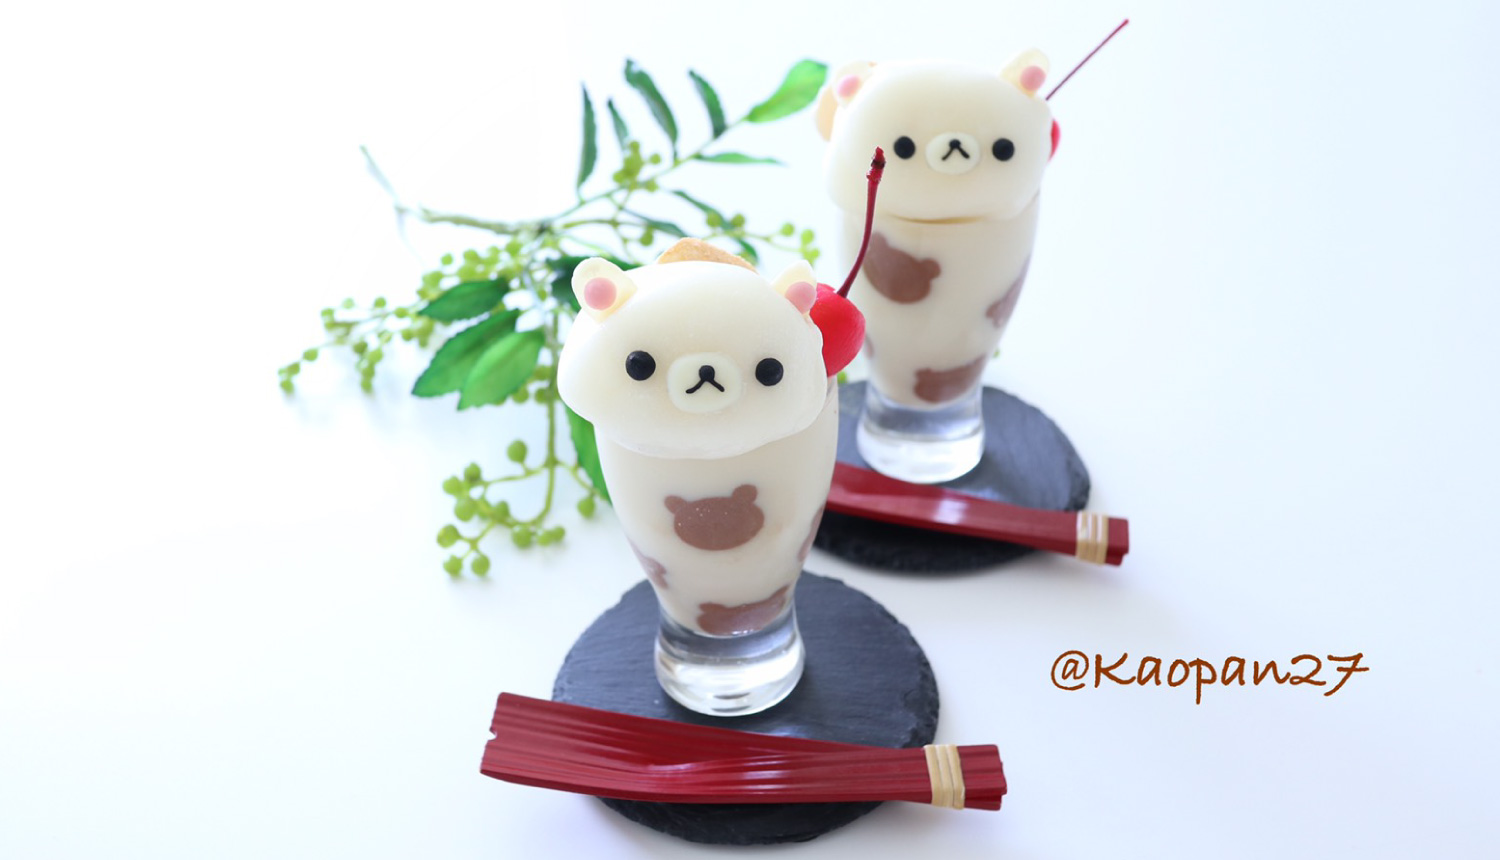
With just a small bit of ingenuity, turn everyday food into something cute using Kaori’s Easy Recipe! With a few simple ideas, an ordinary recipe magically transforms into a cute dish.
Today, I’ll be showing you a dreamy recipe on how to make the healthy Taiwanese snack douhua topped with Yukimi Daifuku mochi ice cream.
Ingredients
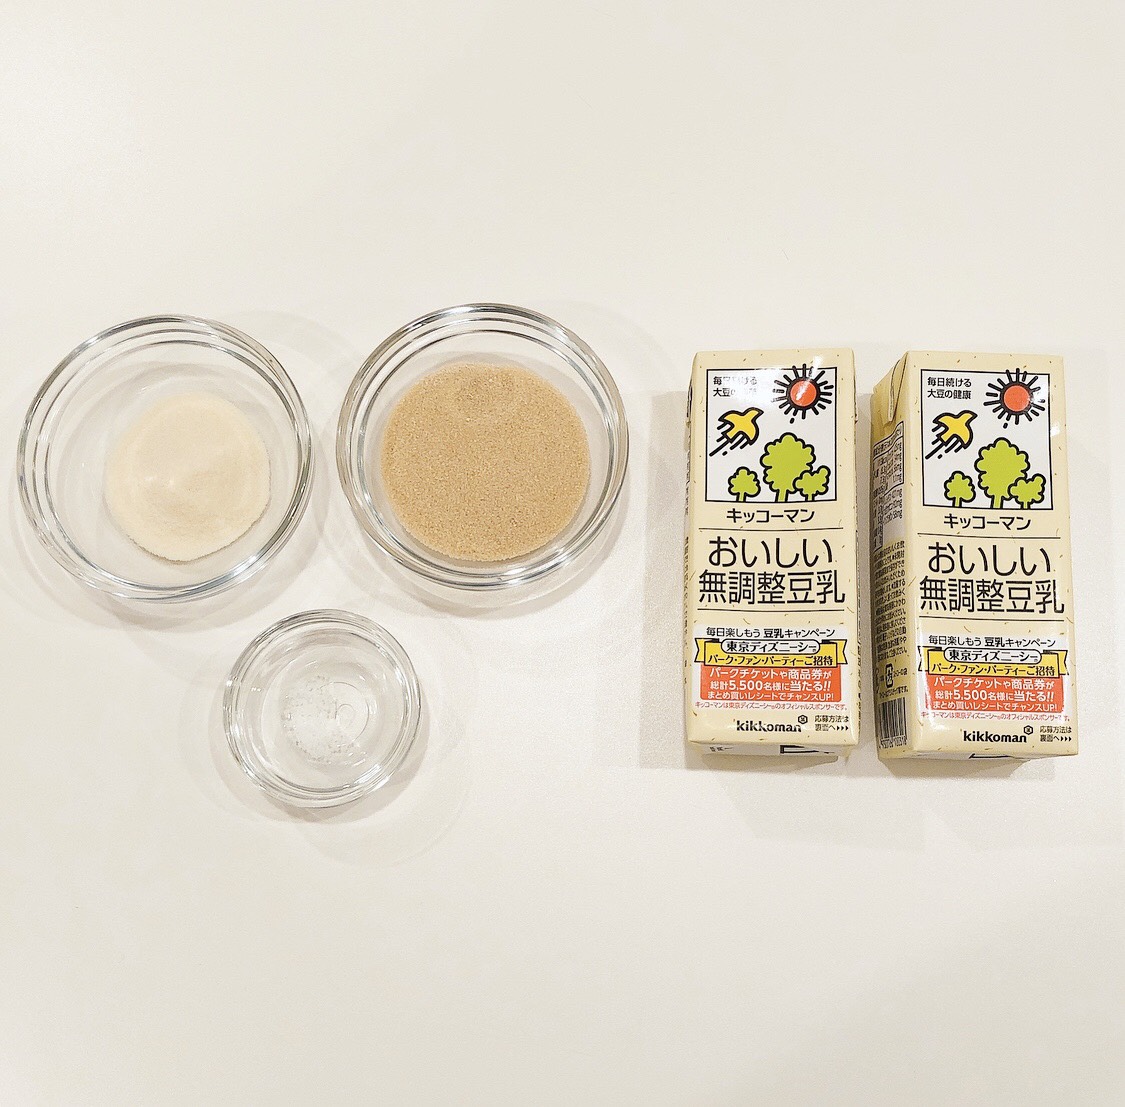
400ml soy milk
2-g Lakanto (Zero-calorie natural sweetener)
Pinch of salt
8g gelatin (dissolved in 1 tbsp water)Pre-preparations
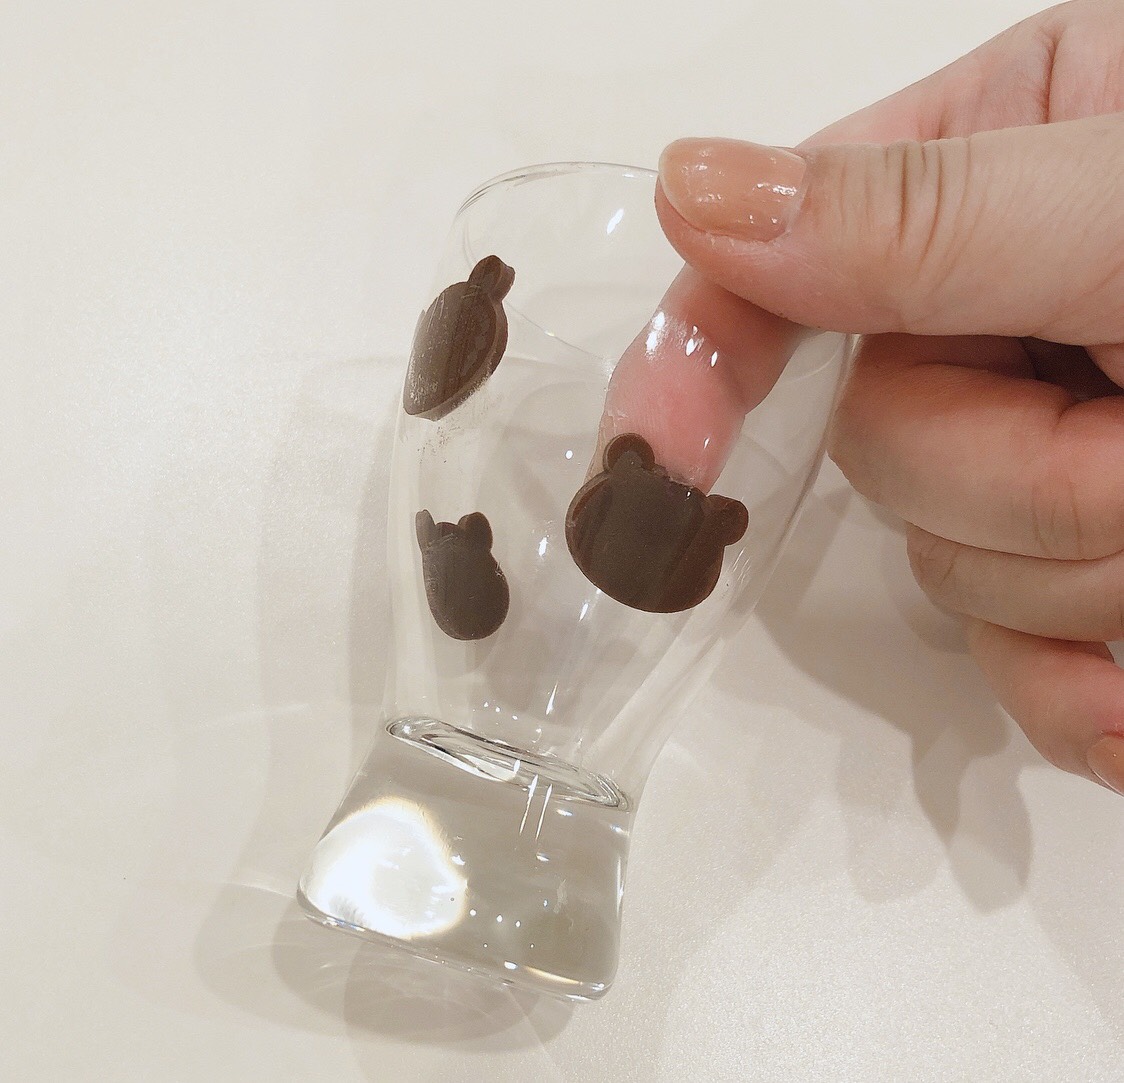
Stick bear-shaped sliced chocolate around the side of a glass and leave to set in the refrigerator.1.
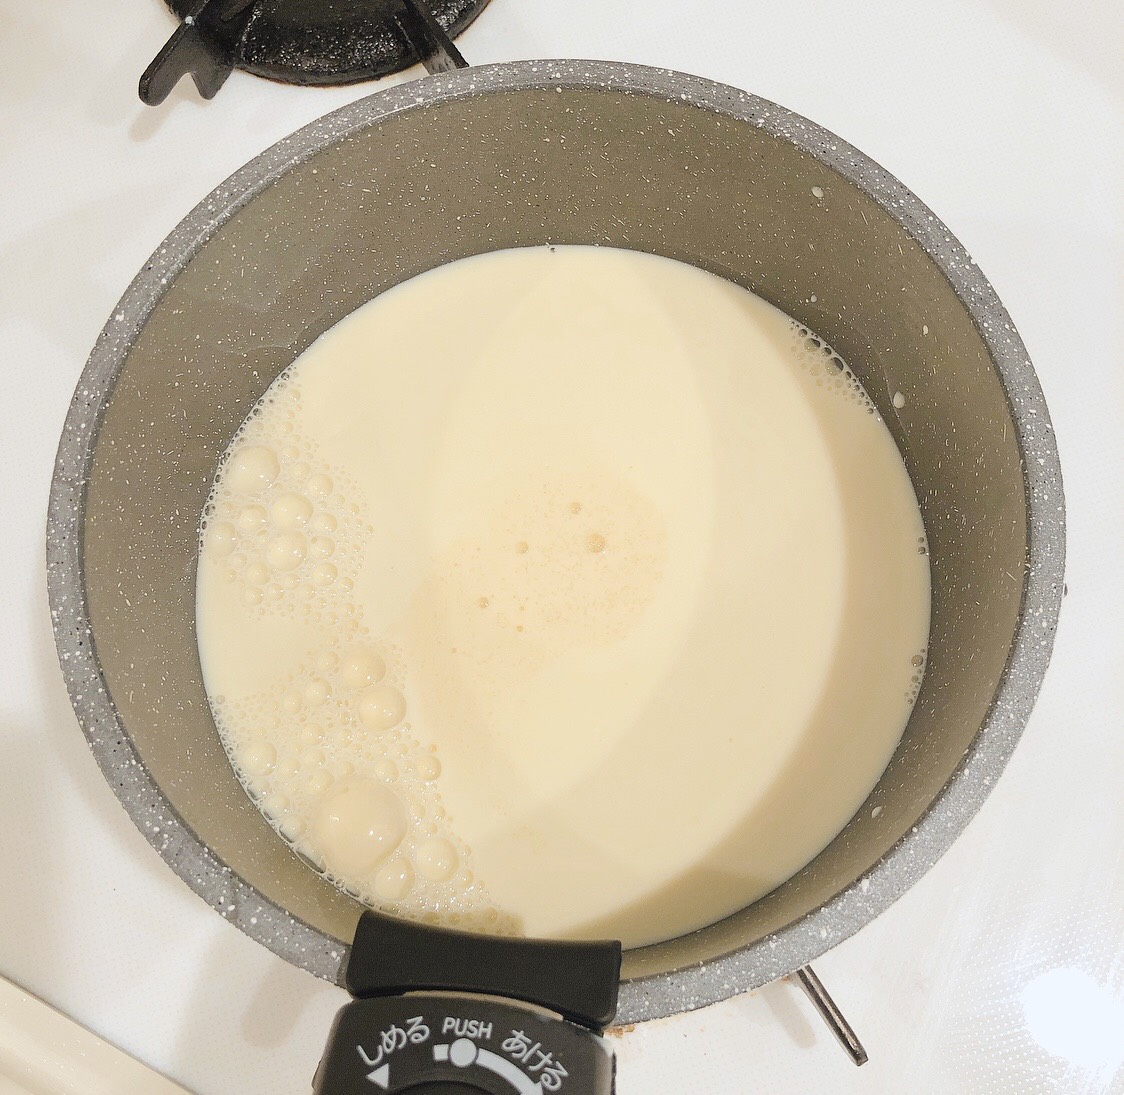
Warm soy milk and Lakanto in a saucepan until the Lakanto is completely dissolved.2.
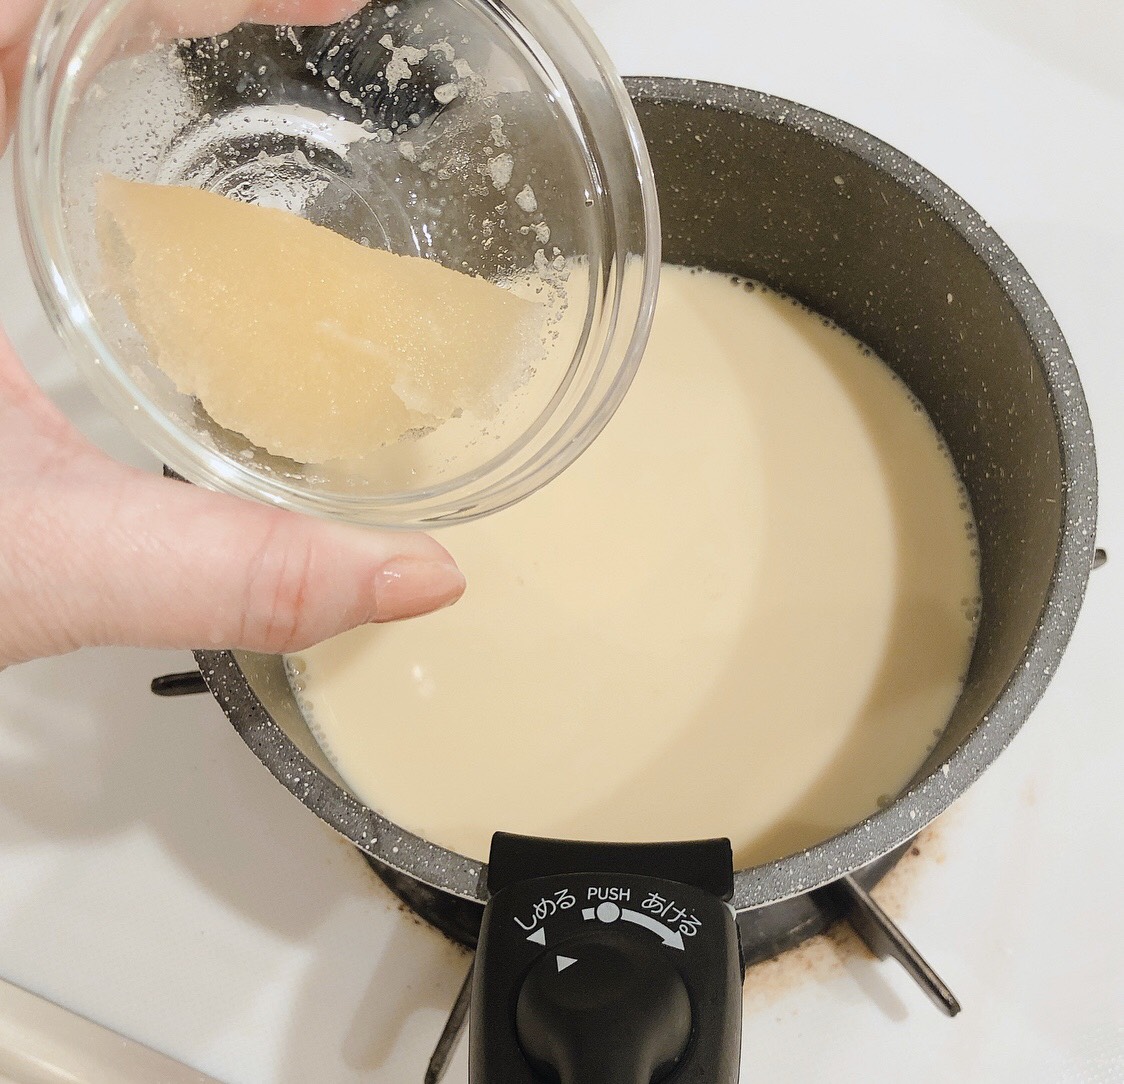
Add the gelatin and mix until fully dissolved.3.
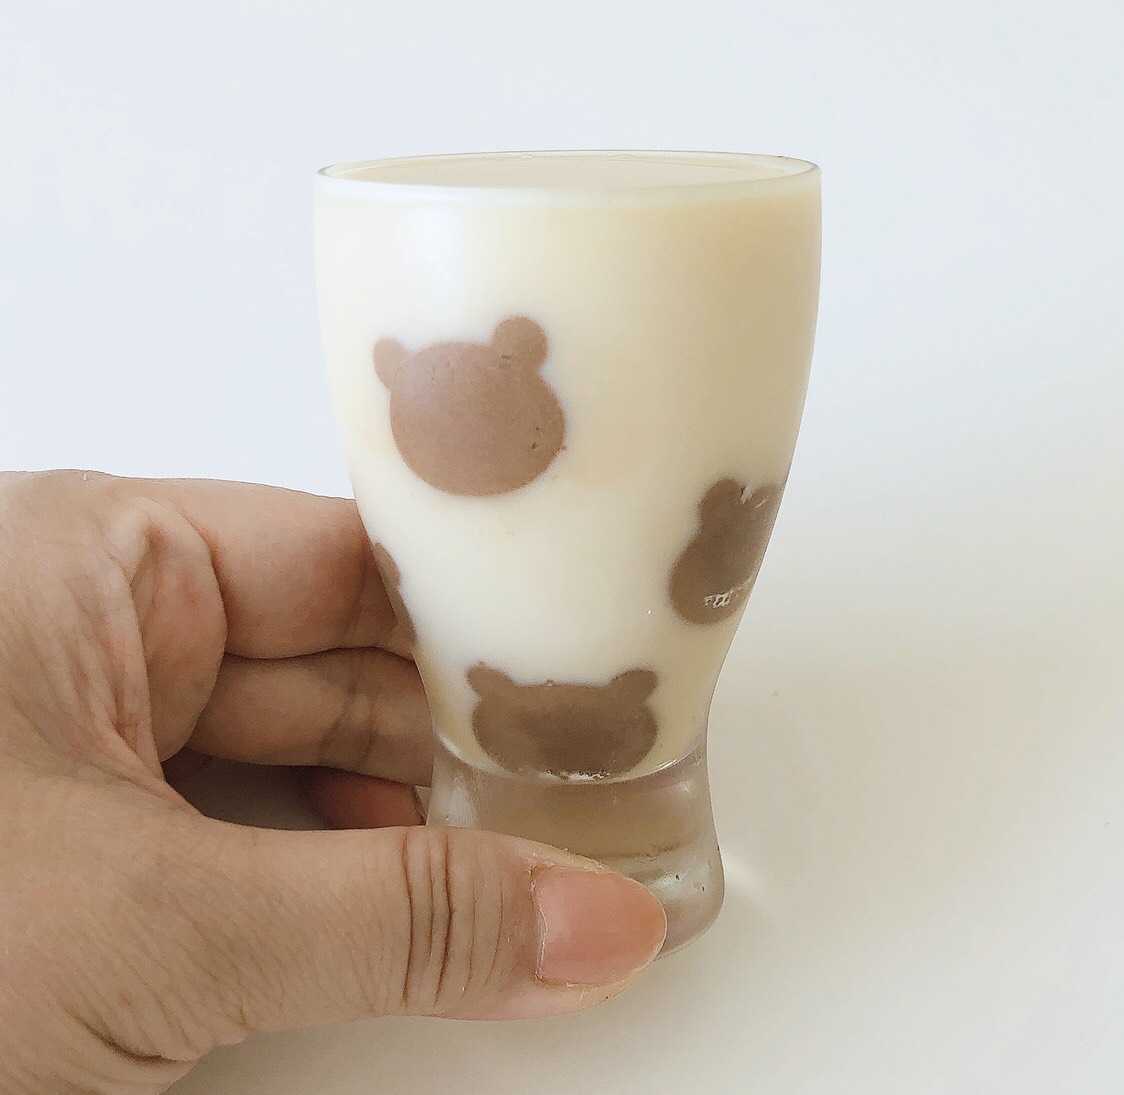
Leave the mix to cool. Once cooled, remove the glass from the refrigerator and pour the mix into the glass. Place back into the fridge until it sets.4.

Add sliced almonds and use a chocolate pen on Yukimi Daifuku to create Korilakkuma’s face, or a face of your choice.5.
Remove the glass from the fridge and add the Yukimi Daifuku. Choose your choice of toppings, like soy flour and brown sugar syrup, then enjoy!
Kaori invites you into her world of character-themed food dishes in her recipe series. Be sure to check out her Instagram where she has uploaded many pictures of her character dishes!
Kaori Kubota (@kaopan27)
I live in Hokkaido and I love to make character themed foods, desserts and pastries♡
I want to see my family smile, so I enjoy putting in a bit of effort to make character foods and changing food into something cute♡
You can see more of my character foods and character bento boxes on my Instagram page → @kaopan72