With just a small bit of ingenuity, turn everyday food into something cute using Kaori’s recipe series! With a few simple ideas, an ordinary recipe magically transforms into a cute dish.
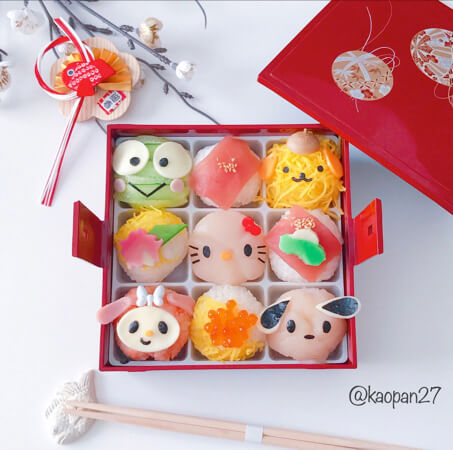
Today, you will learn how to make “Sanrio Character Temaru Sushi”!
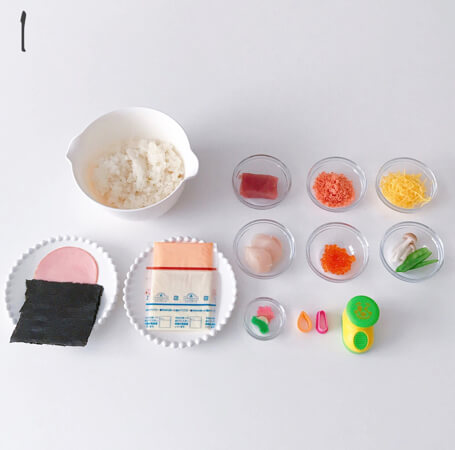
1: Ingredients
Rice
Nori (seaweed)
Ikura (roe)
Nama-fu (wheat starch)
Tuna
Snow peas
☆My Melody (face and ears)
Salmon flakes
Ham
☆Hello Kitty (chubby face)
Scallops
☆Pochacco (ears) / Keroppi (eyes)
Sliced cheese
☆Pompompurin (face, hat)
Shredded omelette
Shimeji mushrooms
☆Keroppi (eyes)
Cucumber
Shape cutters, nori hole punch
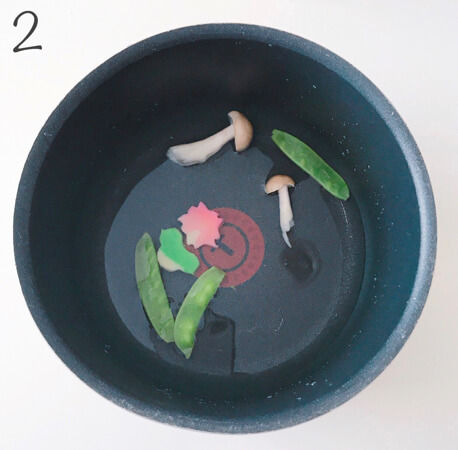
2: Prepare sumeshi (vinegared rice) and cook the mushroom, wheat starch and snow peas in shirodashi. Set aside to cool.
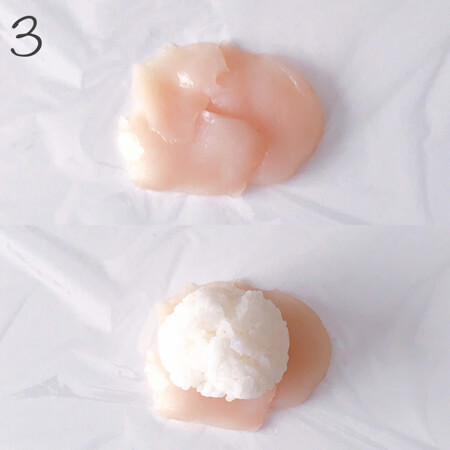
3: Slice the scallop, shape a round sphere of rice and place onto the slice (30g rice used in the photo). Wrap into a round shape with cling film.
4: Thinly slice the cucumber with a peeler and put on 30g rice like before. Wrap into a round shape with cling film.
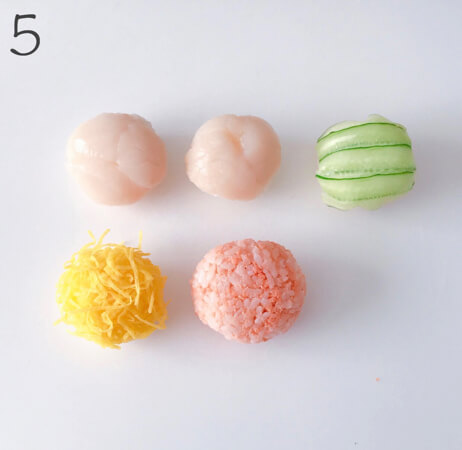
5: Scallop→Hello Kitty & Pochacco
Cucumber→Keroppi
Shredded Omelette→Pompompurin
Put rice onto the shredded omelette that’s on the cling film and wrap like in steps 3 and 4.
(The shredded omelette in this recipe was bought from the market.)
Salmon Flakes→My Melody
(Wrap the rice after covering with salmon flakes)
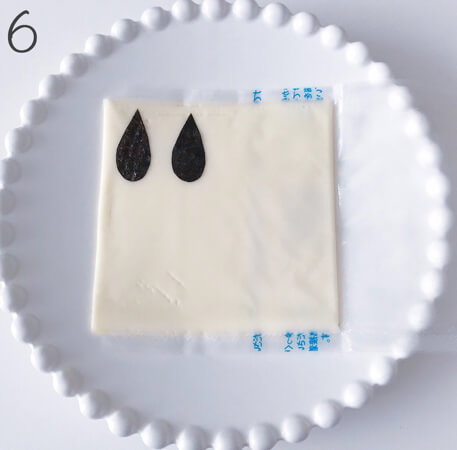
6: For Pochacco’s ears, cut the nori into ear shapes and put onto sliced cheese and cut around it with a toothpick.
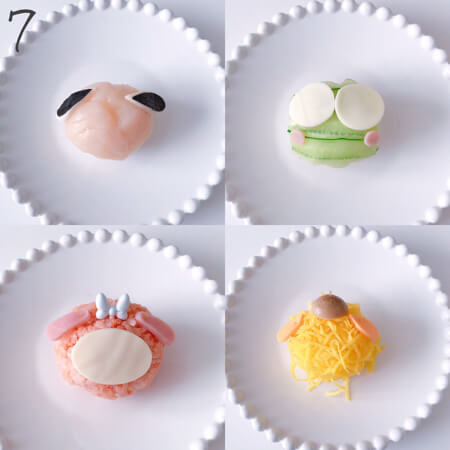
7: Pochacco→Fix the ears from step 6 with fried pasta.
My Melody→Cut the ham into ear shapes and fix with fried pasta. Cut the sliced cheese into an oval and place onto the rice for the face.
Pompompurin→Fix the sliced cheese ears and cooked with mushroom with fried pasta.
Keroppi→Place on sliced cheese eyes and round ham slices for the cheeks.
Hello Kitty→Place on a sliced cheese nose.
Once you have made it this far, place each one onto a plate and place on eyes and noses with hole punched nori.
(If you put the nori on too early it’ll become really flimsy.)
Create some more temari sushi using the same 30g rice and decorate with roe, wheat starch and snow peas.
A perfect bento for New Year’s!
Kaori will be making even more character rice dishes for you to try making!
She has lots of character rice dishes over on her Instagram page, so please be sure to check it out.
■Profile
Kaori Kubota(@kaopan27)
I live in Hokkaido and enjoy making dinner, sweet treats and character food using bread♡
I want to see my family smile, so I enjoy transforming food into characters and making cute meals♡
You can see more of my character food and bentos on my Instagram page → @kaopan27
RELATED ENTRIES
-
With just a small bit of ingenuity, turn everyday food into something cute using Kaori’s Easy Recipe! With a few simple ideas, an ordinary recipe magically transforms into a cute dish. In this recipe, I’ll show you how to make an adorable Miffy Parfait using tofu shiratama! Tofu shiratama can be frozen without hardening, so it’s great to use for cooking as well as making sweets. Ingredients
250g refined rice flour 300g silken tofu ✩ This is about 1 bag of refined rice flour and 1 piece of silken tofu. Canned fruit or fruit of your choice ① Put the refined rice flour and silken tofu into a bowl and mix well. ⚠️ Do not drain the tofu! Don’t add water, just these two ingredients. ✩I knead all ingredients and then freeze it. Feel free to freeze it as dough, or boil it first. You can put them in Tupperware and store them in water in the refrigerator for a day or two. Don’t worry, they won’t harden! ② Add the coloring. Take a little bit of food coloring and add as you like. Here, I’m adding the yellow that will be the center of the flower. ③ After mixing the dough, place it on parchment paper and put it in the freezer for about 30 minutes. You can shape it before placing it in the freezer, but chilling it will make it easier to work with. ④ Cut out Miffy and her flowers. Place the yellow-colored piece into the middle of the flower. Roll the rest of the shiratama into balls. ⑤ Boil the shaped shiratama while on the baking sheet. Boil the round shiratama as well. When they float to the top, place them in cool water. ⑥ Place the shaped shiratama on parchment paper or plastic wrap and let dry briefly before adding decoration. ⑦ Mix black cocoa with a little water, and using the mixture, draw Miffy’s face. ⑧ Place the flowers and shiratama balls inside the glass, follow up with your favorite fruits! (If using canned fruit, feel free to add the syrup as well!) I hope you enjoy decorating this colorful dish! Kaori Kubota(@kaopan27) I live in Hokkaido and I love to make character themed foods, desserts and pastries♡ I want to see my family smile, so I enjoy putting in a bit of effort to make character foods and changing food into something cute♡ You can see more of my character foods and character bento boxes on my Instagram page → @kaopan72 -
With just a small bit of ingenuity, turn everyday food into something cute using Kaori’s Easy Recipe! With just a few simple ideas, an ordinary recipe magically transforms into a cute dish. Today, I’ll teach you how to make two-layer Mizu Yokan, perfect for a hot summer day! You don’t even need an oven to make this sweet treat--just let it chill and harden! It’s great as a summer vacation snack. IngredientsThis recipe makes 2 cups.
For Mizu Yokan: 120g fine-grained sweet bean paste100cc waterPinch of salt1-2g Kanten powder For Matcha Flavoring:5g matcha20g sugar100cc water1-2g Kanten powder 1 Place bean paste, water, salt, and Kanten powder into a pot and boil until dissolved. ⚠The Kanten powder needs to be heated for a further 1-2 minutes after boiling to harden properly. After boiling, reduce heat to low. 2 Pour mixture into container. After about 30 minutes at room temperature, the mixture will start to harden. Work on the matcha flavoring when it begins to harden. 3 Place matcha, water, sugar, and Kanten powder in a pot and boil thoroughly. As you did with the Mizu Yokan, reduce heat to low and continue cooking through. 4 When the mixture is heated through, gently pour it over the Mizu Yokan and refrigerate until ready to serve. This is delicious with a variety of toppings, from red bean paste and fresh cream to Shiratama dumplings and fresh fruit! Kaori Kubota (@kaopan27) I live in Hokkaido and I love to make character themed foods, desserts and pastries♡ I want to see my family smile, so I enjoy putting in a bit of effort to make character foods and changing food into something cute♡ You can see more of my character foods and character bento boxes on my Instagram page → @kaopan72 -
With just a small bit of ingenuity, turn everyday food into something cute using Kaori’s Easy Recipe! With a few simple ideas, an ordinary recipe magically transforms into a cute dish. In this recipe, I'll show you how to make a delicious banana cake that is tasty even if refrigerated! Ingredients
Makes a 18cm pound cake2 ripe bananas100g unsalted butter50g granulated sugar2 eggs100g weak flour 1 Bring the butter to room temperature and mix it with the sugar until it becomes white. I used unsalted margarine for this. 2 Gradually add both the egg whites and yolks and pour slowly into the mixture while mixing. Mash the banana with a fork, add to the bowl, and mix. 3 Sieve in the flour and mix lightly. 4 Bake at 160℃ for 40-45 minutes and it's ready! I used a 15cm pound cake tin and muffin tin to make mine. If using a muffin tin, bake for 30 minutes. Leave to cool and use the edge of the pound cake tin to cut ears. Finish by using a chocolate pen to draw on Rilakkuma's face. Kaori invites you into her world of character-themed food dishes in her recipe series. Be sure to check out her Instagram where she has uploaded many pictures of her character dishes! Kaori Kubota (@kaopan27) I live in Hokkaido and I love to make character themed foods, desserts and pastries♡ I want to see my family smile, so I enjoy putting in a bit of effort to make character foods and changing food into something cute♡ You can see more of my character foods and character bento boxes on my Instagram page → @kaopan72 -
With just a small bit of ingenuity, turn everyday food into something cute using Kaori’s Easy Recipe! With a few simple ideas, an ordinary recipe magically transforms into a cute dish. Today, I'll teach you how to make Baymax mushi-pan steamed bread.
Ingredients
This recipe makes 5 portions140g strong flour20g granulated sugarPinch of salt3g dry yeast3g baking powder5g vegetable oil85ml-90ml milk (room temperature) 1 Mix everything together in a food processor. If you don't have a food processor, you can also knead the ingredients well by hand. 2 Ferment at 40℃ for 40 minutes. If you don't have a fermentation machine, leave in a warm environment. 3 Once the dough has doubled in size, divide into five portions and put into separate cups. If using paper cups, rub a little bit of oil inside. 4 Bake in the oven at 40℃ for 20-25 minutes. 5 After baking, steam in a steamer for 12-13 minutes. If you don't have a steamer, put into a frying pan or large pot with a little bit of water and cover. 6 Once cooled, use some nori seaweed to make Baymax's face and you're done! Kaori Kubota (@kaopan27) I live in Hokkaido and I love to make character themed foods, desserts and pastries♡ I want to see my family smile, so I enjoy putting in a bit of effort to make character foods and changing food into something cute♡ You can see more of my character foods and character bento boxes on my Instagram page → @kaopan72 -
With just a small bit of ingenuity, turn everyday food into something cute using Kaori’s Easy Recipe! With a few simple ideas, an ordinary recipe magically transforms into a cute dish. Today, I'll be showing you how to make Strawberry Milk Chocolate Pudding, a delicious recipe whipped up with love for Valentine's Day. Ingredients
✩Ingredients For Chocolate Pudding 35g chocolate 300ml milk 30g-35g granulated salt 5g gelatine (dissolved in 1 tbsp water) ✩Ingredients For Strawberry Pudding 100g strawberries (fresh or frozen) 350ml milk 30g-35g granulated salt 5g gelatine (dissolved in 1 tbsp water) Weck jars for the dessert. 1 First, we'll make the chocolate pudding. Put the milk and granulated sugar into a pot and heat on the hob until the sugar melts. Turn the heat off, throw in the chocolate, and allow to fully melt. Once melted and the mixture is cooled, add the gelatine to dissolve. 2 Now, we'll make the strawberry pudding. Put the milk and granulated sugar into a pot and heat on the hob until the sugar melts. Add the mix to a blender with the strawberries and blitz. Add back onto the hob and heat through slightly. Allow the mixture to cool then add the gelatine to dissolve. 3 Once both mixtures are completely cooled, add them to the jars in an alternating pattern and chill until set. ⚠️Make sure the dessert is completely set and not runny before serving. About an hour each in the refrigerator should be sufficient. Top with cream and strawberries and enjoy! Kaori Kubota (@kaopan27) I live in Hokkaido and I love to make character themed foods, desserts and pastries♡ I want to see my family smile, so I enjoy putting in a bit of effort to make character foods and changing food into something cute♡ You can see more of my character foods and character bento boxes on my Instagram page → @kaopan72 -
With just a small bit of ingenuity, turn everyday food into something cute using Kaori’s Easy Recipe! With a few simple ideas, an ordinary recipe magically transforms into a cute dish. Today, I'll be showing you a simple recipe for Valentine's Day made with ingredients bought entirely from the 100 yen store Seria. I call it the "Rilakkuma Hot Chocolate Stick." Ingredients
Square mould from Seria (makes six sticks) 1 bag of milk chocolates 1 bag of white chocolates 1 bag of dark chocolates Toppings of your choice (I used caramel chocolate chips and walnuts) 1
Melt all the chocolates separately over a bain-marie. 2
Create layers with each chocolate type. Pick your first choice and pour into the mould and wait for it to set lightly before adding the next chocolate. For this recipe, I went ahead and added the chocolate a little before layers had finished setting to create a marbling effect. ✩I also added some strawberry chocolate I had left over from my Rilakkuma chocolates. 3
Once all your chocolate is in the mould, stick in some lollipops and add toppings of your choice making sure they don't overflow. This will ensure they set together with the chocolate. 4
Allow to set overnight and your chocolate stick is ready. 5
I made Rilakkuma chocolates from scratch and added those to the sticks to finish. Kaori invites you into her world of character-themed food dishes in her recipe series. Be sure to check out her Instagram where she has uploaded many pictures of her character dishes! Kaori Kubota (@kaopan27) I live in Hokkaido and I love to make character themed foods, desserts and pastries♡ I want to see my family smile, so I enjoy putting in a bit of effort to make character foods and changing food into something cute♡ You can see more of my character foods and character bento boxes on my Instagram page → @kaopan72